Single Sign-On (SSO)
Learn how to configure Single Sign-On (SSO) in Ternary, including setup steps for Okta, Google Workspace, and Microsoft Entra ID.
Ternary supports enterprise Single Sign-On (SSO) to centralize authentication and user provisioning across the platform. SSO integrations allow organizations to enforce identity policies through their existing identity provider while controlling how users are created, authenticated, and authorized within a Ternary tenant.
Ternary supports SAML-based integrations with major identity providers, including Okta, Google Workspace, and Microsoft Entra ID. Each integration enables authenticated access, optional auto-provisioning, and role or scope assignment based on identity attributes.
SSO configuration requires coordination with Ternary Customer Success to establish a secure connection between the identity provider and the tenant before setup begins.
Okta SSO Configuration with Ternary
If you use Okta as your IdP, then a new configuration option is available that minimizes error and accelerates time to a successful SSO login. Please see SSO Setup for Okta Users.
Google Workspace SSO Configuration
With Ternary’s Google Workspace integration, organizations can achieve the following:
- Ensure all authorized users of the Ternary tenant authenticate using Google Workspace.
- Automatically provision new users in the tenant when they authenticate through Google Workspace.
- Define the default Ternary role assigned to users during auto provisioning.
Prerequisites
- A Google Workspace administrator with permission to create new SAML applications.
- A corporate email domain that matches the domain used to provision users in Google Workspace. At this time, only one email domain is supported per SSO integration, and only one SSO integration is supported per Ternary tenant.
- Coordination with a Ternary Customer Success Manager to obtain a Connection Name (for example,
yourcompanyname-saml). This connection name corresponds to configuration created internally by Ternary and will be referenced throughout the setup process.
Create Google Workspace SAML App
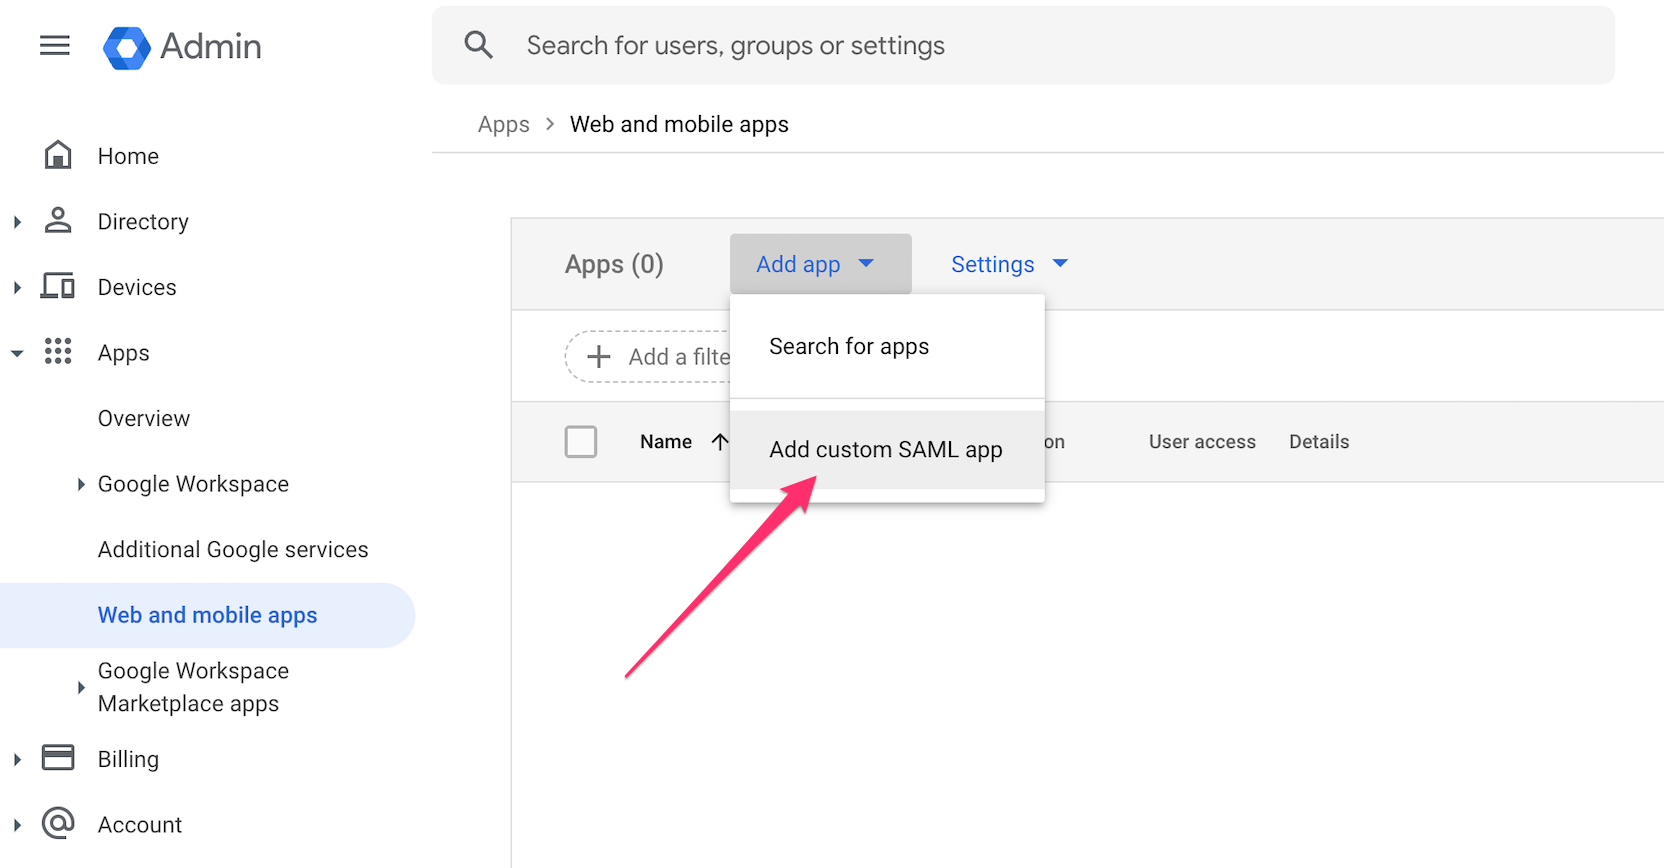
In the Google Workspace Admin console:
- Navigate to Web and mobile apps and select Add custom SAML app.
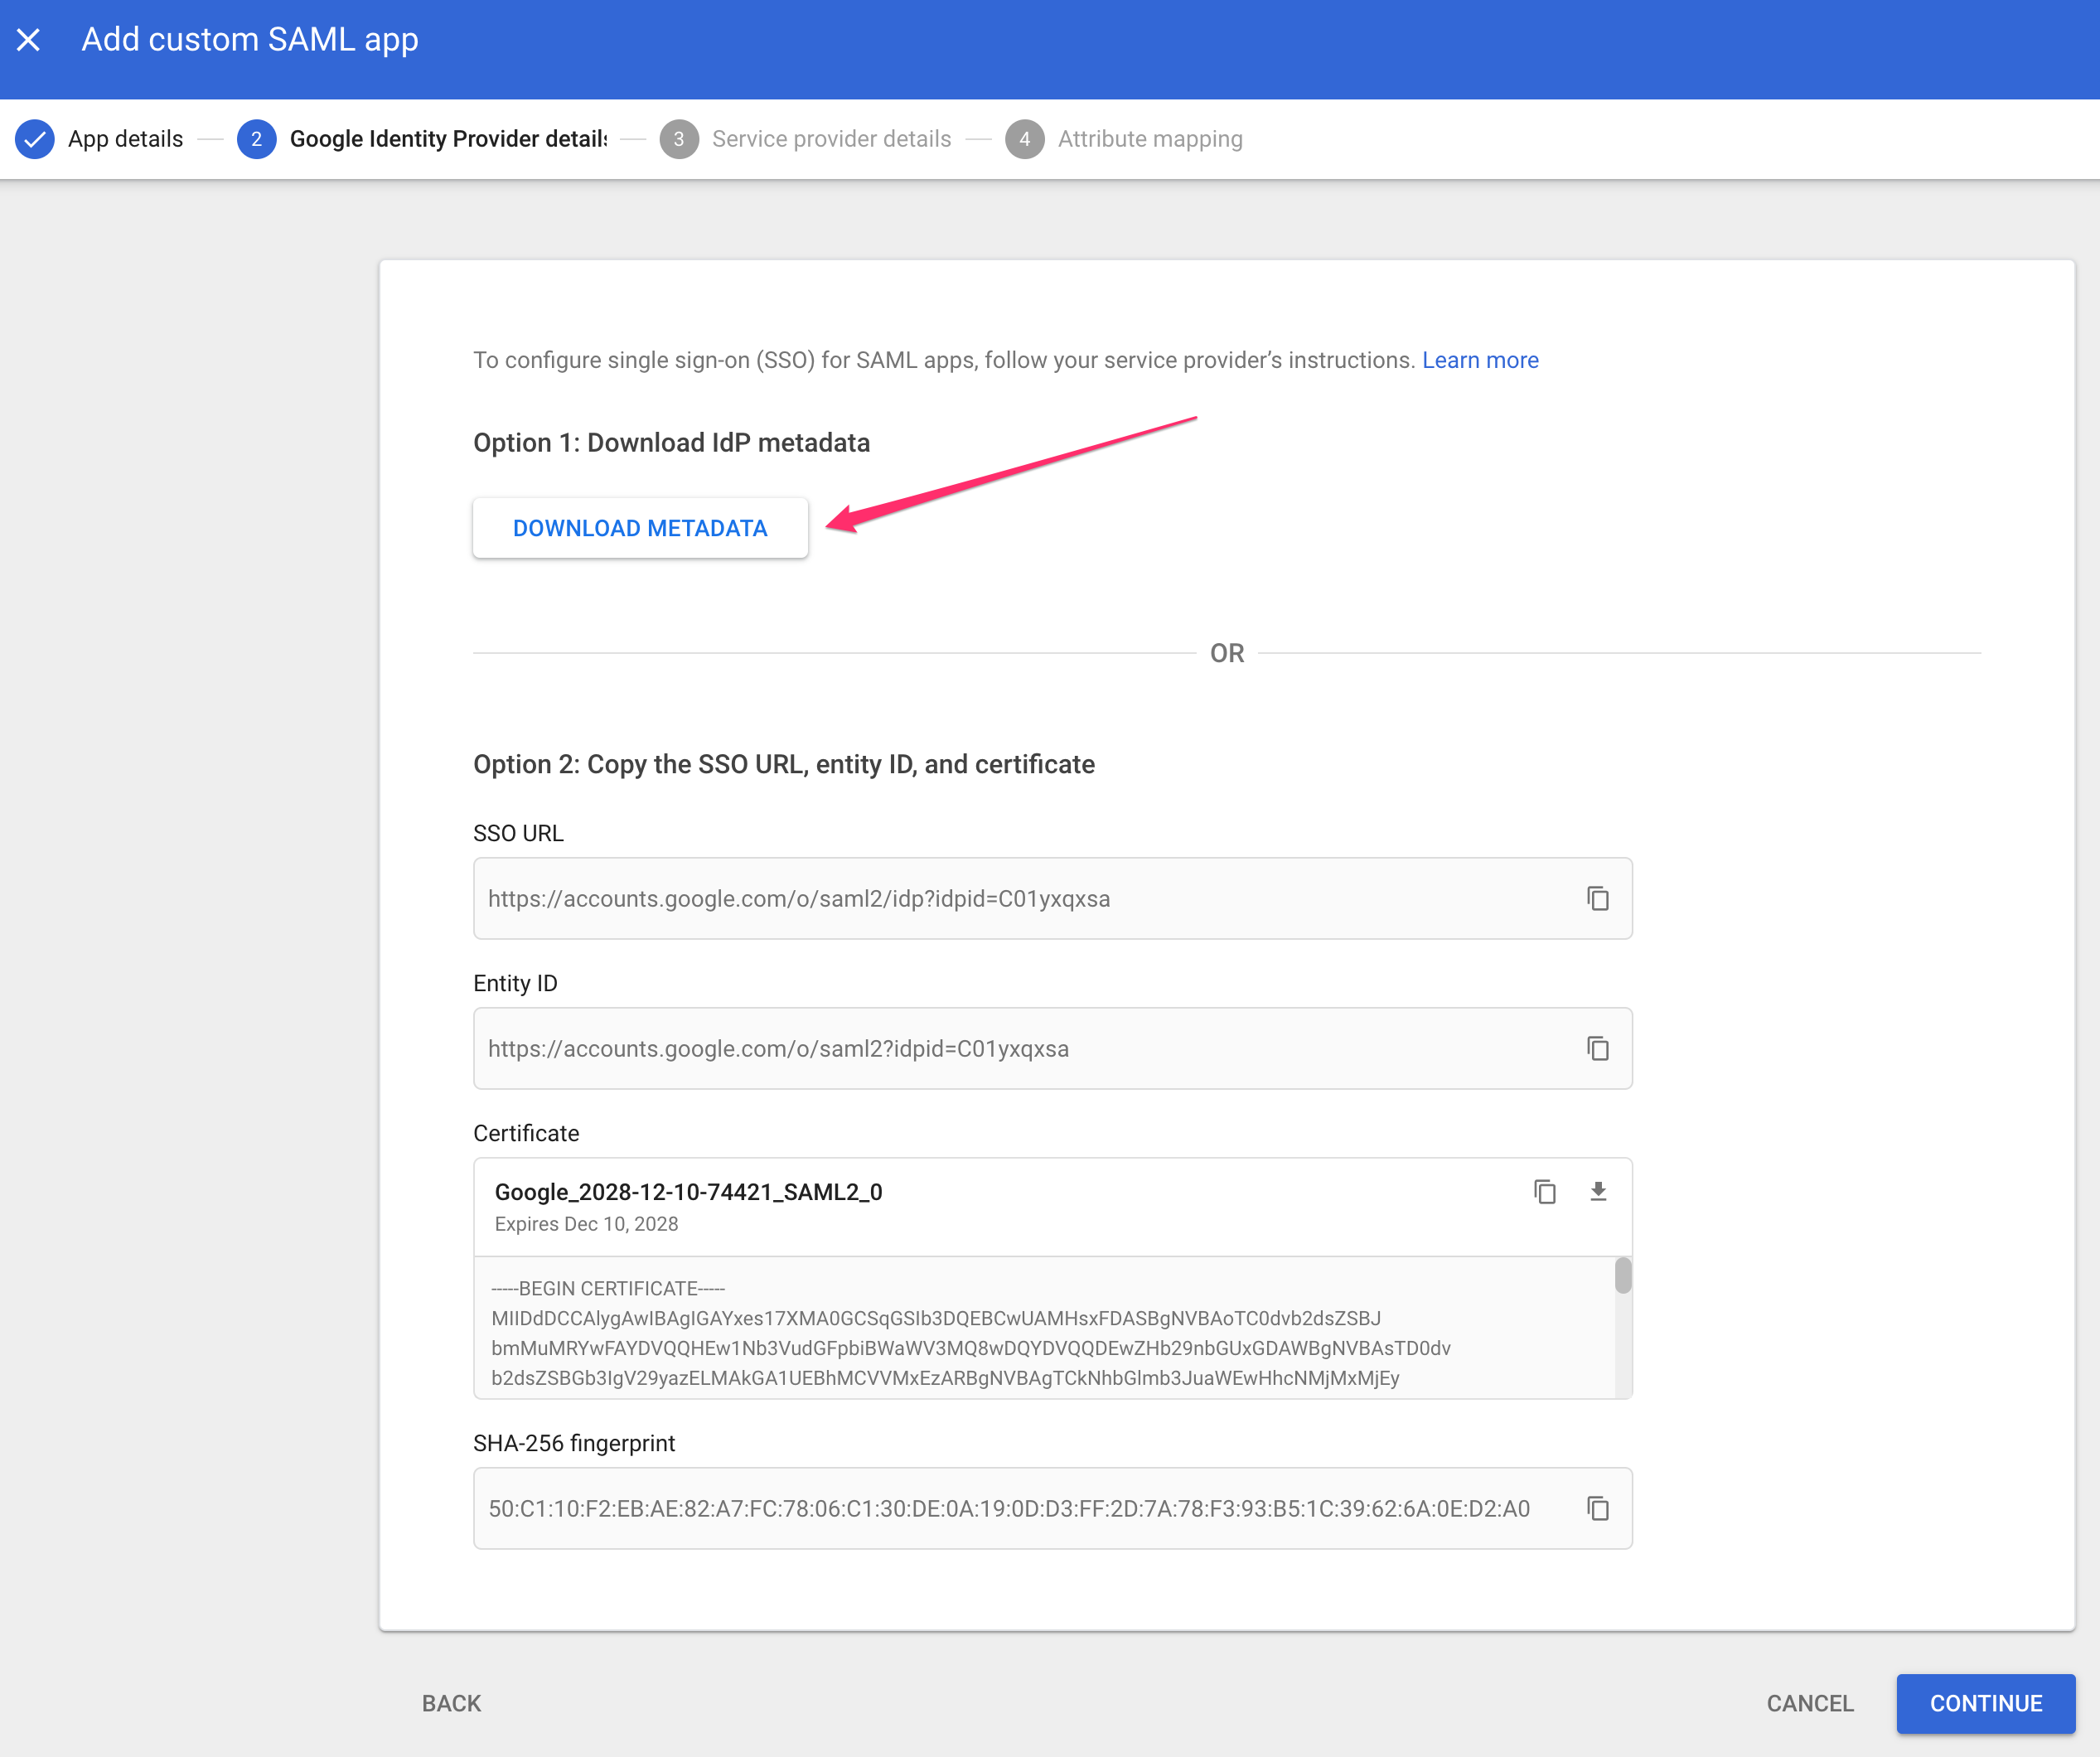
- Provide a name for the custom SAML app, along with an optional description and app icon, then select Continue.
- Select Option 1: Download IdP metadata and forward the downloaded metadata bundle to the Ternary Customer Success Manager. Select Continue.
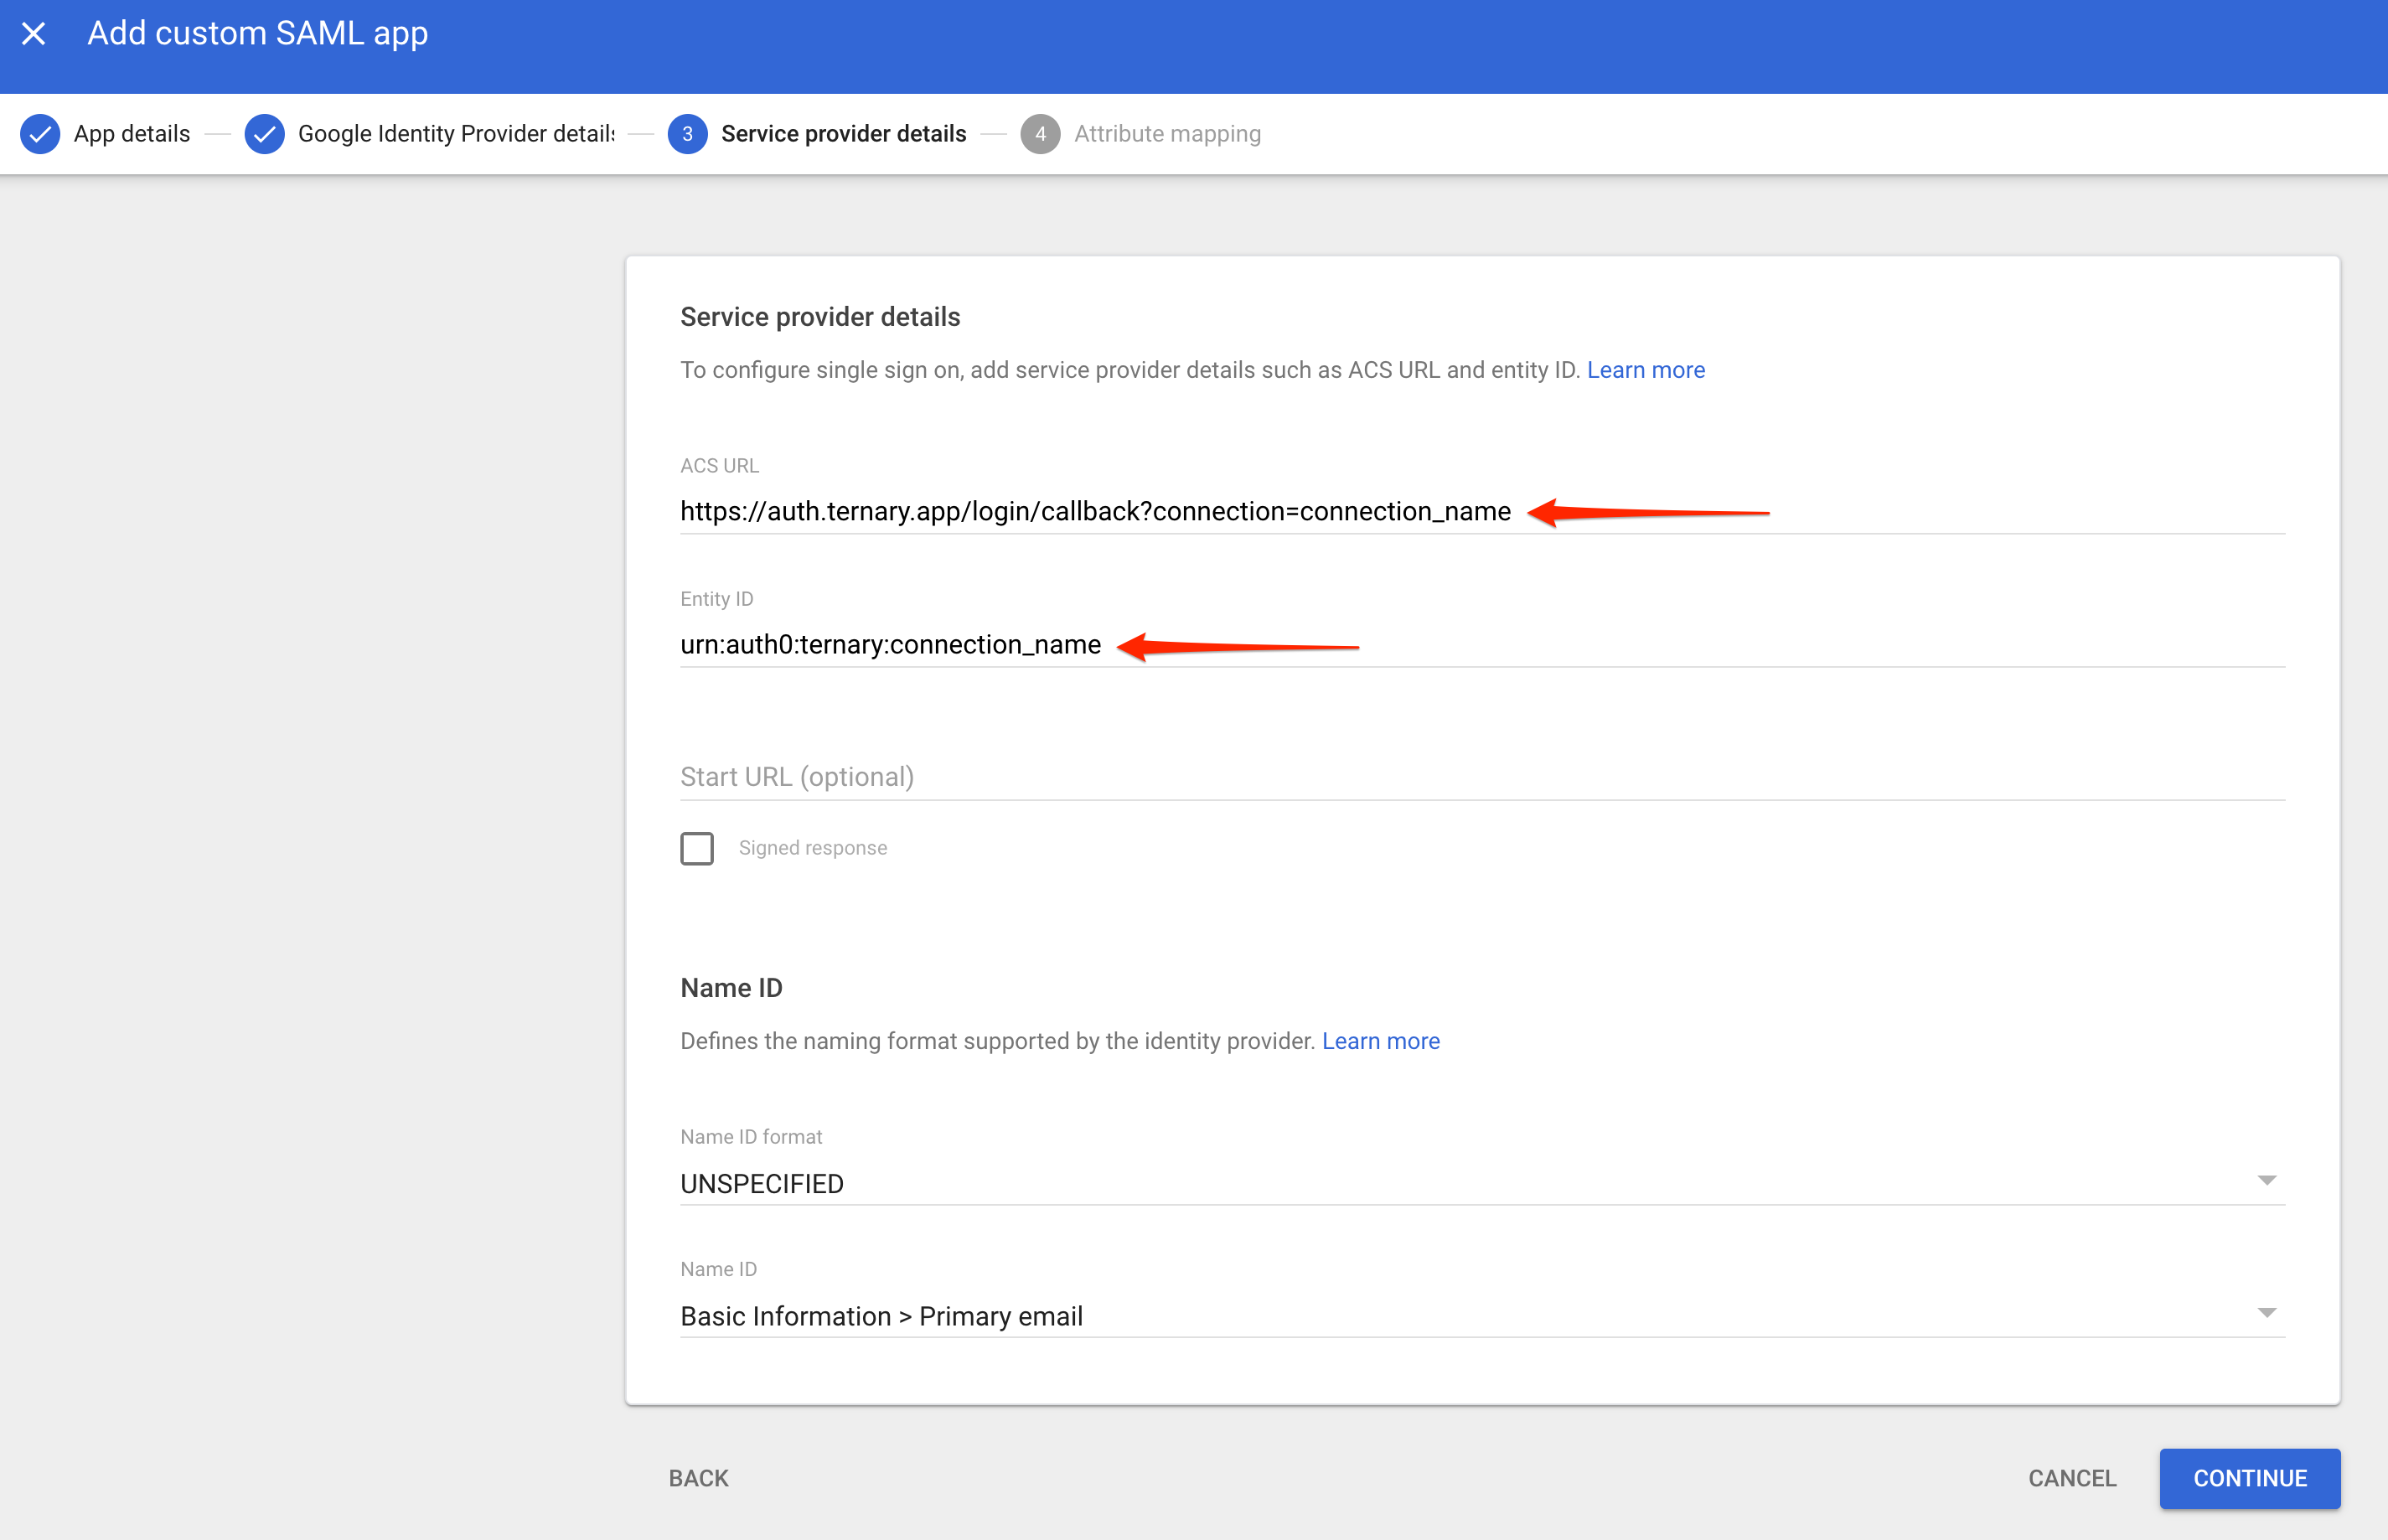
- On the Service provider details page, enter the following values. The Customer Success Manager will have provided the required connection name. If a connection name has not been received, contact Customer Success before proceeding.
- ACS URL: https://auth.ternary.app/login/callback?connection=yourcompanyname-saml
- Entity ID:
urn:auth0:ternary:yourcompanyname-saml
- Accept the default values for the remaining fields and select Continue.
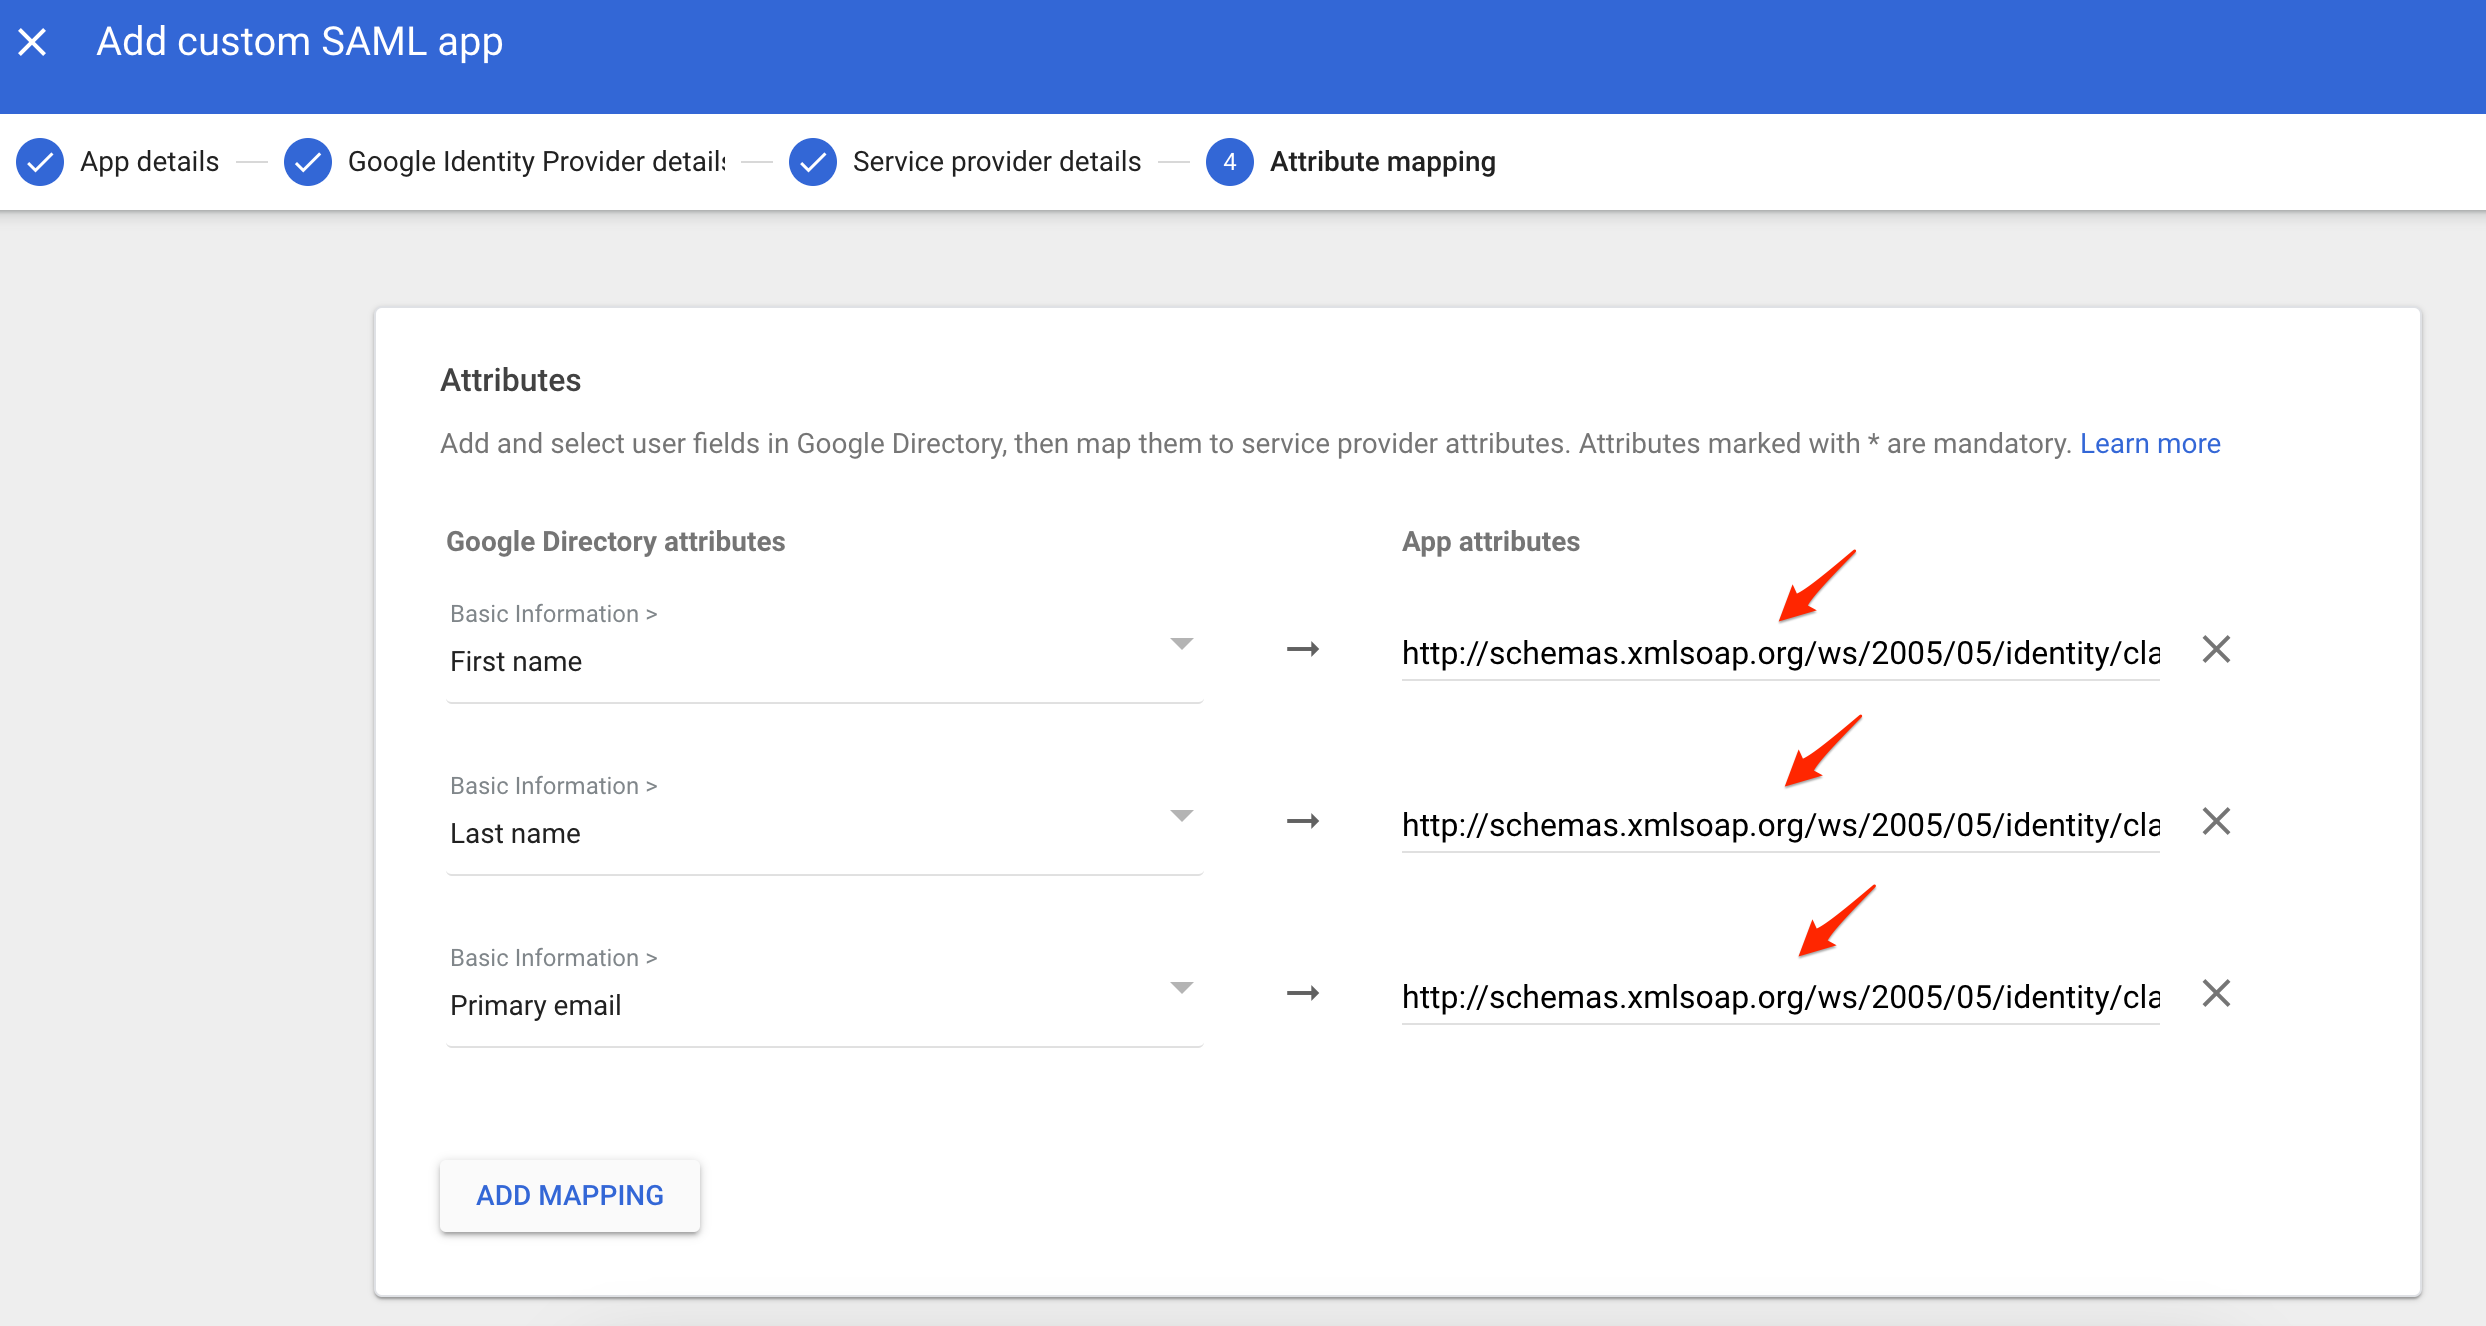
- On the Attributes page, configure the user attribute mappings that will be included in the SAML token sent to Ternary. Add the following Google Directory attributes by copying each value into the App attributes field:
- First name: http://schemas.xmlsoap.org/ws/2005/05/identity/claims/firstname
- Last name: http://schemas.xmlsoap.org/ws/2005/05/identity/claims/lastname
- Primary email: http://schemas.xmlsoap.org/ws/2005/05/identity/claims/emailaddress
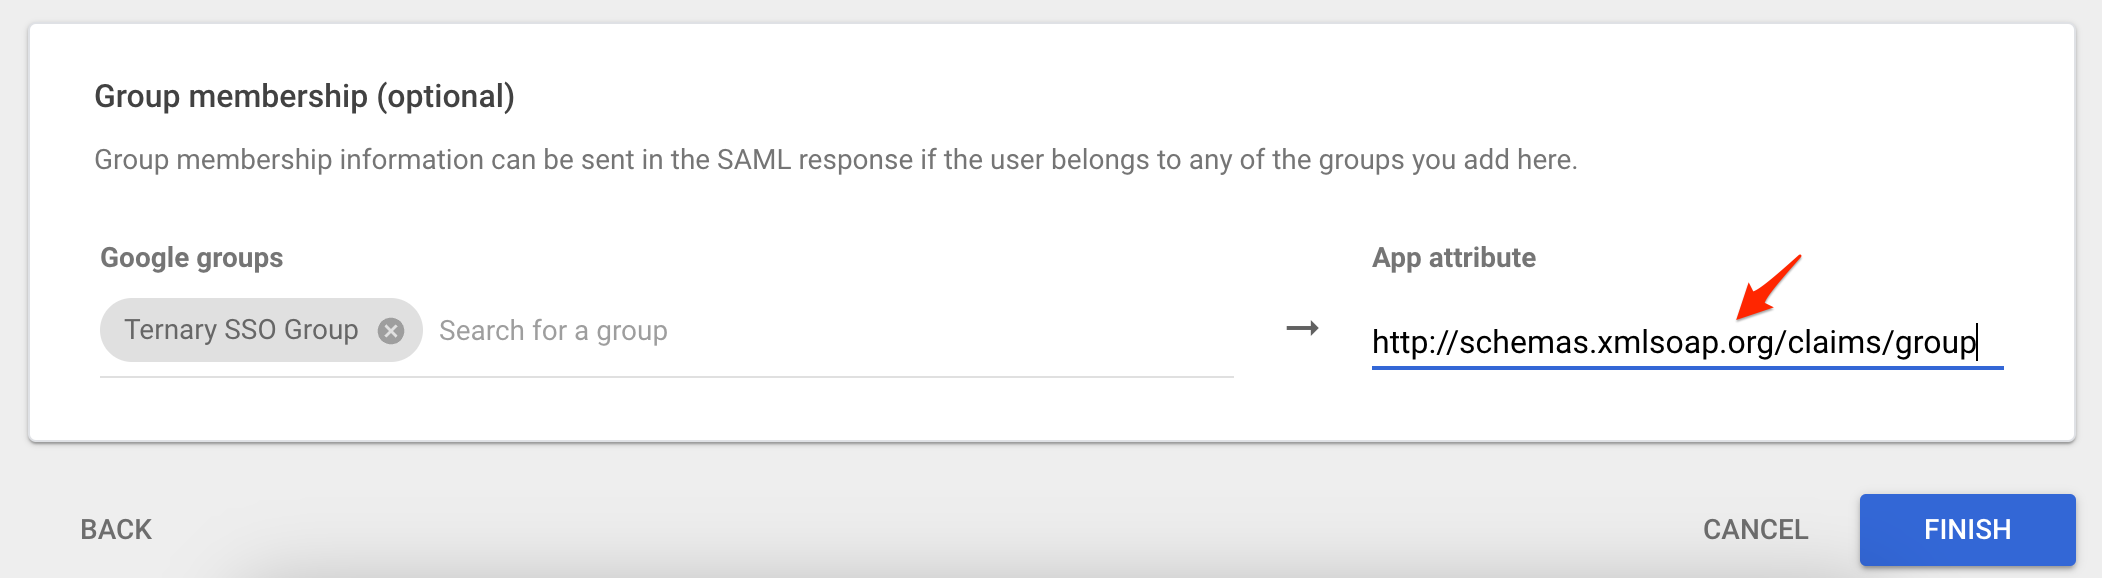
- Optionally, if Google Groups are used to control access or Scoped Views in Ternary, configure group mappings under Group membership (optional). Map the relevant Google groups to the following app attribute: http://schemas.xmlsoap.org/claims/group
- For example, a Google group named Ternary SSO Group may be mapped to the group attribute. Additional details on SSO-based Scoped View assignment are available in the related documentation. Select Finish when complete.
Enable User Access
To make the Google SSO application available:
- Select Expand User access.
- Assign the application to the appropriate users or groups. In this example, the Ternary SSO Group in Google Directory is granted access to the SAML SSO application.
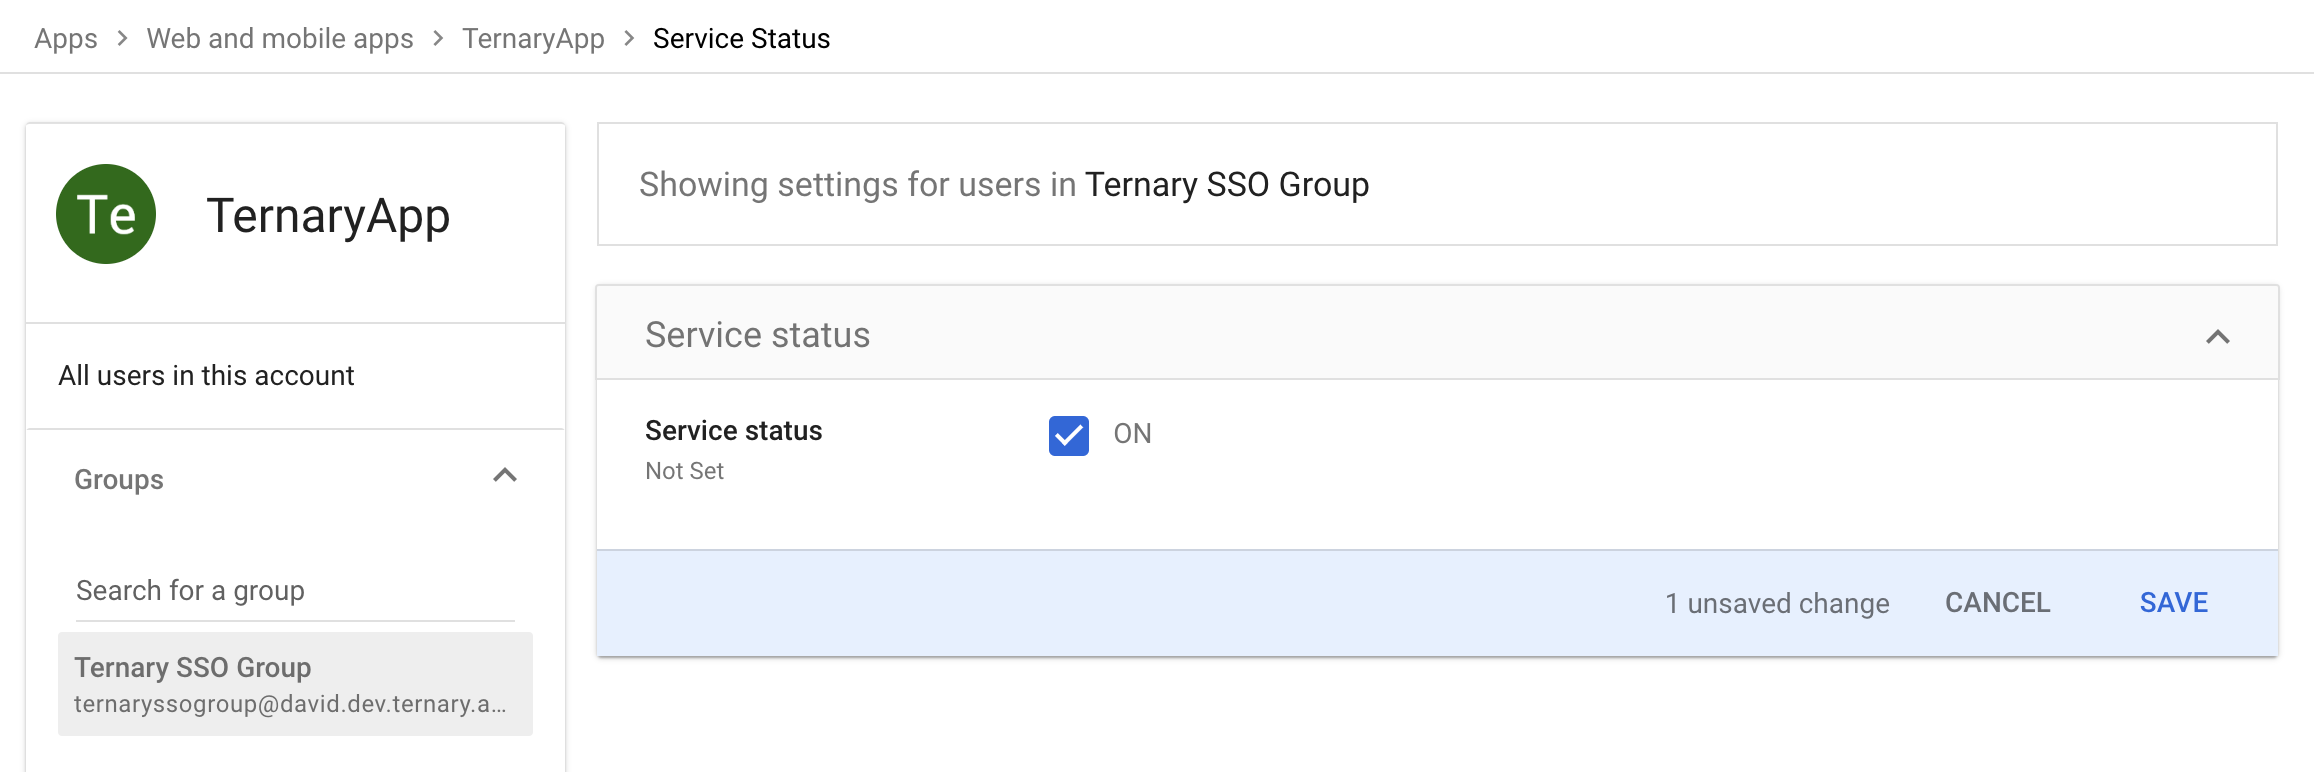
- Select Save to complete the configuration. The application should now appear as ON for the organization.
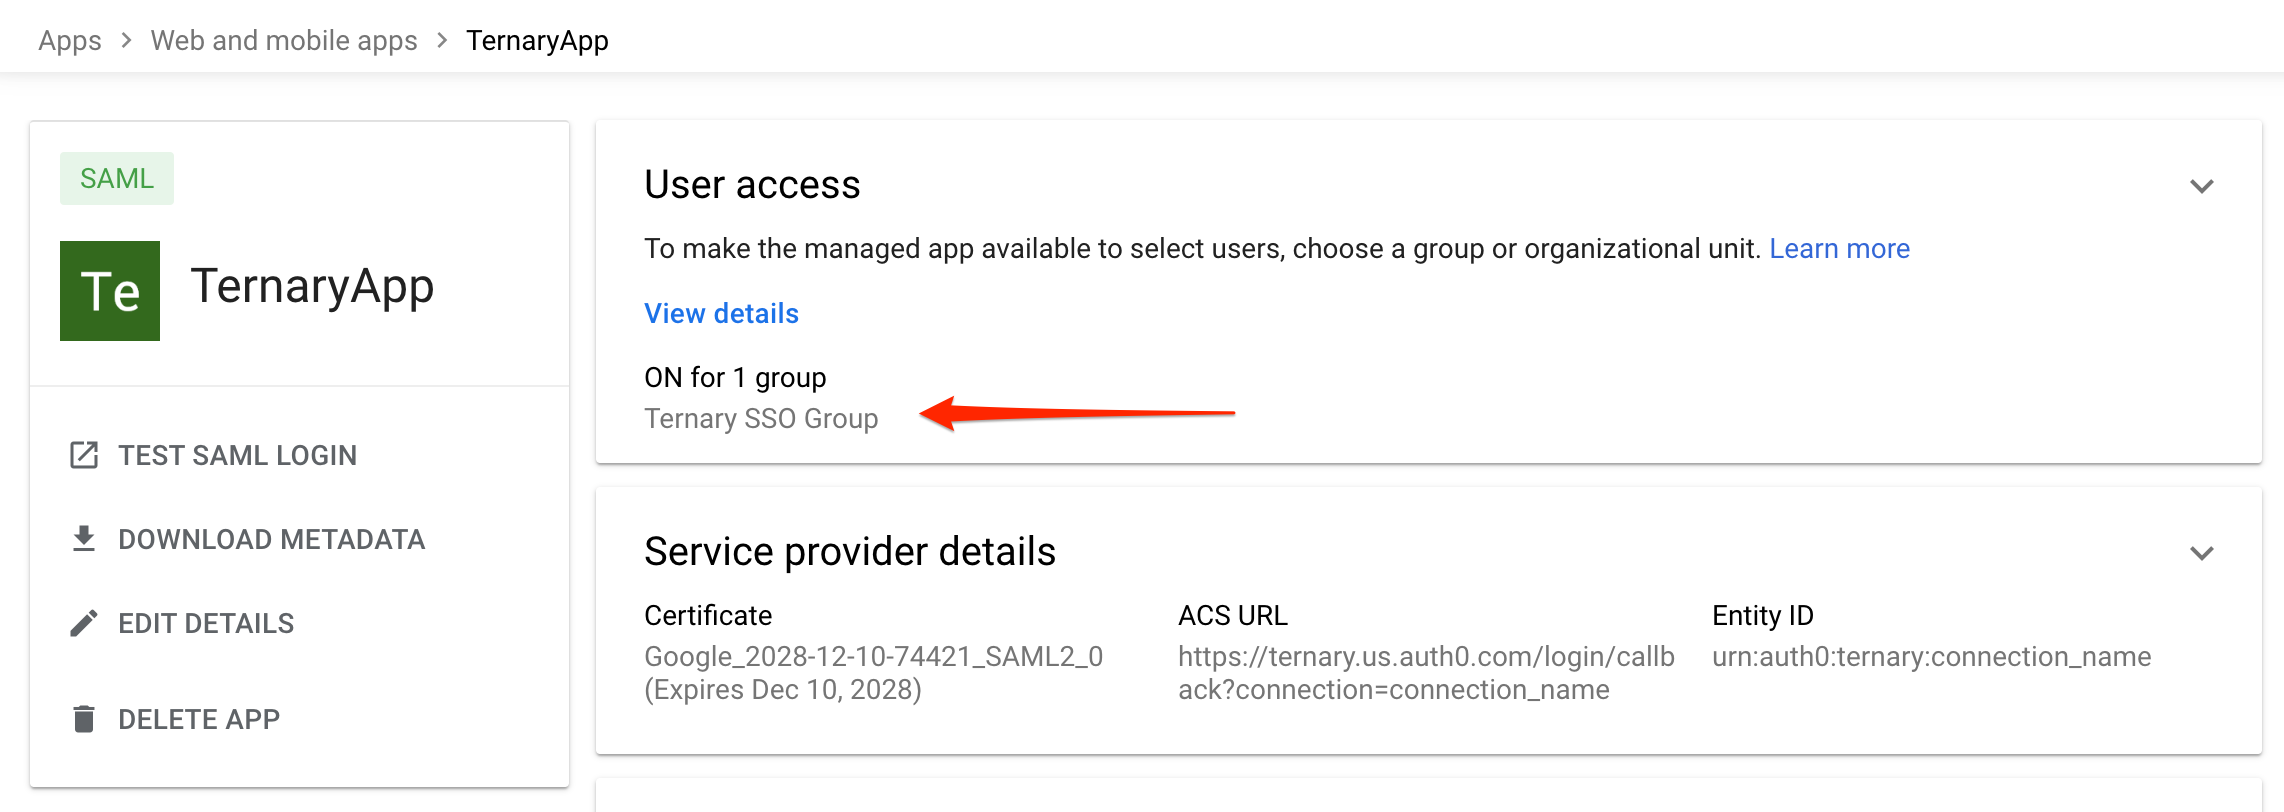
Validate the Configuration
It is recommended to test the integration using the TEST SAML LOGIN option available in Google Workspace.

If the test does not succeed, open a Support case and include any technical details displayed at the bottom of the test results page.
A short video tutorial demonstrating the Google Workspace SSO configuration process is also available for reference.
Microsoft Entra ID SSO Configuration
With Ternary’s Microsoft Entra ID integration, organizations can achieve the following:
- Ensure all authorized users of the Ternary tenant authenticate using Microsoft Entra ID.
- Automatically provision new users in the tenant when they authenticate through Entra ID.
- Define the default Ternary role assigned to users during auto provisioning.
Prerequisites
- An Azure Entra ID administrator with permission to create and manage SAML applications.
- A corporate email domain that matches the domain used to provision users in the Entra ID directory. At this time, only one email domain is supported per SSO integration, and only one SSO integration is supported per Ternary tenant.
- Coordination with a Ternary Customer Success Manager to obtain a Connection Name (for example, yourcompanyname-saml). This connection name corresponds to configuration created internally by Ternary and will be referenced throughout the setup process.
Create the Azure Entra ID Enterprise Application
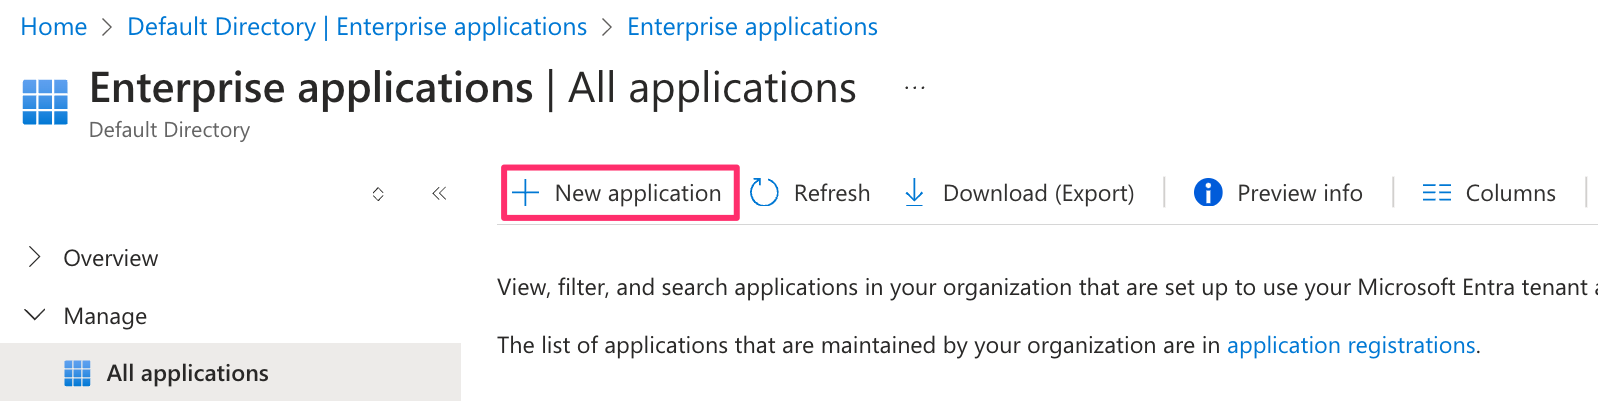
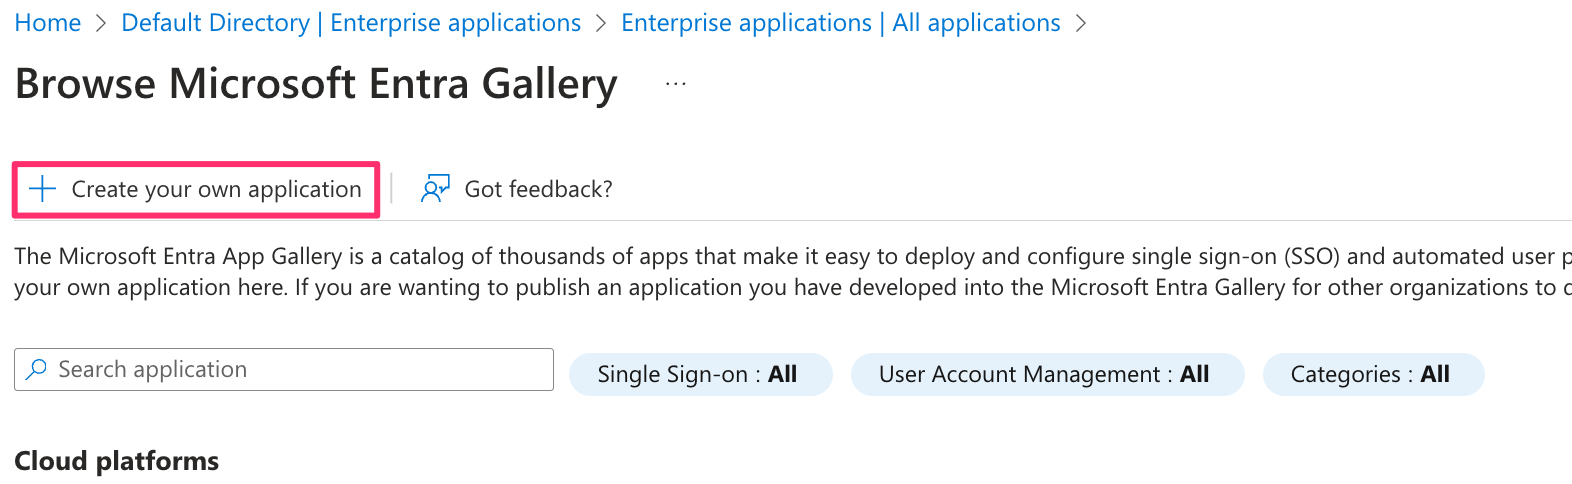
- In the Azure portal, navigate to Microsoft Entra ID, then select Enterprise Applications.
- Choose New Application.
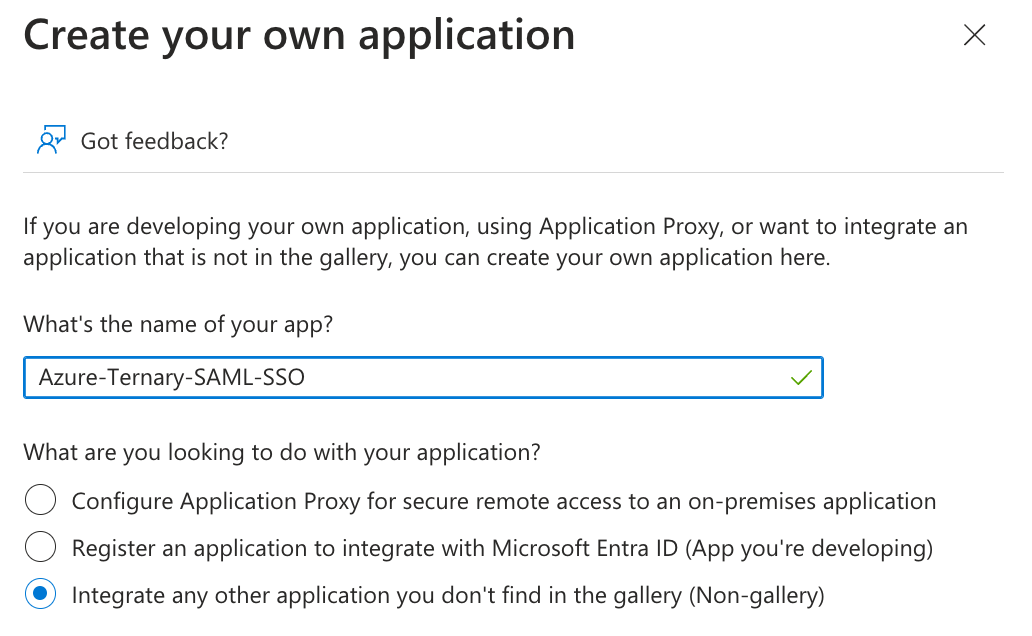
- Select Create your own application.
- Provide a name for the Ternary SSO SAML application and complete the creation process.
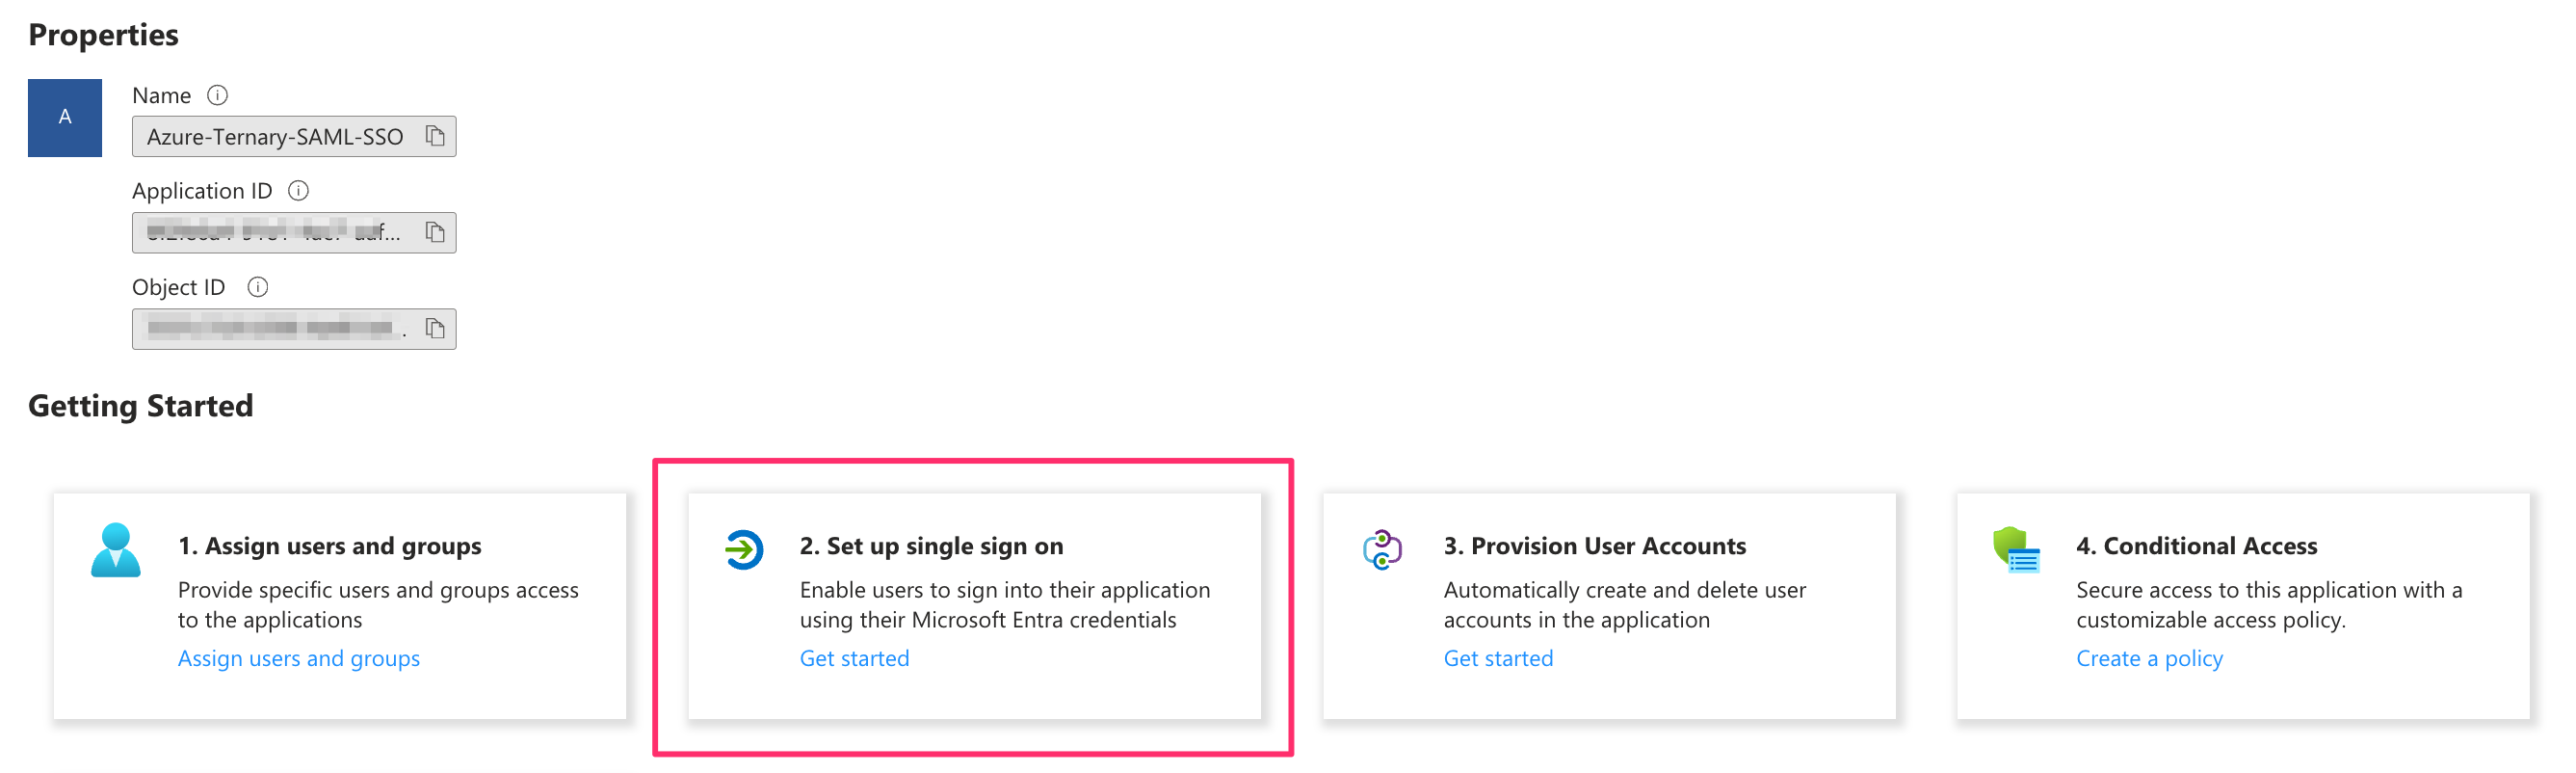
Configure Single Sign-On
- After the enterprise application is created, select Set up single sign-on.
- Choose SAML as the single sign-on method.

- Edit the Basic SAML Configuration section and enter the Identifier (Entity ID) and Reply URL (Assertion Consumer Service URL) provided by Ternary Customer Success.
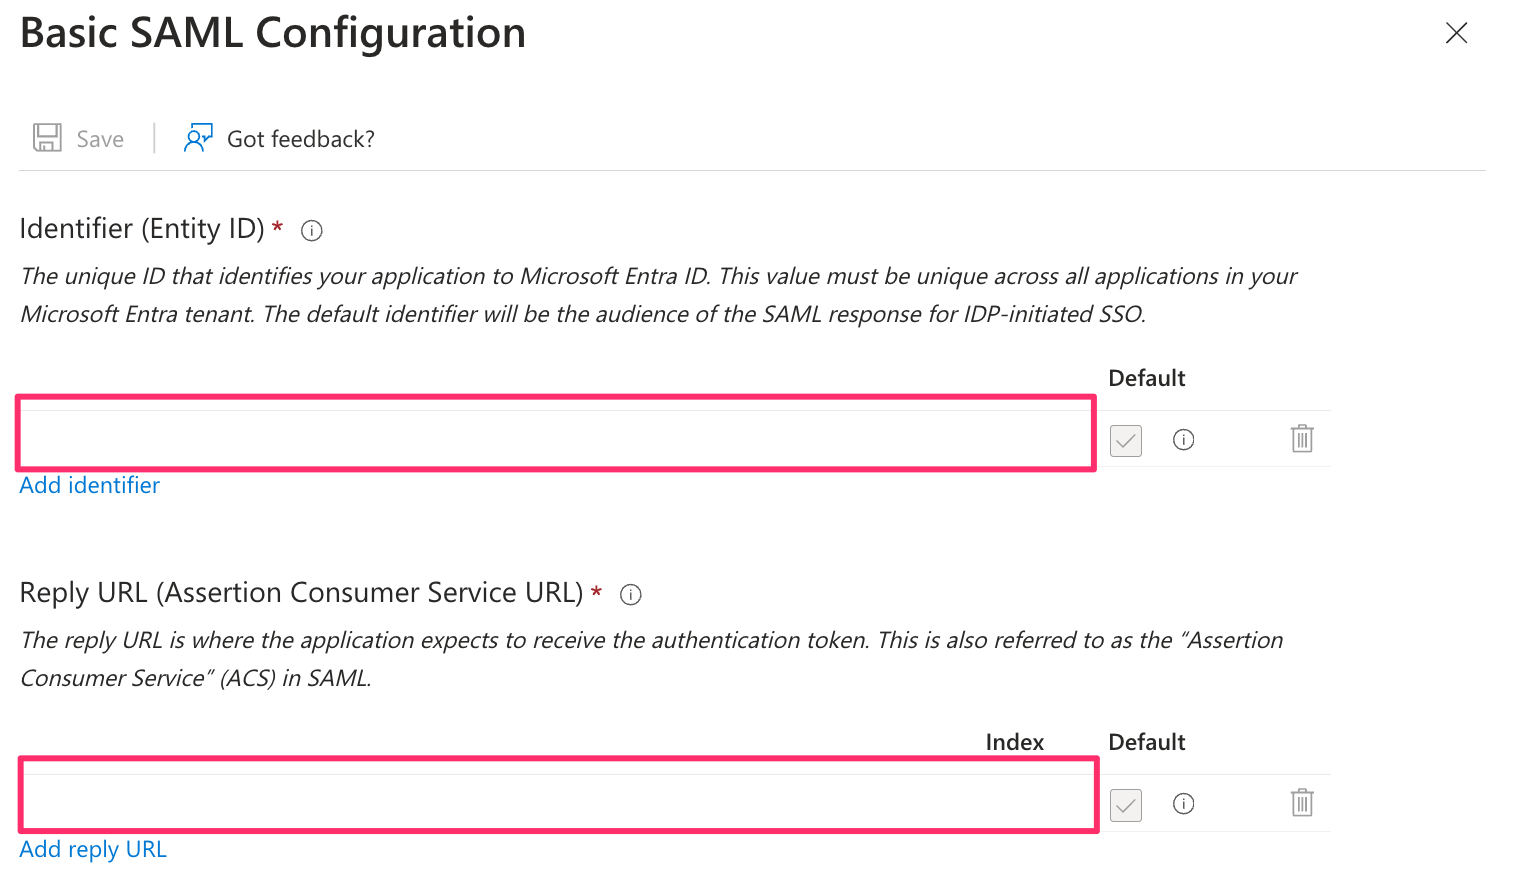
- Save and close the configuration.
Configure SAML Claims
Next, configure the required and additional SAML claims. While Ternary supports a validated set of Entra ID claims, organizations may have custom configurations depending on internal identity policies.
- Open the Attributes & Claims section.
- Review or create the following claims:
Required claim
Name: nameidentifier
Namespace: http://schemas.xmlsoap.org/ws/2005/05/identity/claims
Name identifier format: Email address
Source: Attribute
Source attribute: user.mail
Additional claims
Name: emailaddress
Namespace: http://schemas.xmlsoap.org/ws/2005/05/identity/claims
Source:Attribute
Source attribute: user.mail
Name: givenname
Namespace: http://schemas.xmlsoap.org/ws/2005/05/identity/claims
Source:Attribute
Source attribute: user.givenname
Name: name
Namespace: http://schemas.xmlsoap.org/ws/2005/05/identity/claims
Source:Attribute
Source attribute: user.userprincipalname
Name: surname
Namespace: http://schemas.xmlsoap.org/ws/2005/05/identity/claims
Source:Attribute
Source attribute: user.surname
Configure Group Claims (Optional)
To assign Scoped Views through SSO, configure a group claim:
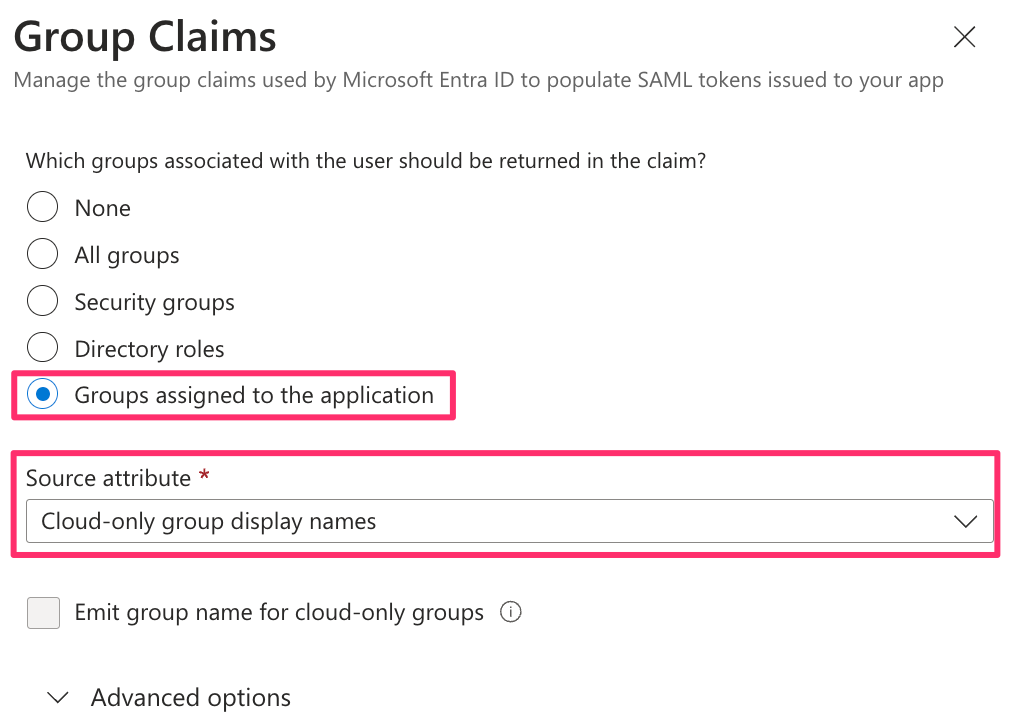
- Add a group claim following the guidance in the Scoped Views documentation.
- After saving, the group claim should appear as:
Claim Name: http://schemas.microsoft.com/ws/2008/06/identity/claims/groups
Value: user.groups[Application Group]
Share Metadata with Ternary
In the SAML Certificates section of the enterprise application:
- Select Download the Federation Metadata XML.
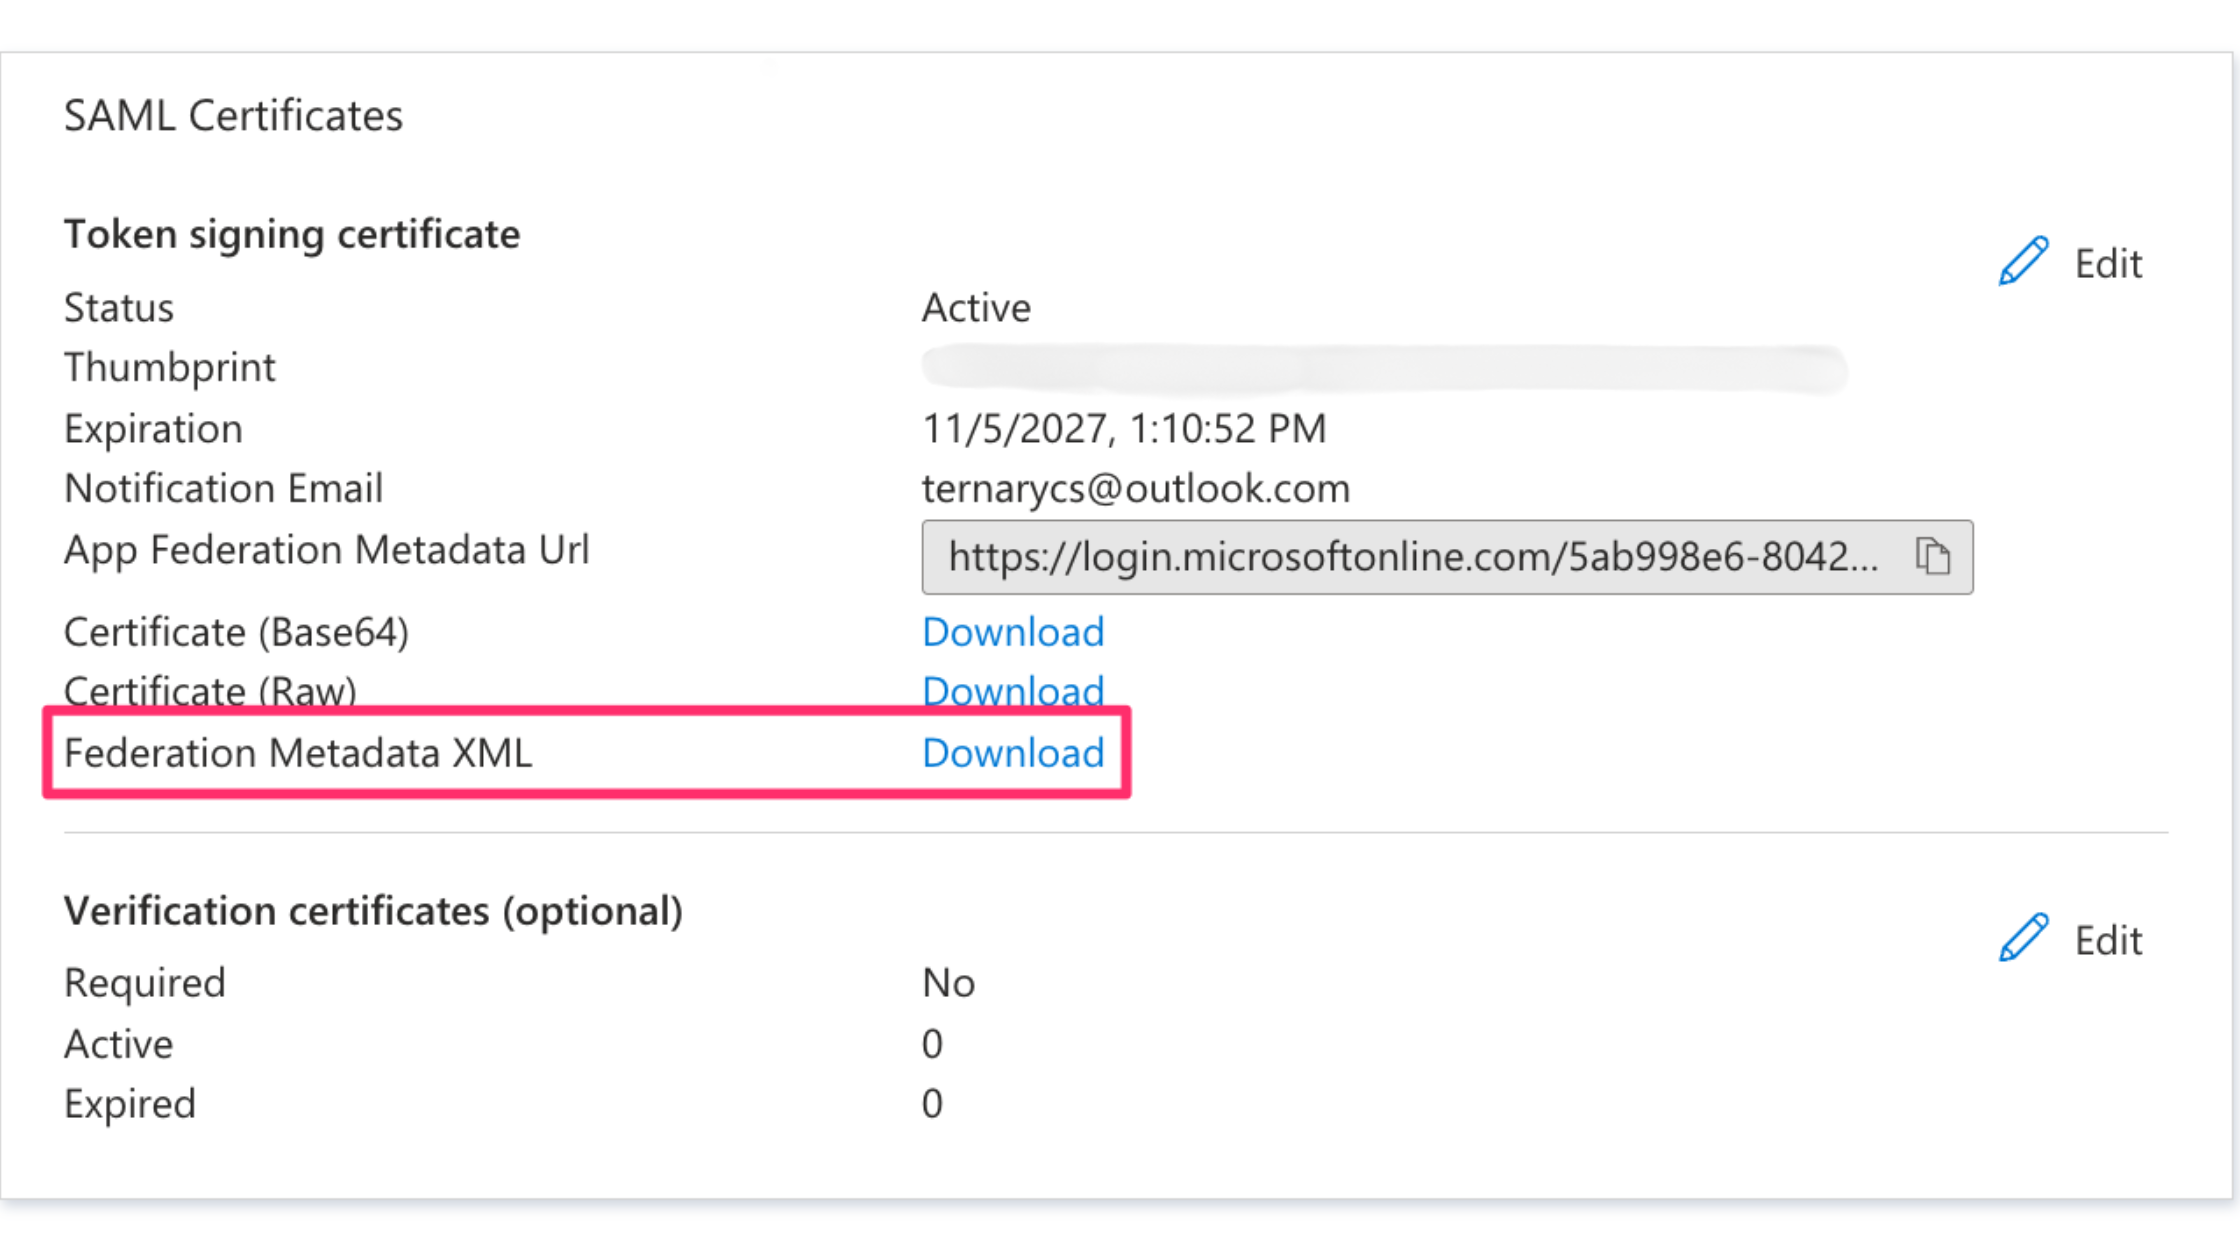
- Provide the downloaded file to the Ternary Customer Success Manager.
Completion and Validation
At this point, the Microsoft Entra ID configuration is complete. Ternary Customer Success will coordinate validation and testing of the SAML integration to confirm successful authentication and provisioning behavior.
Generic SAML Provider configuration
If you don't use Okta, Google Workspace, or Entra, follow these steps for other SAML Identity Providers.
Prerequisites
Before configuring SAML for Ternary, ensure the following requirements are met:
- A corporate email domain that matches the domain used to provision users in Okta. Only one email domain and one SSO integration are supported per Ternary tenant.
- A Connection Name provided by Ternary Customer Success. This value follows the format
yourcompanyname-samland must be used consistently across the SSO configuration. Contact Customer Success to obtain this before starting the setup.
Create the SAML Integration
In your IdP of choice, create a new SAML integration. Configure the SAML settings with the following values (naming may differ between identity providers):
- Single sign-on URL: https://auth.ternary.app/login/callback?connection=yourcompanyname-saml
- Audience URI (SP Entity ID): urn:auth0:ternary:yourcompanyname-saml
- Default RelayState: Leave blank
- Name ID format: Unspecified
- Application username: Email
SAML Attributes
These two attributes must be set for SAML with Ternary to function properly.
| Attribute Name | Type | Value |
|---|---|---|
| http://schemas.xmlsoap.org/ws/2005/05/identity/claims/name | unspecified | The user's full name (both first name and last name.) |
| http://schemas.xmlsoap.org/ws/2005/05/identity/claims/emailaddress | unspecified | The user's email address, preferably lowercase but our system is not case sensitive. |
Gather Information to Share with Ternary
To complete the SSO setup, Ternary requires a few details from the SAML application you just created in your identity provider:
- Identity Provider Single Sign-On URL
- Identity Provider Issuer
- X.509 Certificate
Share these details with Ternary Customer Success, who will finalize the SSO configuration and bind it to your tenant.
Validate the Integration
Once Ternary Customer Success confirms that the SSO integration is active, try logging into Ternary using your organization email. Note: Do not hit 'Sign up', only Continue
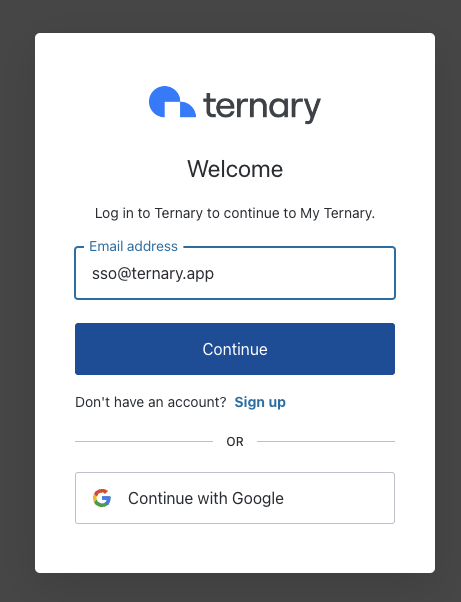
After clicking Continue, authentication should be handled by your IdP without prompting for a password. Then, if configured correctly, the user will be redirected directly into your Ternary tenant.
Updated 3 months ago