Microsoft Azure
Learn how to configure the Microsoft Azure integration in Ternary to connect cost and usage data exports, set up app registration, and enable enhanced monitoring permissions.
The Microsoft Azure integration allows Ternary to access Azure cost and usage data exports to provide cost visibility across the Azure environment. Ternary connects to Azure Cost Management exports for both actual and amortized costs, and optionally to Azure Monitor for usage metrics and resource-level insights.
Managed Service Providers configuring Azure should begin with the MSP billing configuration documentation.
Prerequisites for Ternary's Microsoft Azure Integration
The following permissions are required before beginning the Azure integration configuration:
- Azure Active Directory administrator permissions
- Azure Billing Administrator permissions
- Blob Storage permissions in a subscription to create a container and assign container permissions for the Cost and Usage Data export
How to configure Microsoft Azure integration in Ternary
The configuration process consists of three steps: downloading the Ternary certificate, setting up Azure cost exports and permissions, and creating the Azure Cloud in Ternary. Here’s how:
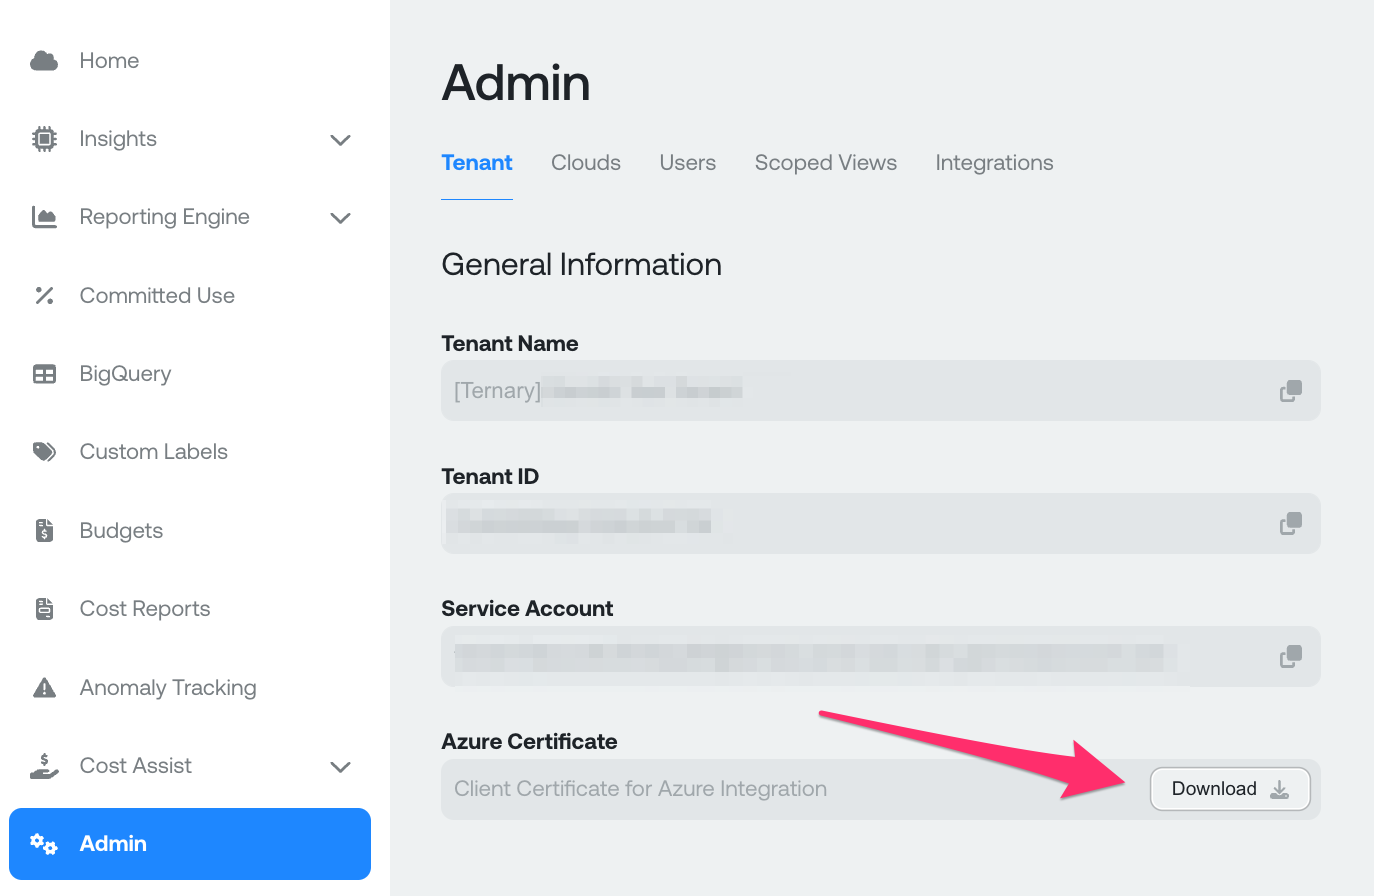
Step 1: Download the Azure Certificate
Ternary authenticates to the Azure environment using a unique certificate generated within the Ternary tenant. This certificate is required before proceeding to Step 2.
- Navigate to Admin in the Ternary App.
- Click the Download button under Azure Certificate.
- Save the file locally as
Ternary_Azure.pem.
To verify the authenticity of the downloaded certificate, follow the steps in the Appendix.
Note: Certificates have a limited validity period (typically 4 years). After expiration, a new certificate must be generated and configured by repeating this step.
Step 2: Azure Cost Export Setup and Permissions
Step 2 covers two paths: automated setup using the Ternary Terraform module, or manual configuration through Azure Active Directory and Cost Management. Both paths result in the same permissions and export structure.
Option A: Terraform Module (Recommended)
Ternary provides a Terraform module that provisions all required resources and permissions automatically. The module is available at the Ternary GitHub repository.
The following inputs are required:
- billing_account_id: The Azure Billing Account ID with administrator permissions
- client_certificate_path: Path to the
Ternary_Azure.pemfile downloaded in Step 1 - enhanced_access_scopes: A list of subscriptions, management groups, or other entities Ternary should have visibility into
module "ternary" {
  source = "https://github.com/TernaryInc/ternary-onb-permissions.git//azure/terraform?ref=master"

  billing_account_id      = "MY_MICROSOFT_BILLING_ACCOUNT_ID"
  client_certificate_path = "/path/to/your/Ternary_Azure.pem"
  enhanced_access_scopes = [
    "/providers/Microsoft.Management/managementGroups/MY-ROOT-MANAGEMENT-GROUP-GUID"
  ]
}

output "ternary_directory_id" { value = module.ternary.directory_id }
output "ternary_app_id" { value = module.ternary.app_id }
output "ternary_storage_account" { value = module.ternary.storage_account }
output "ternary_storage_container" { value = module.ternary.storage_container }
output "ternary_actuals_path" { value = module.ternary.actuals_path }
output "ternary_amortized_path" { value = module.ternary.amortized_path }

provider "azuread" {
  tenant_id = "my-active-directory-tenant-id"
}

provider "azurerm" {
  features {}
}
Once the module runs successfully, collect the outputs and proceed directly to Step 3.
Option B: Manual Configuration
The following steps cover manual configuration of the Azure environment:
Step B1: Create an App Registration
- As the AD administrator, navigate to Azure Active Directory > App Registrations.
- Click + New Registration and fill in the following fields:
- Name: My Ternary (suggested)
- Supported Account Types: Accounts in this organizational directory only (Single tenant)
- Redirect URI: Leave blank After submitting, copy and save the Application ID and Directory ID for use in Step 3.

- Click Add a certificate or secret, then select the Certificates tab.
- Click Upload certificate and browse for the
Ternary_Azure.pemfile downloaded in Step 1. The Description field can be optionally left blank. - Click Add to complete the upload. The certificate will appear with either the entered description or a [email protected] subject.
The certificate expires every 3 years. To request a different expiration period, contact Ternary support.
Watch the below video tutorial for a better walkthrough of this step.
Step B2: Create Billing Exports
If two Azure Billing Exports of types Cost and usage details (actual) and Cost and usage details (amortized) with export type Daily export of month-to-date costs already exist, proceed directly to Step 3. Existing exports are preferred as they contain more complete historical data. Exports created through the steps below will begin populating from the current day.
Note: Azure supports backfilling historical data for new exports. Historical data can be retrieved by manually running exports for previous date ranges or by using the Azure portal to export past months.
- As a billing administrator, open Cost Management in the Azure Portal.
- In the left navigation, select Exports.
- Confirm the Scope matches the billing scope to be managed in Ternary. Ternary recommends selecting the Billing Account to maximize cost and usage visibility.

- Create the first export with the following settings:
- Name: ternary-bill-export-actuals (suggested)
- Metric: Cost and usage details (actual)
- Export type: Daily export of month-to-date costs
- File Partitioning: On
- Storage: Select a subscription, storage account, and container. Set the directory to
actuals. Use a dedicated container for billing export data only. Note the container name, as Ternary will be granted access to it in Step 3.
- Save the export and create a second export with the following settings:
- Name: ternary-bill-export-amortized (suggested)
- Metric: Cost and usage details (amortized)
- Export type: Daily export of month-to-date costs
- File Partitioning: On
- Storage: Use the same subscription, storage account, and container as the actuals export. Set the directory to
amortizedto avoid overlap.
Watch this below video tutorial for a better walkthrough of this step.
Step 3: Grant Ternary Access to the Billing Export
This step grants the app registration created in Step 1 read access to the billing export container.
- Navigate to Blob Storage Accounts and confirm the subscription matches the one selected in Step 2. Select the storage account.
- In the Storage Account view, select Access Control (IAM), and then Add Role Assignment.
- Search for and select the Storage Blob Data Reader role, then press Next.
- On the Members tab, ensure the assignment type is set to User, group or service principal, then select Select members.
- Search for the app registration name from Step 1 (My Ternary if the suggested name was used). Select it and click Select to close the drawer.
- Click Review + Assign to complete the role assignment.
- Avoid placing any data in this container that should not be accessible to Ternary.
Watch this below video tutorial for a better walkthrough of this step.
Step 3: Create the Azure Integration in Ternary
A Ternary Integration is a configuration that ingests billing exports from Azure, Google Cloud, or Amazon Web Services into Ternary.
- Navigate to Admin in the Ternary UI and select New Integrations > Create Azure Integration.
- On the Generic tab, enter the following values from Step 2:
- Application ID
- Directory (Tenant) ID
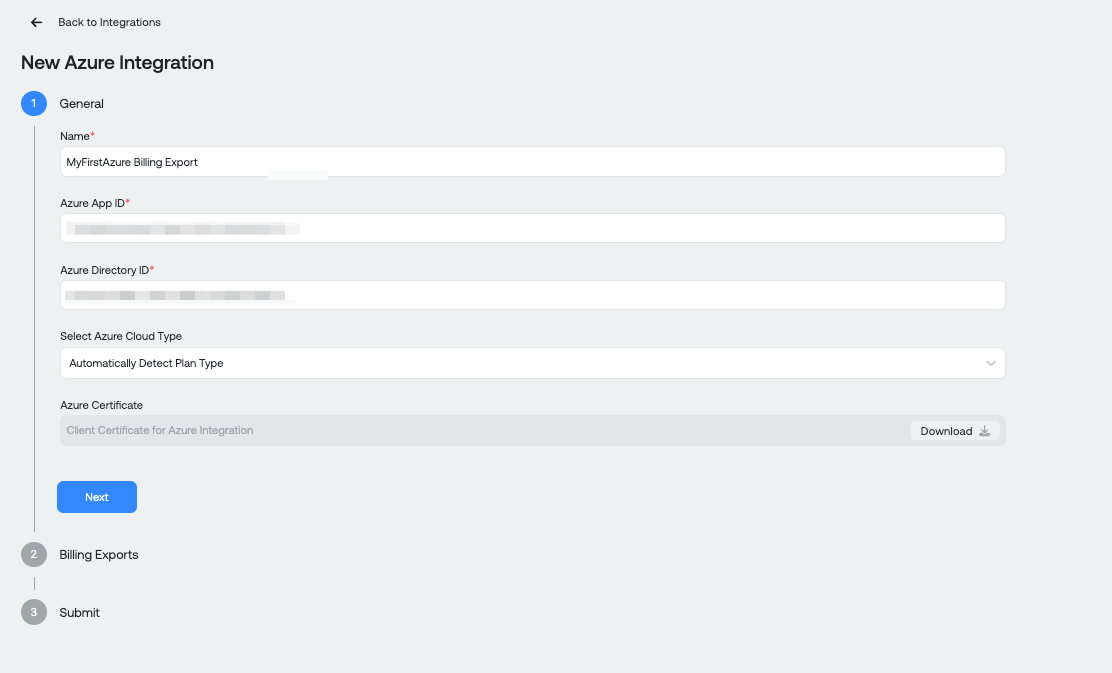
- Click Next to add the billing exports and enter the following values:
You can either paste the billing export storage URL to automatically populate or enter the details manually:
- Service URL: Use the Azure Storage Account name in the format https://yourstorageaccountname.blob.core.windows.net Note: If connecting to GovCloud, the URL will end in blob.core.usgovcloudapi.net
- Storage Container: The container name from Part 2
- Storage Container Prefix: The directory path prefix from Part 2 (e.g., actuals)
- Start and End Date: Optional. Use when referencing a legacy billing export with a known date range.
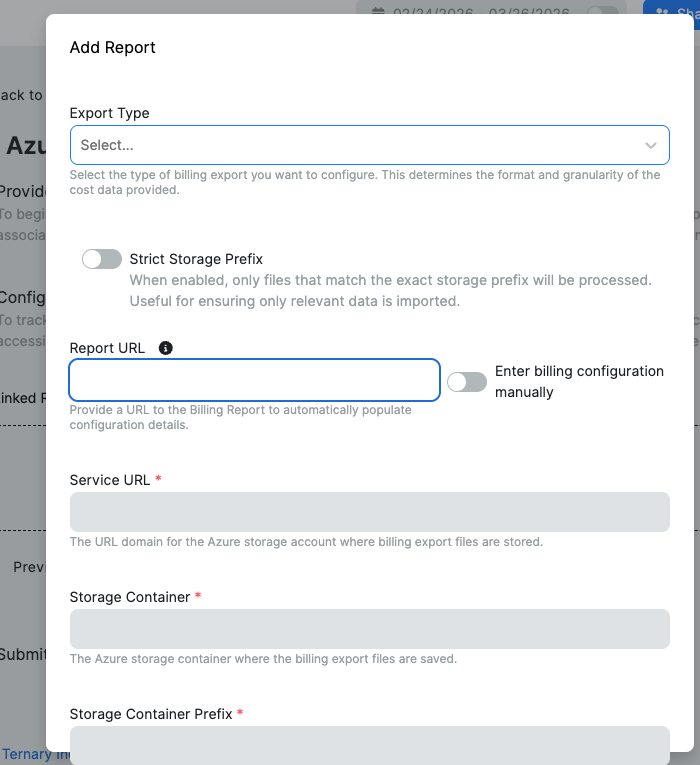
- Repeat these steps for the amortized export, selecting Cost and usage details (Amortized) in the dropdown.
- Click Add Report and confirm the UI shows Created Reports: 2. This ensures Ternary has access to all configured data exports.
- Click Submit to complete the configuration.
Azure billing data may take a few hours to populate in Ternary.
Note: To auto-populate the billing export fields, provide the URL of the Azure blob containing the report.
- Navigate to Storage Accounts in the Azure Portal.
- Select the account that contains the billing export file.
- Click Data Storage in the side navigation and select Containers.
- Navigate to the billing report in the container. This will be a manifest.json file or a CSV containing billing information.
- In the overview pane, click Copy to clipboard in the URL field.
- Paste the value into the Report URL field in the Billing Exports section of the Azure integration.
For more details about storage account endpoints, refer to this Azure documentation.
Repeat Step 3 for every additional billing export to be made available in Ternary. Multiple exports may be required if the organization has different contract types with Microsoft or uses separate Azure AD directory instances.
Watch this below video tutorial for a better walkthrough of this step.
Important Considerations
New billing exports created during this setup will not contain historical data. To include historical data in Ternary, create separate prior-month exports to cover the historical period alongside the current exports collecting ongoing data. Repeat Step 3 for each additional export to ensure Ternary has access.
For guidance on the correct combination of exports to fully represent Azure costs in Ternary, contact the Ternary solutions team.
Appendix: Verifying the Client Certificate
The Ternary client certificate can be validated against the Ternary Root CA to confirm authenticity. All client certificates generated by Ternary are signed by this Root CA.
The Ternary Root CA particulars are as follows:
- Issuer: C=US, ST=Delaware, L=Claymont, O=Ternary, Inc., OU=Client Certificates for Azure, CN=Ternary RSA Root CA 2022.7/emailAddress = [email protected]
- Subject: C=US, ST=Delaware, L=Claymont, O=Ternary, Inc., OU=Client Certificates for Azure, CN=Ternary RSA Root CA 2022.7/emailAddress = [email protected]
- SHA256 Fingerprint:
52:0E:36:2C:36:D2:25:88:1E:E2:03:B9:88:63:D8:E1:25:78:BC:DB:89:84:81:9B:4A:72:B2:E1:56:C6:E4:42
To validate the certificate, download ca.pem from the Ternary public GitHub repository and run the following command:
openssl verify -CAfile ca.pem Ternary_Azure.pemAn output of OK confirms that Ternary_Azure.pem is signed by the Ternary Root CA private key.
Enable Enhanced Azure Functionality in Ternary
Enhanced Azure functionality extends the base integration to include recommendations, and rich usage metrics from Azure Monitor. This brings Azure support in Ternary to a similar level as AWS and Google Cloud.
Additional permissions are required at various levels in the Azure environment to enable this functionality. This section assumes a Ternary or My Ternary managed principal has already been created and that Ternary has read access to the billing export files.
Step 1: Create an Amortized Cost Export
Enhanced functionality requires access to an amortized cost export in addition to the actual costs export already configured.
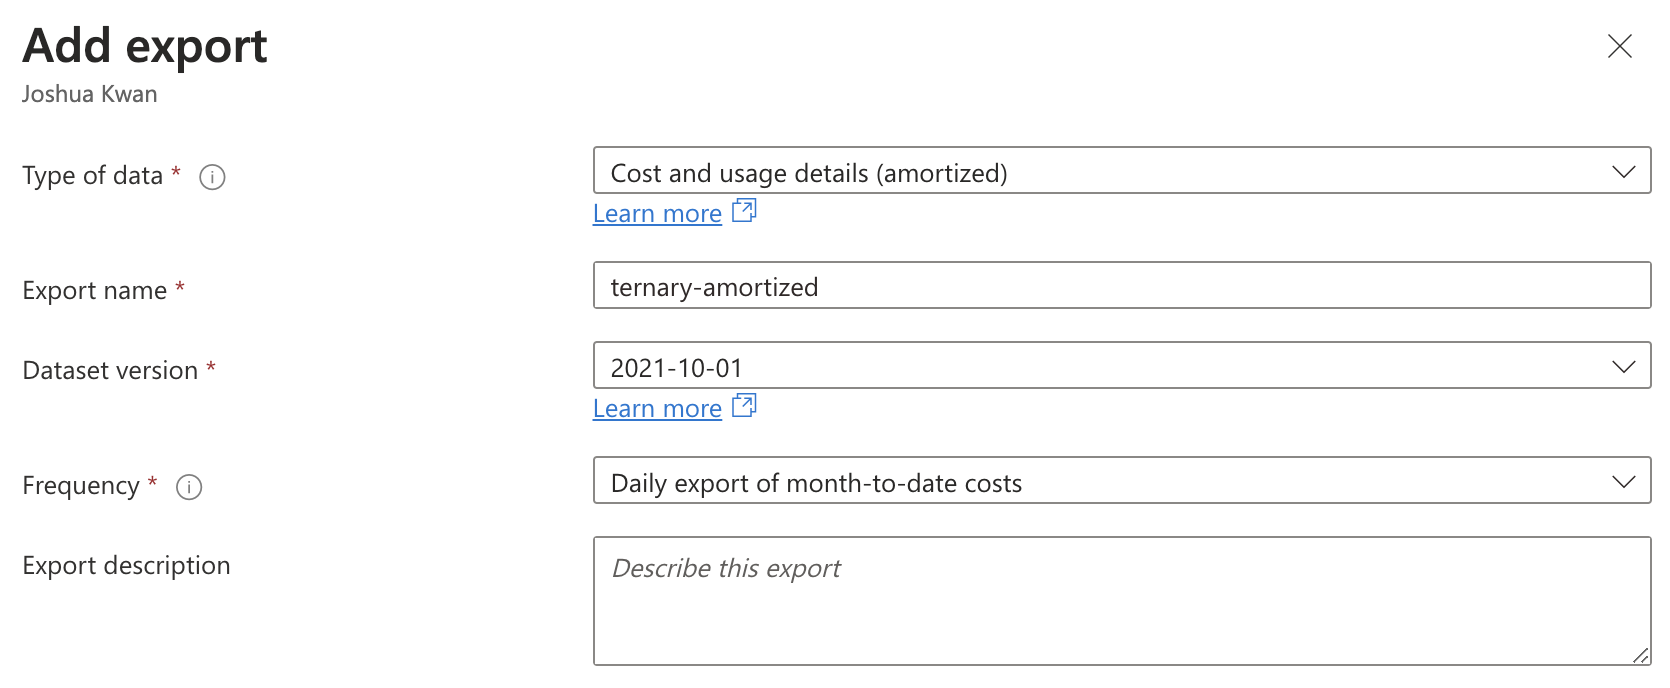
- In Azure Cost Management, select Exports and click Create.
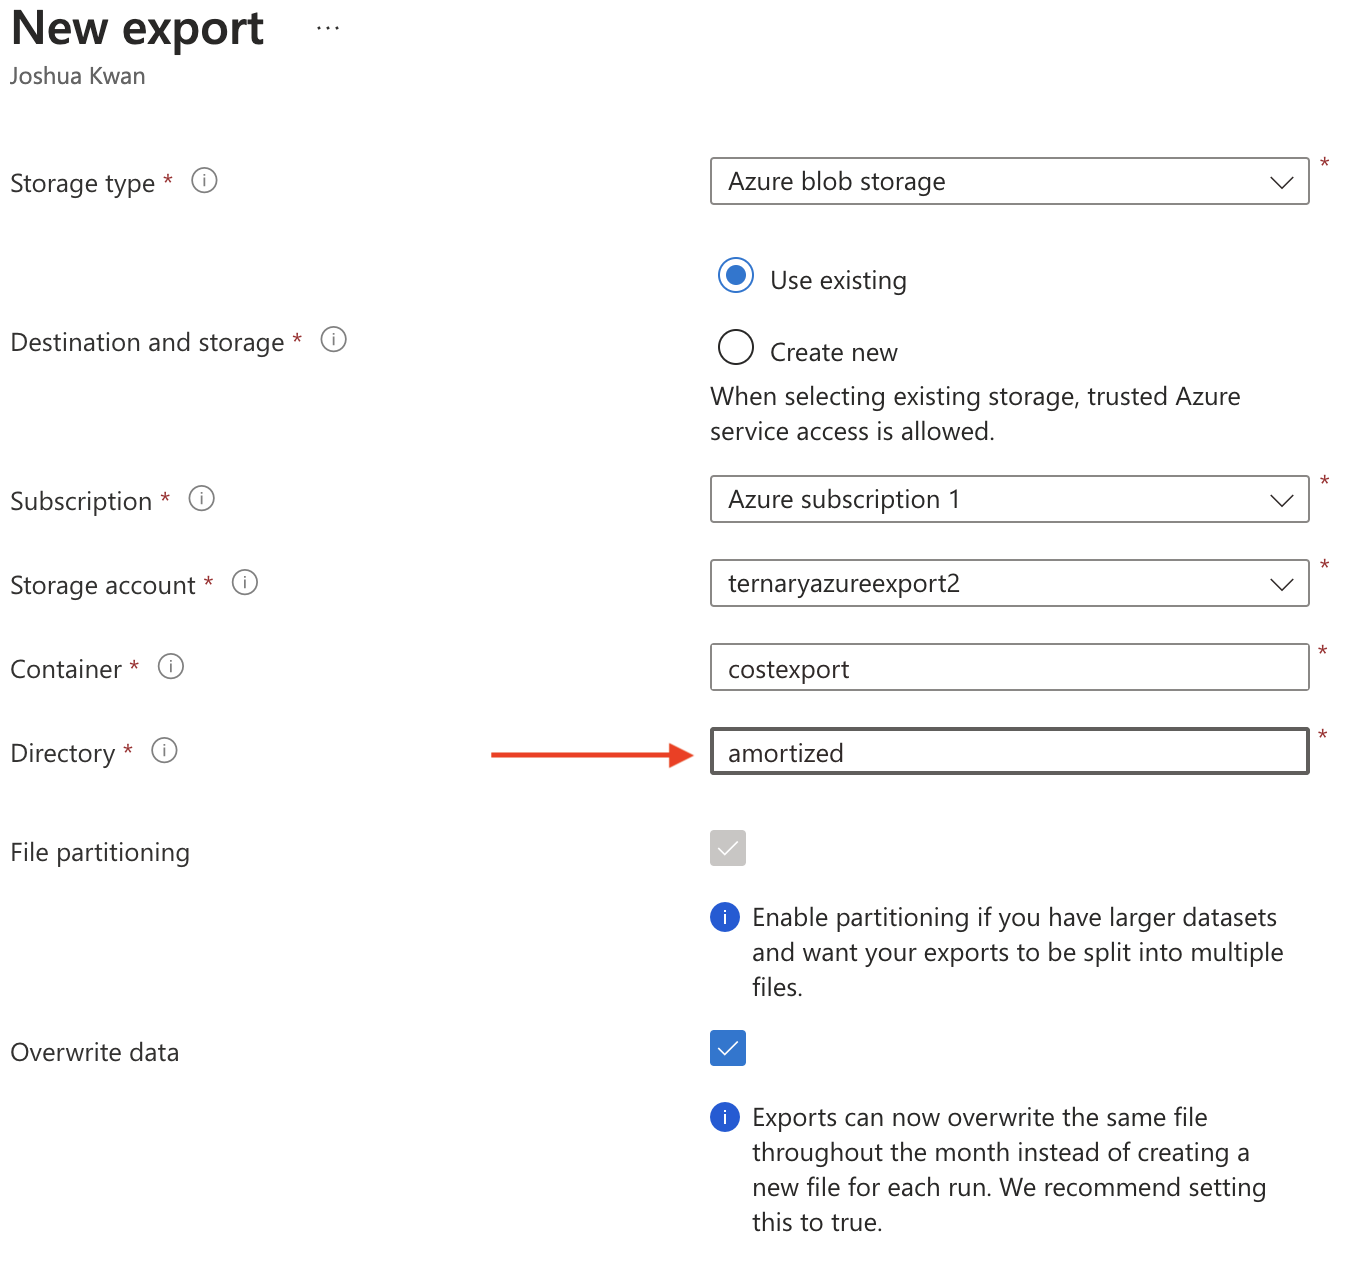
- In the Add Export panel, select Cost and usage details (amortized) as the type of data.
- Select Add and configure the export destination:
- Select Use existing destination and choose the same Subscription, Storage Account, and Container used for the existing actual costs export.
- Enter a new Directory path to avoid overlap with the actual costs export directory.
- Enable both File partitioning and Overwrite data.
Step 2: Assign Management Group Permissions
Assign the following read-only roles to Ternary at the Tenant Root Group level in the Azure Management Groups panel.
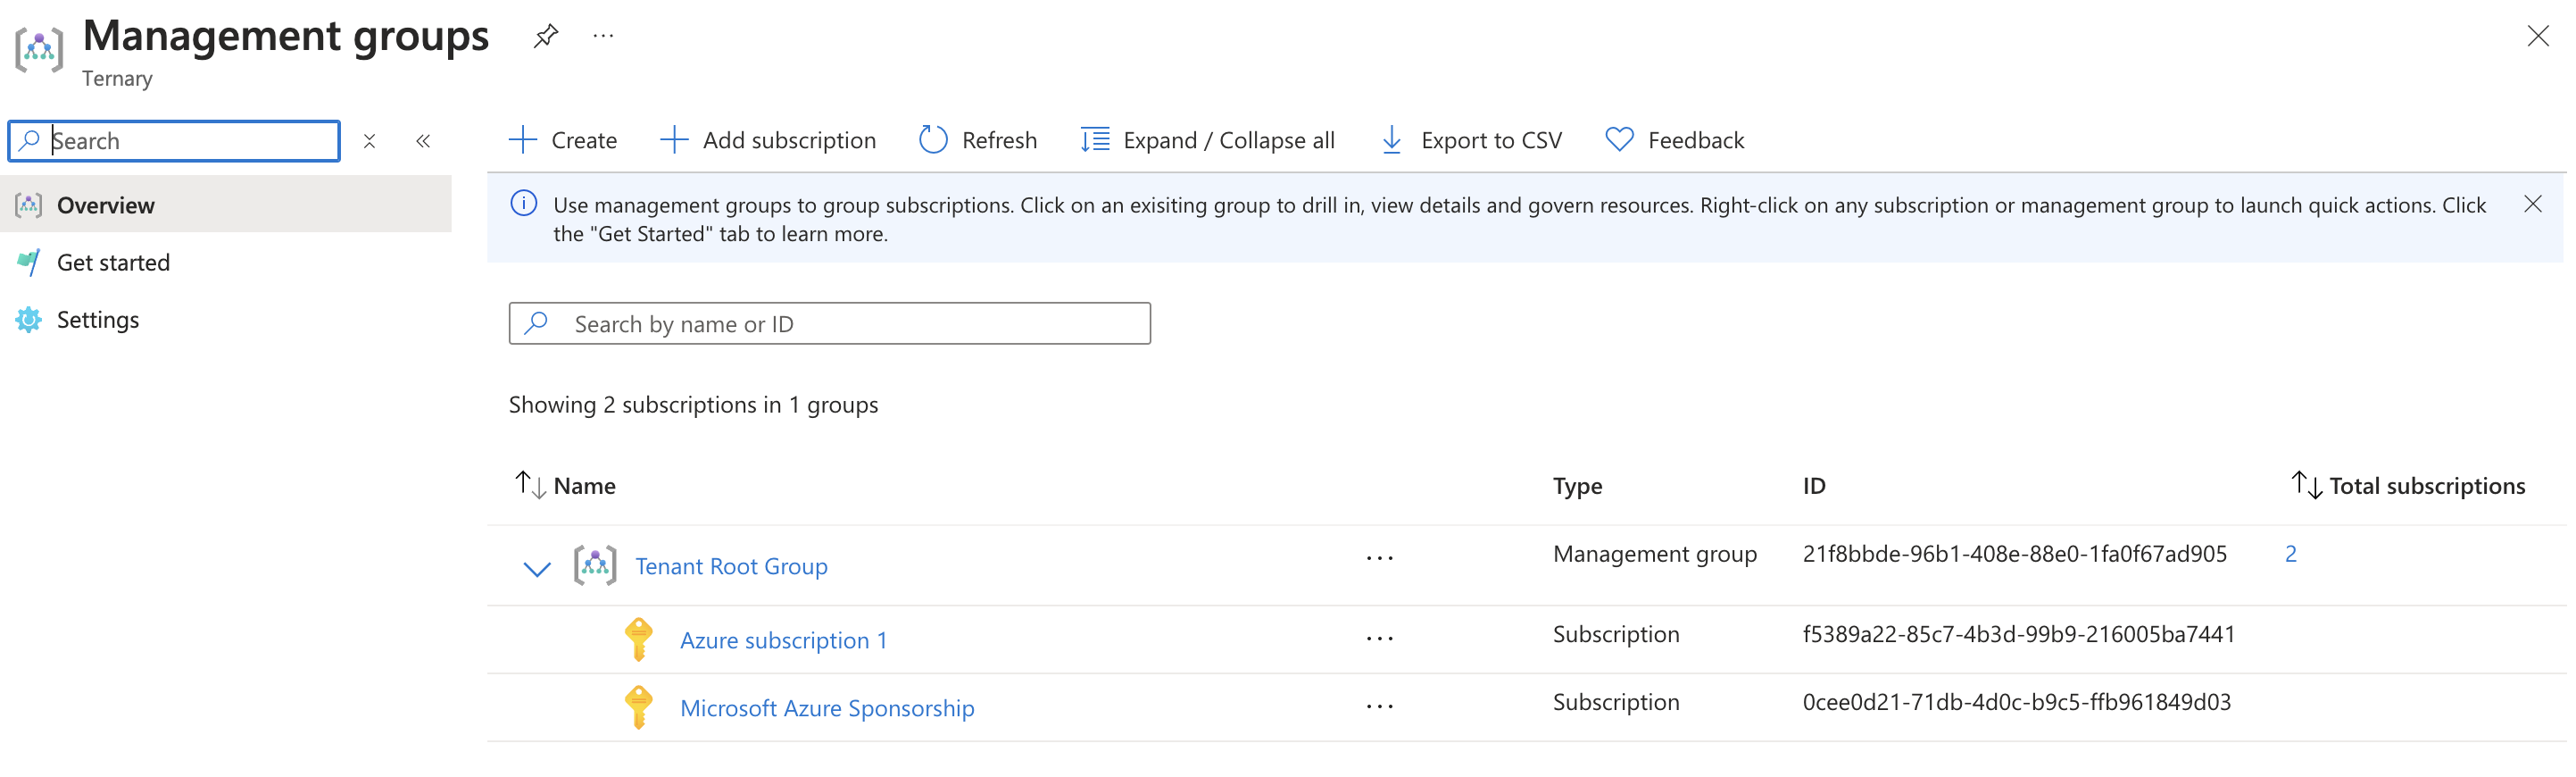
- Navigate to Azure Management Groups and click Tenant Root Group.
- Select Access Control (IAM), and then Add role assignment.
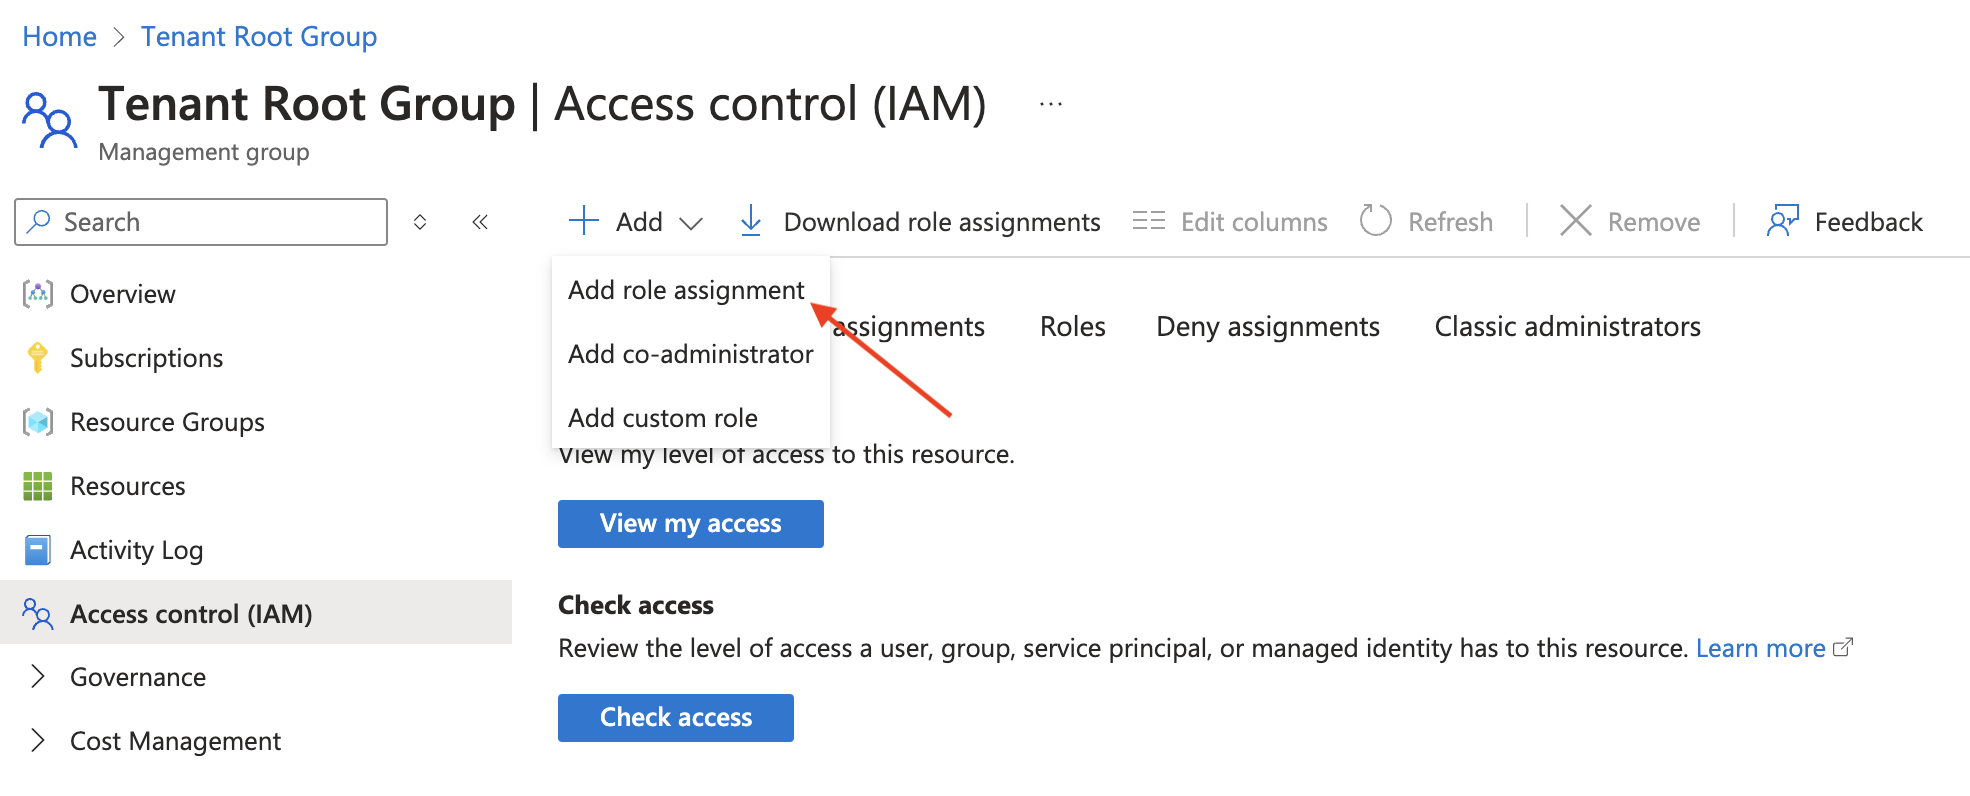
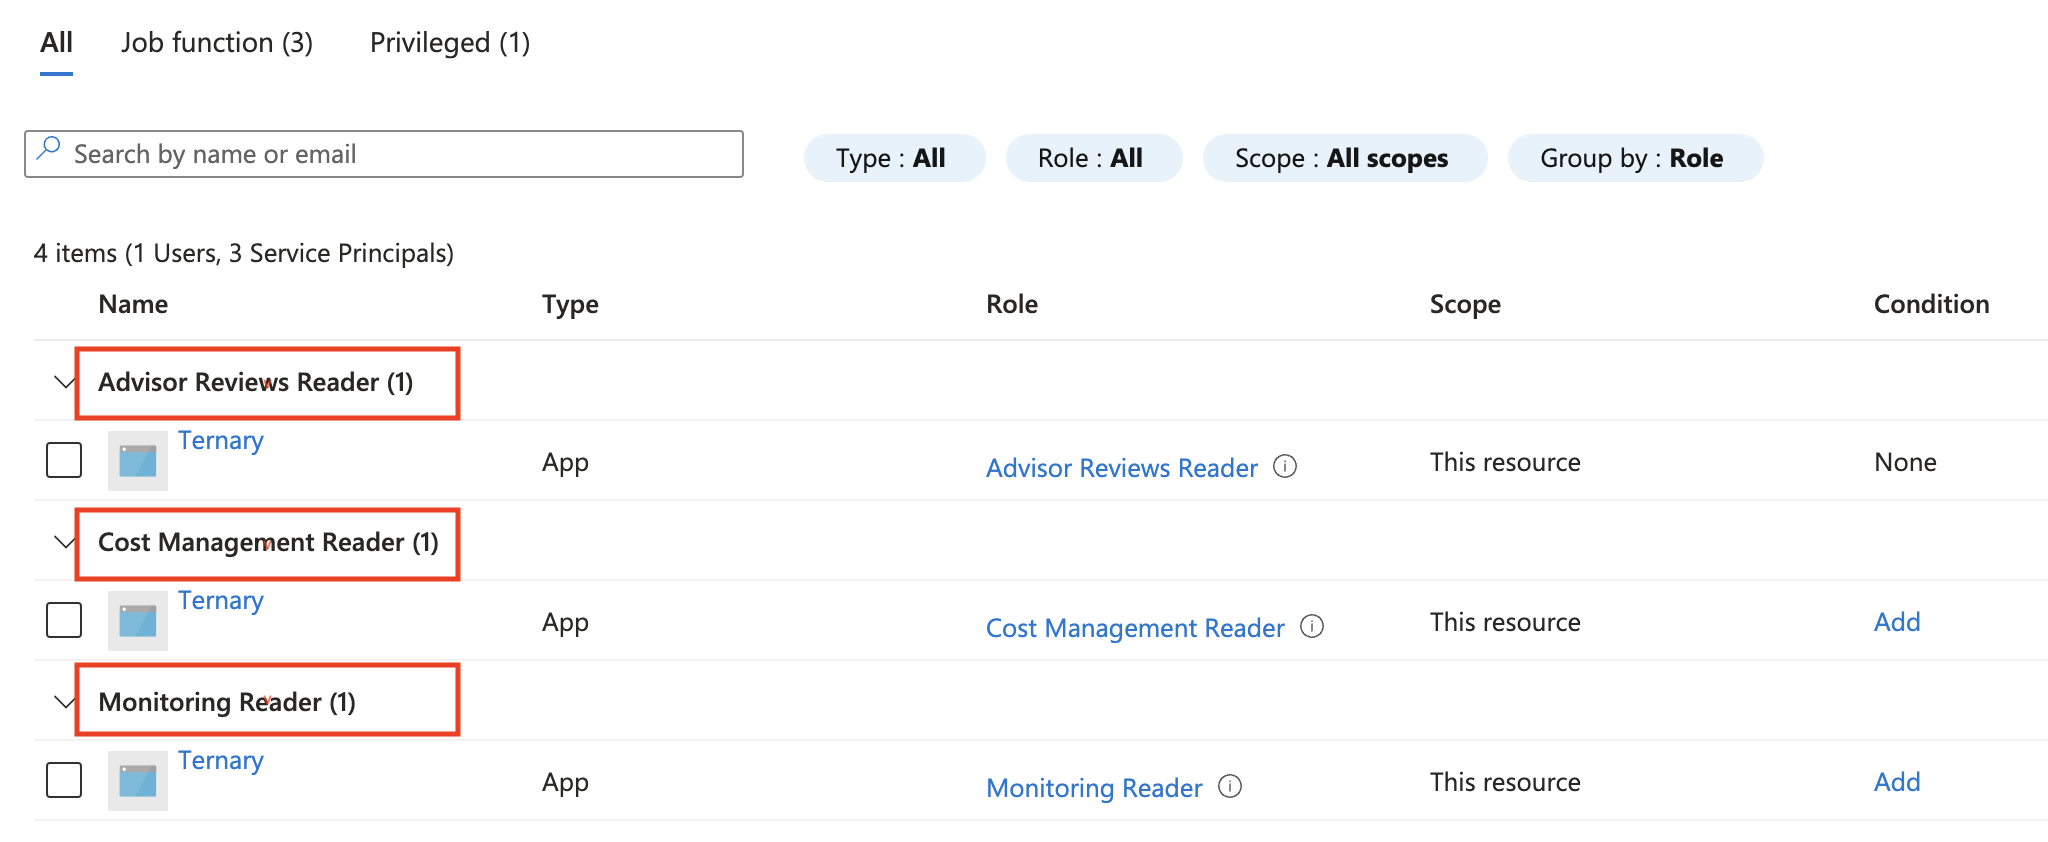
- Add the following three role assignments, searching for My Ternary when selecting the member:
- Advisor Reviews Reader: Allows Ternary to surface Azure-generated cost recommendations alongside recommendations for other cloud providers.
- Cost Management Reader: Allows Ternary to query billing profiles and billing accounts to generate reservation and savings plan recommendations and utilization summaries.
- Monitoring Reader: Allows Ternary to retrieve usage metrics for Azure resources and join them with billing data for enhanced views.
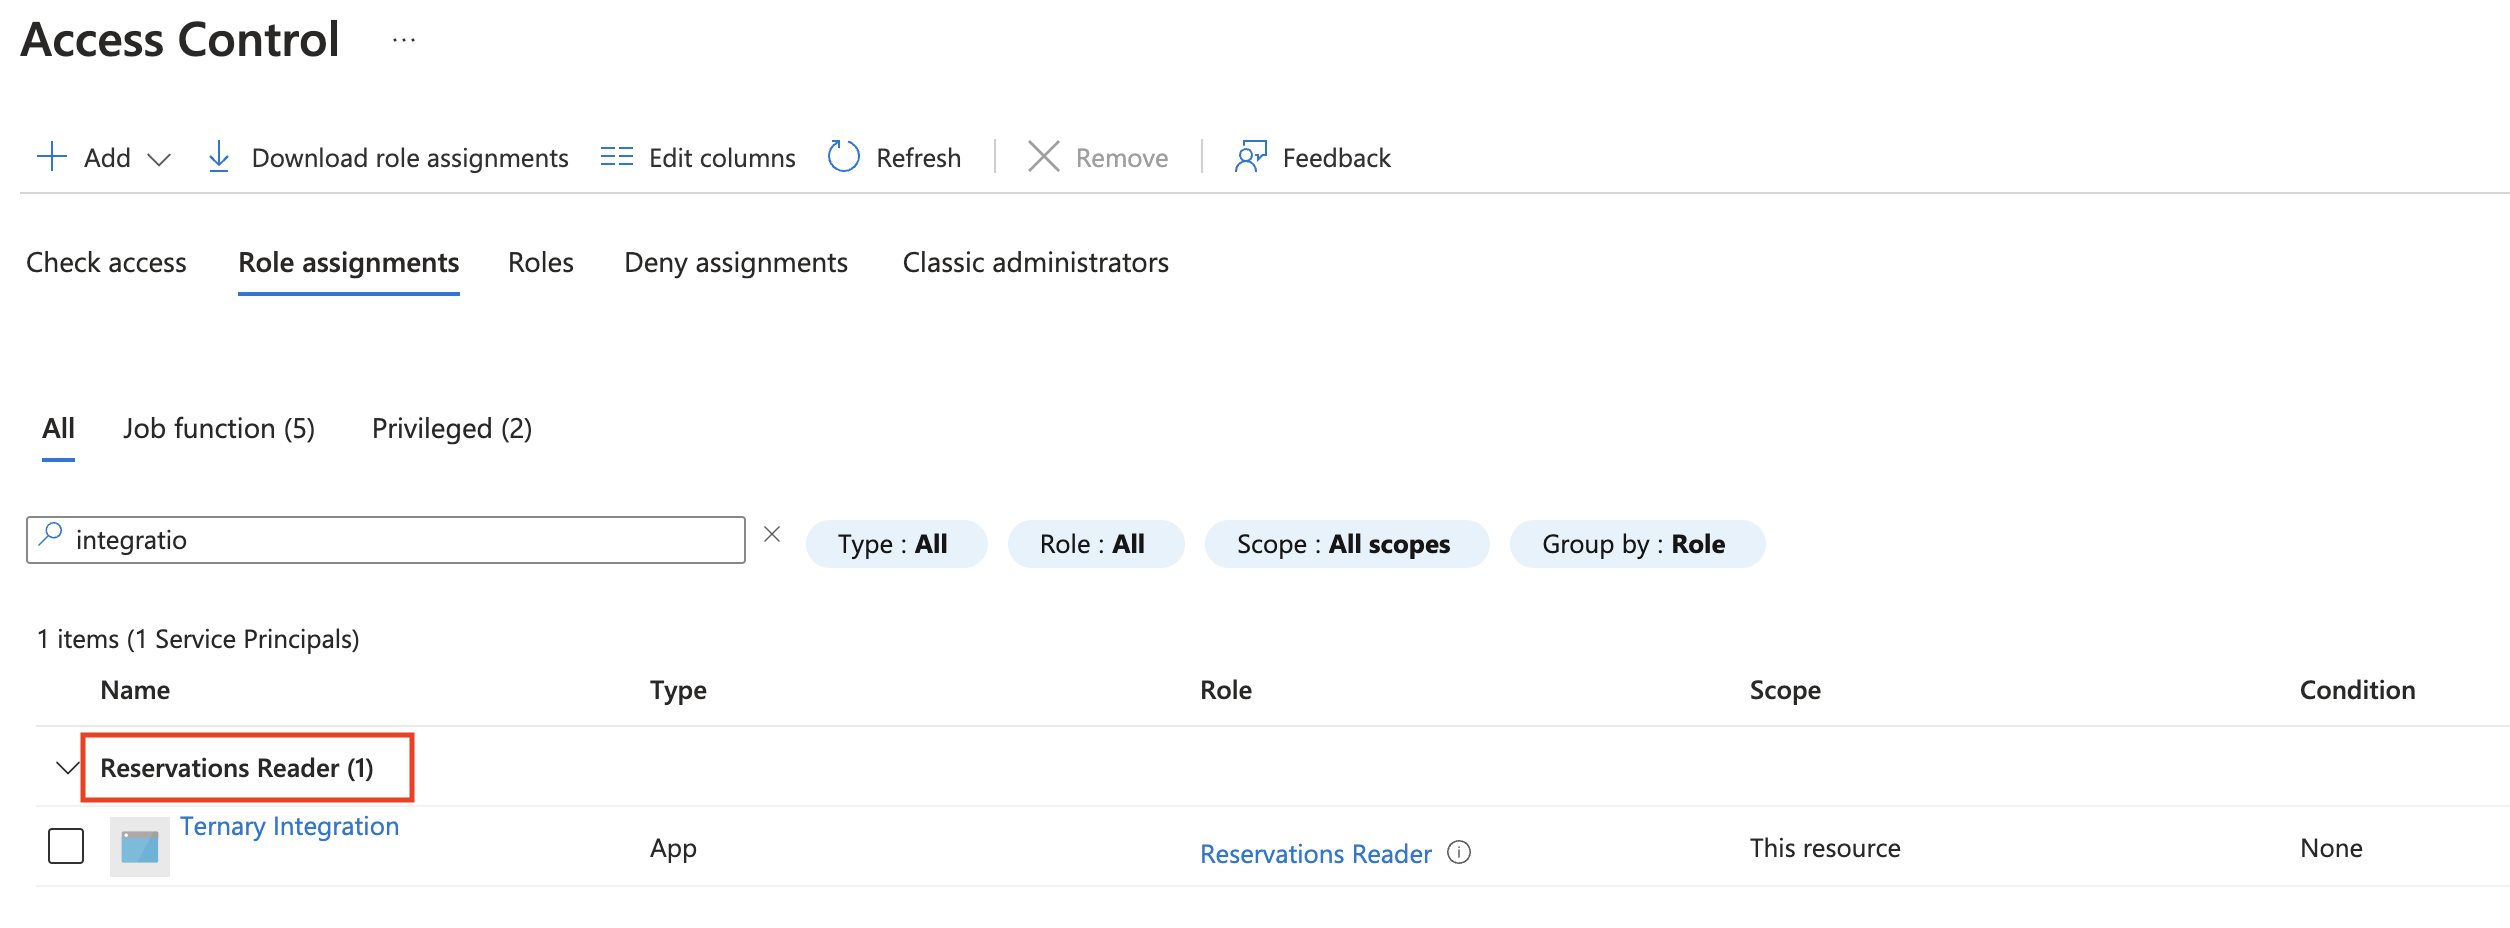
Step 3: Assign Reservations Permission
- Navigate to the Azure Reservations panel.
- Select Add Role Assignment and grant Ternary the Reservations Reader role.
This grants Ternary visibility into all reservations across the entire Azure tenant.
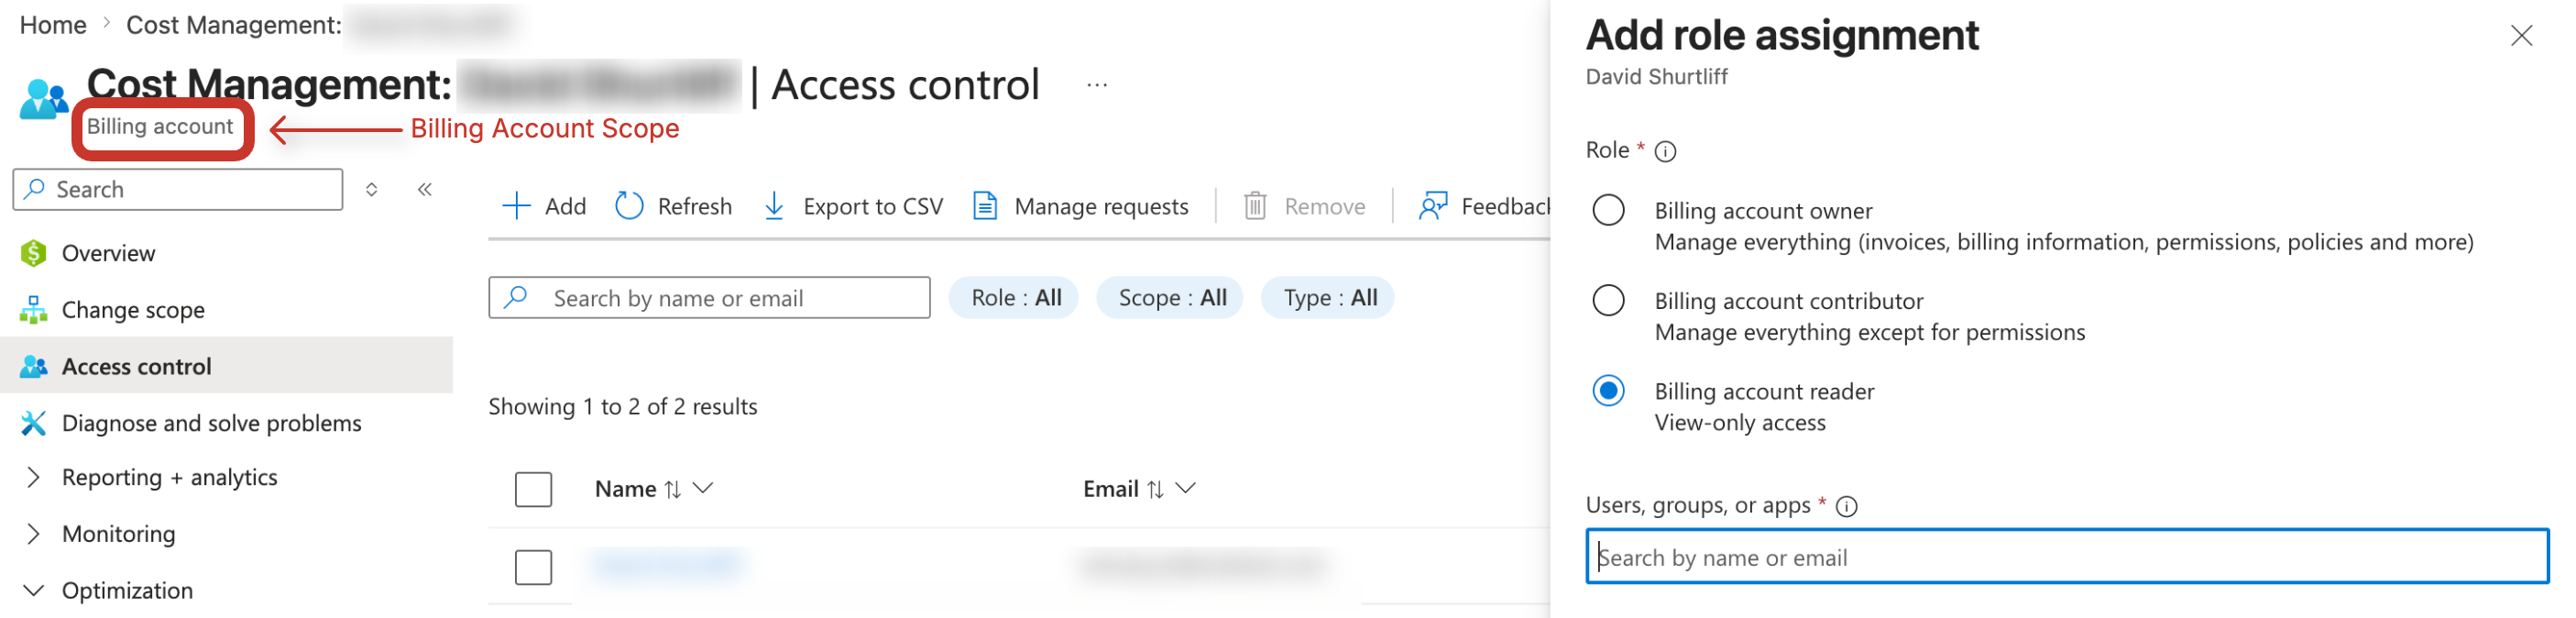
Step 4: Assign Billing Account Permission
- In Azure Cost Management, select Access Control and grant Ternary the Billing account reader role at the billing account scope
This allows Ternary to query savings plans information for the entire billing account. Confirm that the scope displayed next to Access Control (IAM) is set to the billing account before proceeding.
If Reader access at the billing account level cannot be granted, the same access can be assigned individually to each savings plan in the Azure tenant. This process must be repeated as new savings plans are acquired.
Updated about 1 month ago