Snowflake
Learn how to configure the Snowflake integration in Ternary to ingest billing data and analyze warehouse usage and query activity.
The Ternary Snowflake integration ingests Snowflake billing data and warehouse and database usage metrics to provide visibility into Snowflake costs and operational activity.
Billing data enables analysis of Snowflake spend across accounts, warehouses, and query workloads. Warehouse Insights analyzes warehouse utilization and query history to surface operational patterns and potential cost drivers.
Once configured, Snowflake data becomes available across Ternary dashboards, the Reporting Engine, and the Data Warehouse and Database Insights views for cost analysis and usage monitoring.

Prerequisites of Ternary’s Snowflake integration
The following requirements must be met before configuring the Snowflake integration:
-
A Ternary user with the Tenant Admin role.
-
A Snowflake user that has been assigned the ACCOUNTADMIN role.
Alternatively, if assigning a custom role to the user, first grant “imported privileges” on the Snowflake system database to that custom role, so the role can access Snowflake usage views. The process for granting these privileges is documented here in Snowflake, or see Step 0 below. -
The first Snowflake account connected to Ternary must have the ORGADMIN capability enabled at the account level. The ORGADMIN role does not need to be assigned to the Ternary Snowflake user. Documentation for enabling ORGADMIN can be found here.
The instructions to enable ORGADMIN are reproduced below for convenience. Run the following commands in the Snowflake account that will be used with Ternary:
USE ROLE ORGADMIN;
ALTER ACCOUNT ternary_account SET IS_ORG_ADMIN = TRUE
How to configure the Snowflake integration in Ternary?
Step 0: Configure a custom Snowflake role (optional)
For requirement #2 above, If a custom role is preferred instead of the default ACCOUNTADMIN role, create the role in Snowflake and grant access to the Snowflake system database.
-
Create a custom role in Snowflake. Record the role name, as it will be required during the Ternary configuration process.
-
Grant access to the Snowflake system database by running the following command in a Snowflake worksheet:
GRANT IMPORTED PRIVILEGES ON DATABASE SNOWFLAKE TO ROLE "custom_role_name"
This Snowflake documentation provides additional details on enabling roles to access schemas in the Snowflake database.
Step 1: Gather required Snowflake configuration details
The following 6 pieces of information are required before configuring the Snowflake integration in Ternary:
- Snowflake Organization Name: Finding the name of the organization's documentation here.
- Account Name: Each Snowflake account that Ternary will ingest data from. Find a list of Snowflake accounts in your organization as documented here.
- Role Name: Either the default ACCOUNTADMIN role or a custom role configured during Step 0.
- Warehouse Name: The compute resource used by Ternary to query Snowflake organization- and account-level system views. Ternary can query all necessary system views through one warehouse per account.
- Username: The Snowflake user for Ternary to authenticate and connect to each Snowflake account.
Step 2: Configure Snowflake in Ternary
After gathering the required information, configure the Snowflake integration in Ternary.
-
Sign in to the Ternary instance at https://my.ternary.app
-
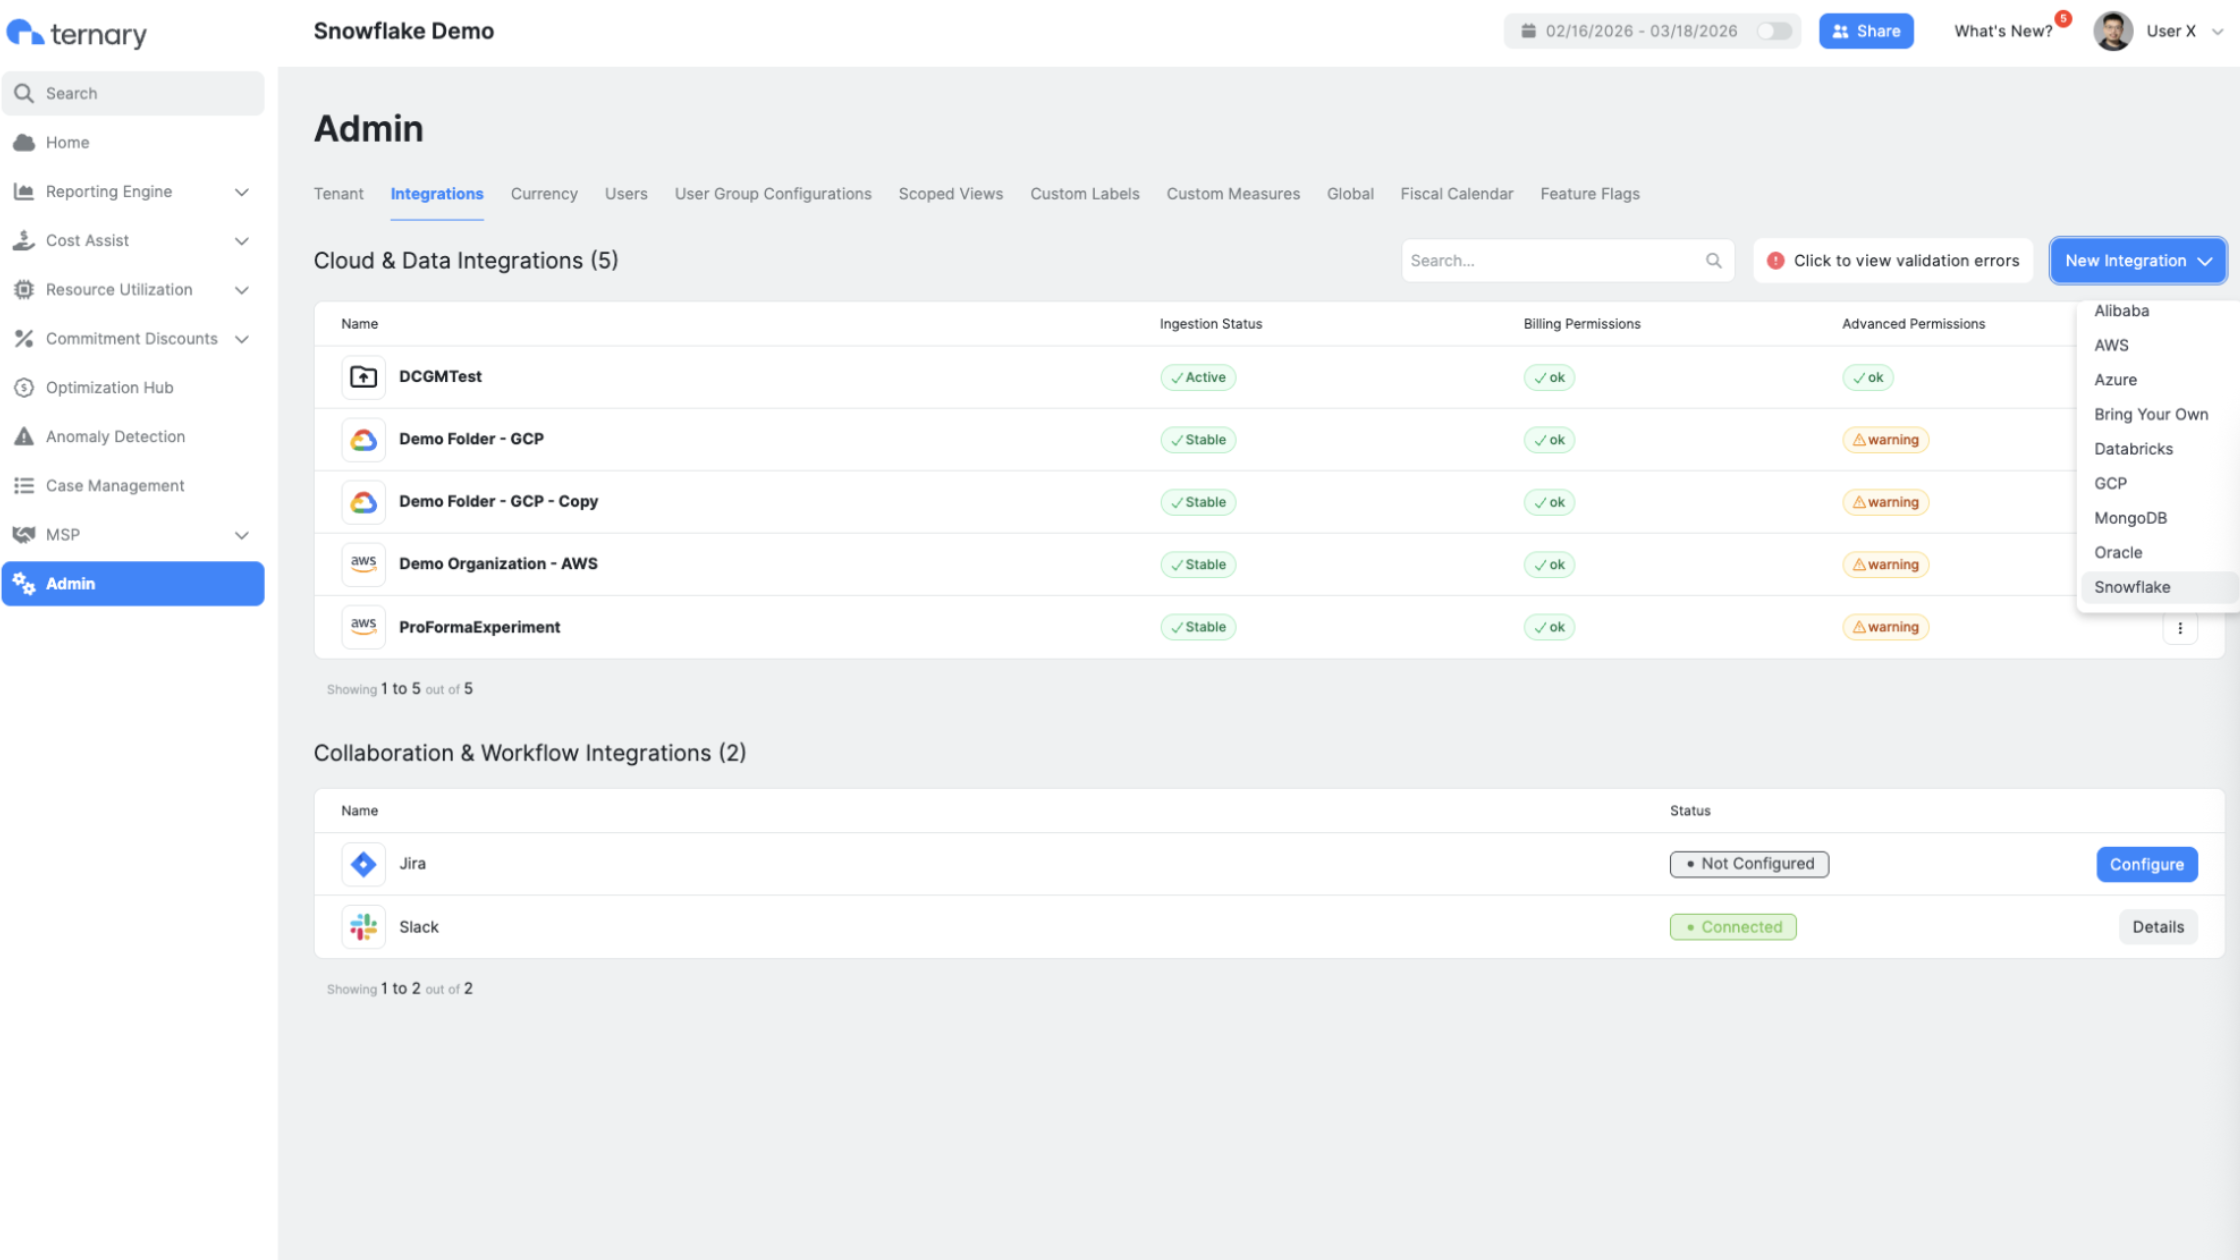
Open Admin from the left navigation menu.
-
Select the Integrations tab.
-
Select New Integration, then choose Snowflake.
-
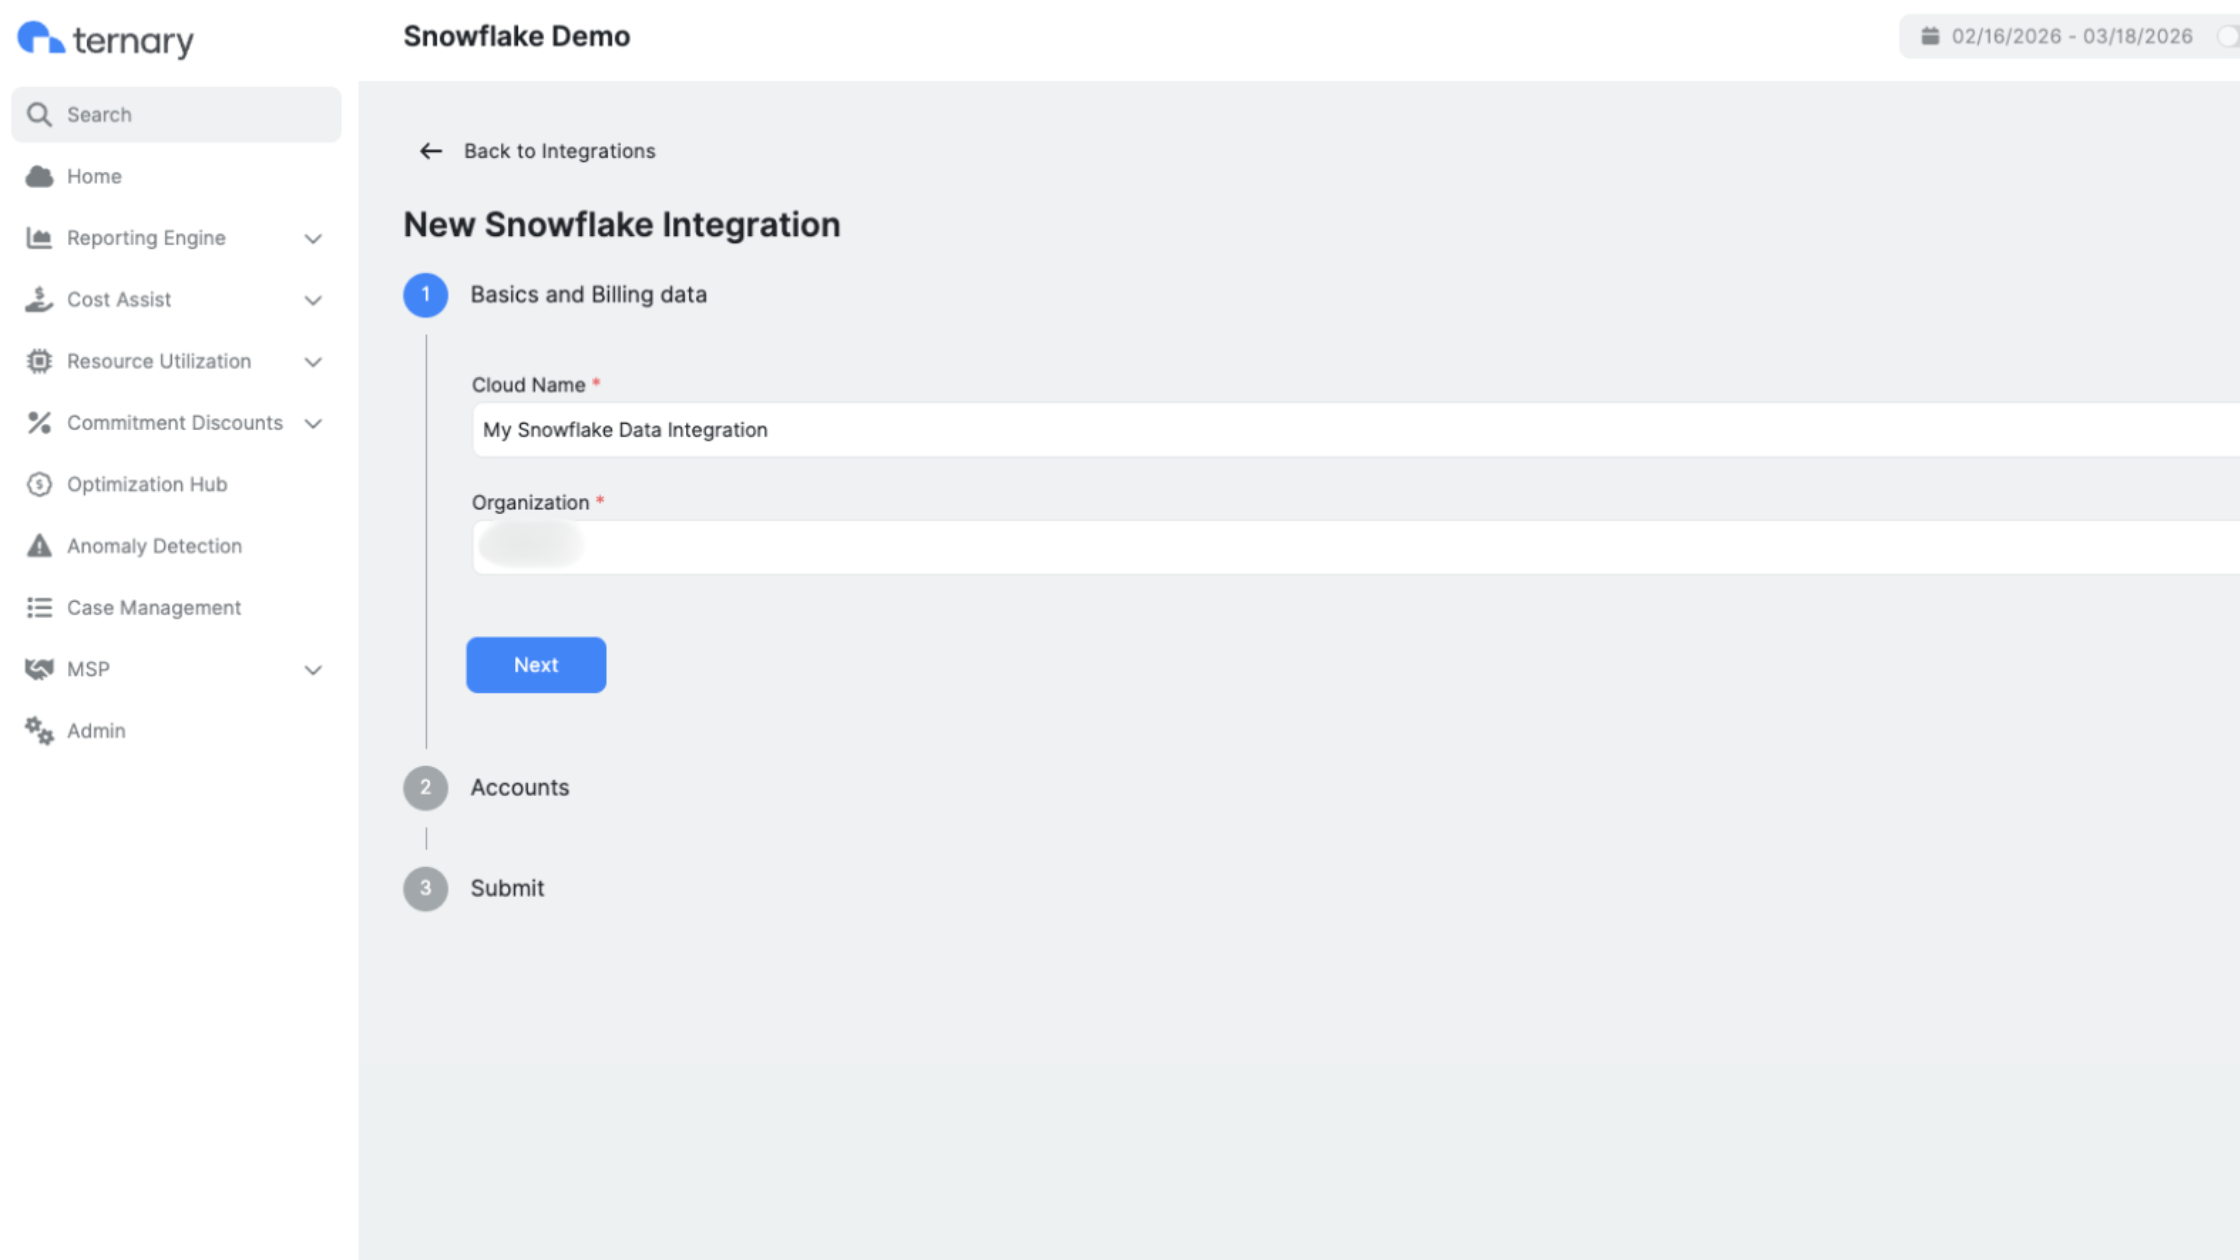
Enter the Cloud Name (display name for this data integration) and the Snowflake Organization Name (find your organization name here).
-
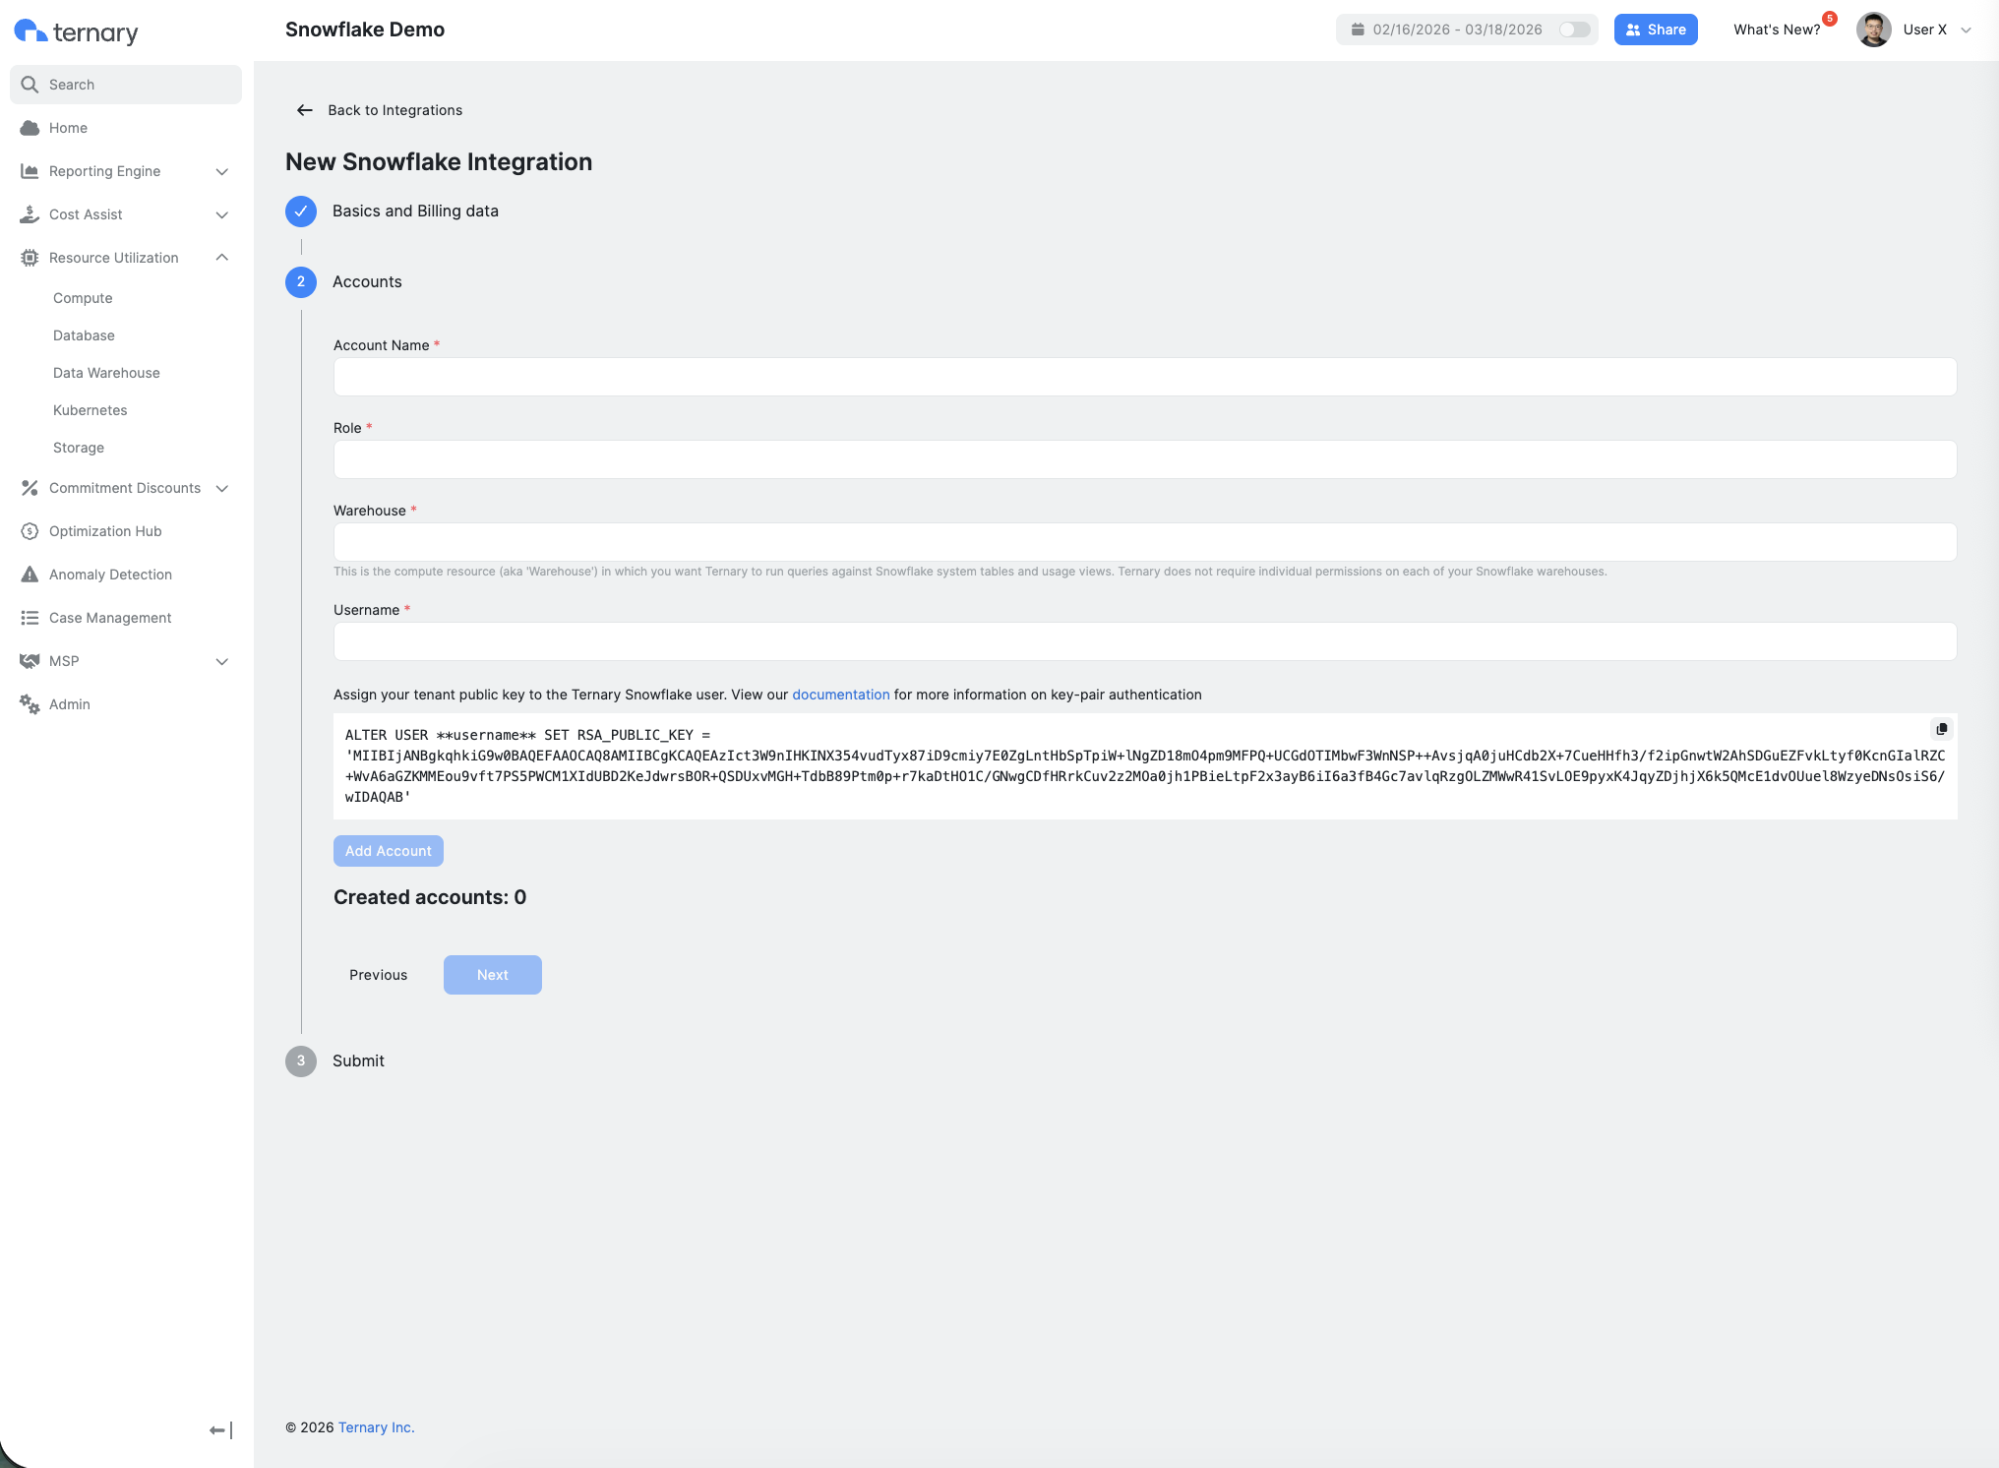
In Account 1, provide the following information: Account Name, Role, Warehouse and Username.
-
Copy the ALTER USER code block displayed in the Snowflake configuration section and run it in Snowflake as an administrator. This command enables public key authentication for the configured user, which is the preferred authentication method in Snowflake.
-
To configure additional Snowflake accounts, select Add Account and repeat the configuration steps for each account.
-
Select Submit to save the integration.
Step 3: View Snowflake data in Ternary
After the integration is configured, Snowflake billing data and query history may take up to 24 hours to populate in Ternary. Once the data is available:
- Open Resource Utilization from the left navigation menu.
- Navigate to the Data Warehouse.
- Select Snowflake.
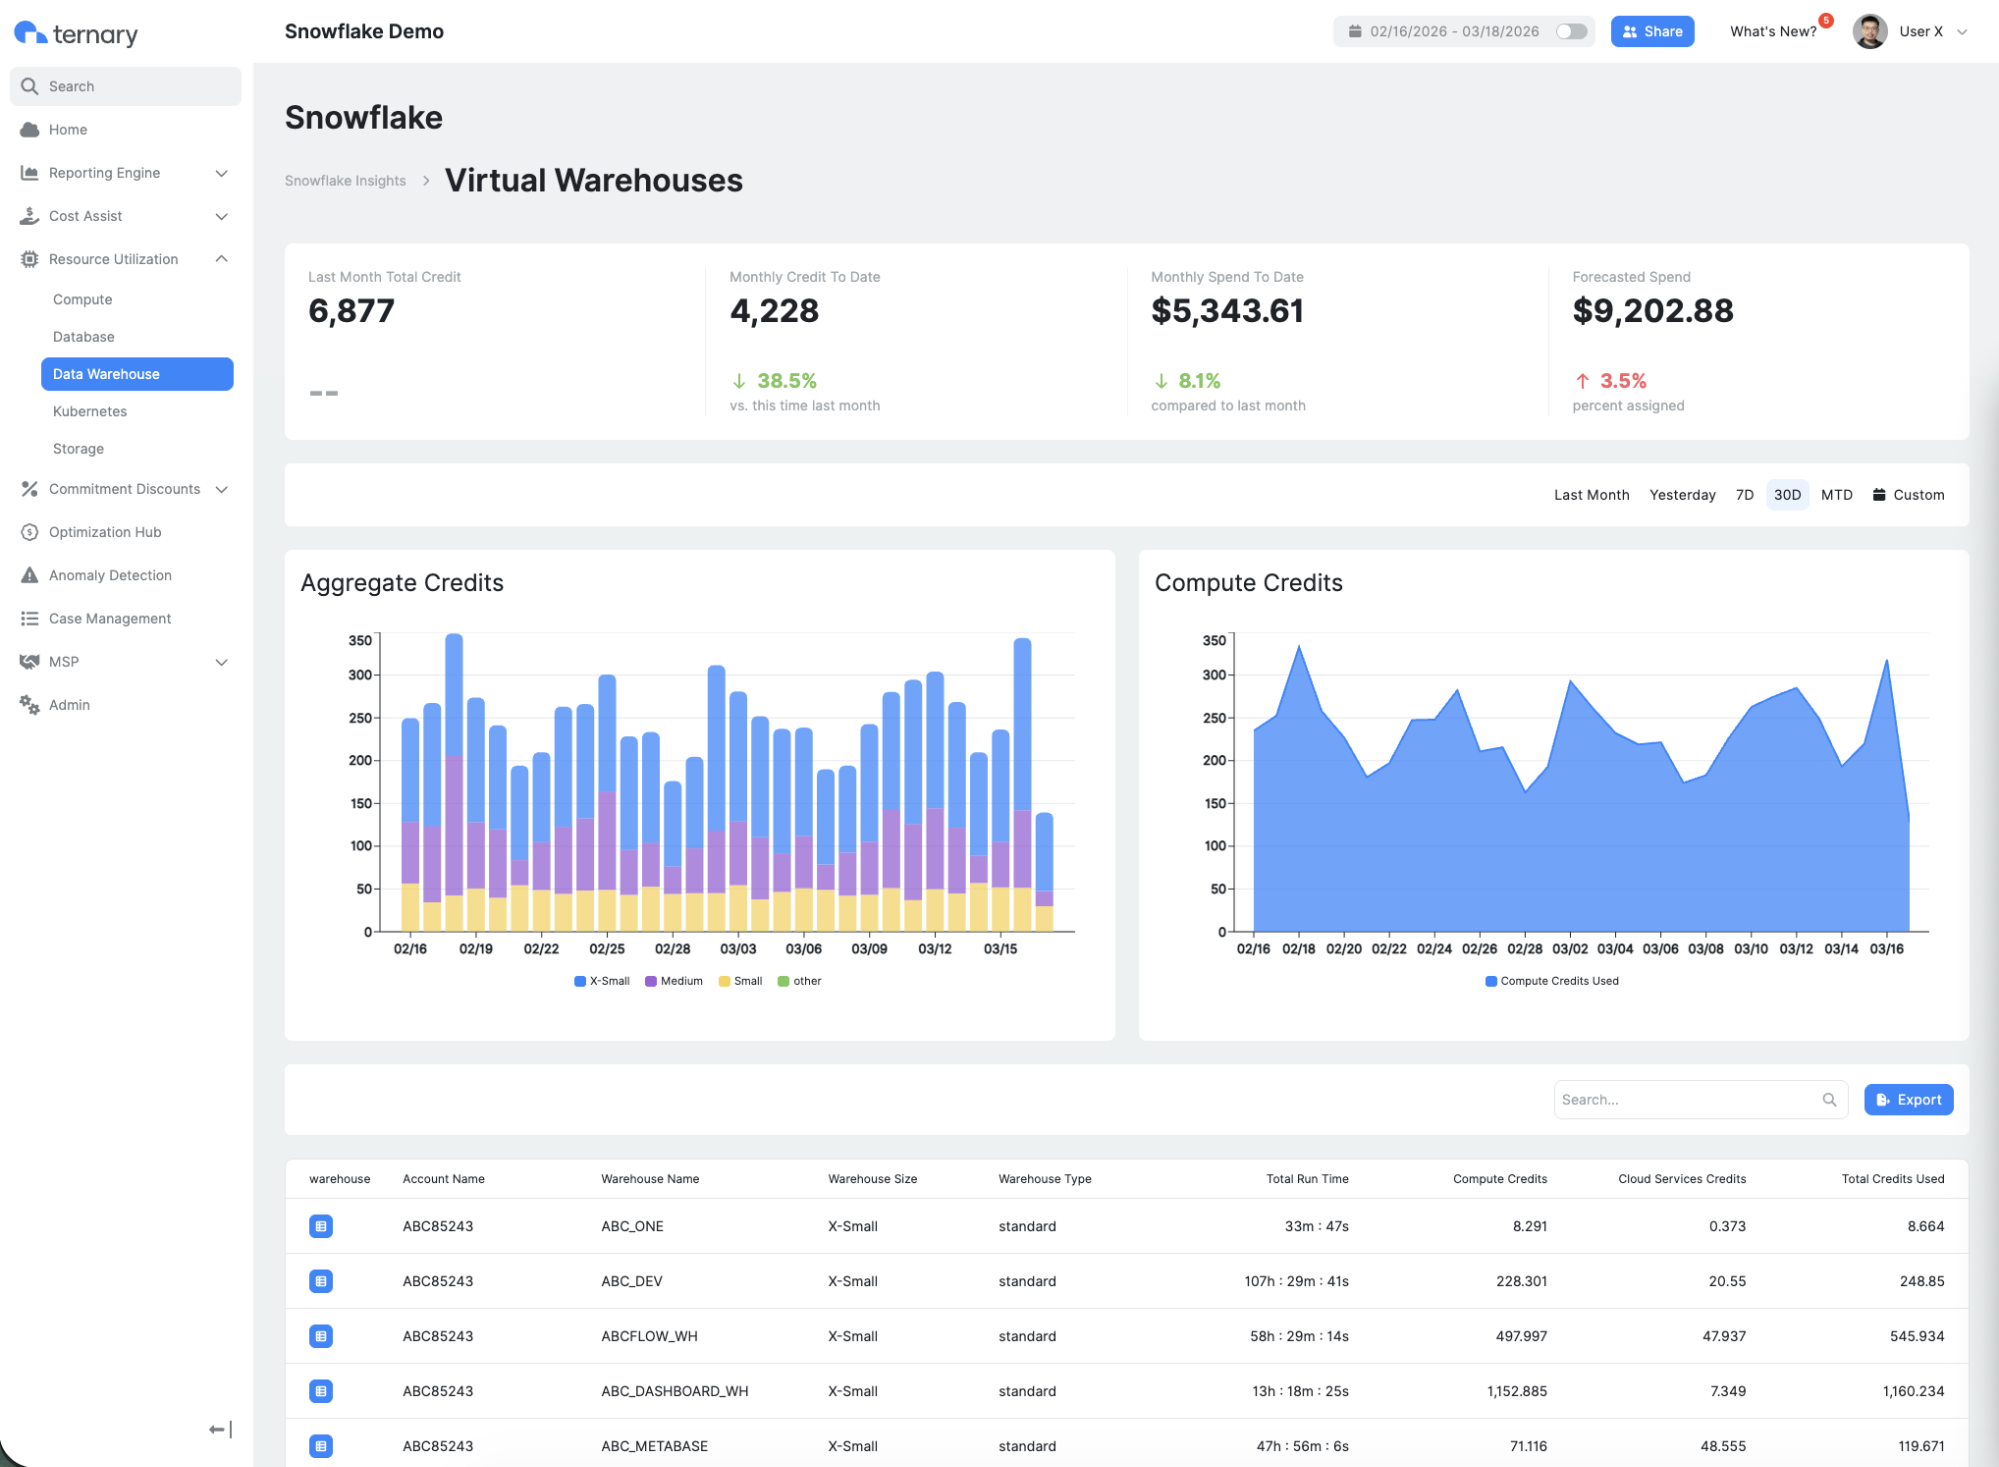
The page displays an overview of virtual warehouse usage and query activity. Snowflake data can also be analyzed using the Ternary Reporting Engine to build reports and dashboards based on Snowflake cost and usage metrics.
FAQ
- What is the Warehouse field?
The Warehouse field defines the compute resource used by Ternary to execute queries against Snowflake system tables and usage views.
- This warehouse is not associated with data ingestion or account selection. Ternary requires warehouse access only to run metadata queries.
- Individual warehouses do not require separate permissions. Any warehouse accessible by the configured role can be used.
- Think of the warehouse as the compute resource where Ternary executes queries, similar to how a slot pool determines where queries run in BigQuery.
For example, an organization may operate many warehouses for different teams or workloads. Any warehouse accessible to the configured role can be selected. Ternary uses that warehouse only to run read only metadata queries against Snowflake system views.
Updated 4 months ago