Google Cloud
Learn how to configure the Google Cloud integration in Ternary to connect cost and usage data exports, and enable enhanced monitoring permissions.
Ternary ingests Google Cloud Billing Export data, Google Cloud Metrics, and committed use information to provide detailed cost and utilization visibility across various services.
This guide explains how to configure BigQuery billing exports, grant access to the Ternary service account, and complete the Google Cloud configuration in Ternary. Once connected, billing data becomes available in Ternary for reporting, optimization analysis, and service level cost visibility across resources such as Compute Engine, Cloud Storage, Memorystore, and other Google Cloud services.
Managed Service Providers configuring Google Cloud should begin with the MSP billing configuration documentation.
Prerequisites for Ternary's Google Cloud Integration
The following permissions are required before beginning the Google Cloud integration configuration:
- Organization Administrator access to the Google Cloud organization that will be shared with Ternary. Using a GCP organization is recommended and aligns with Google Cloud enterprise best practices.
- Billing Account Administrator access to the Cloud Billing account whose billing data will be analyzed in Ternary. This billing account should correspond to the selected organization.
- An active Ternary tenant assigned to the organization. Each tenant includes a unique Ternary service account ID in the format [email protected]. This service account will be used when granting access to billing data and other required resources.
How to configure Google Cloud integration in Ternary?
Step 1: Enable BigQuery billing export
Enable Cloud Billing export to BigQuery. Ternary ingests billing data directly from this dataset.
In the Billing → Billing Export page, enable the following exports:
- Standard usage cost
- Detailed usage cost
- Pricing
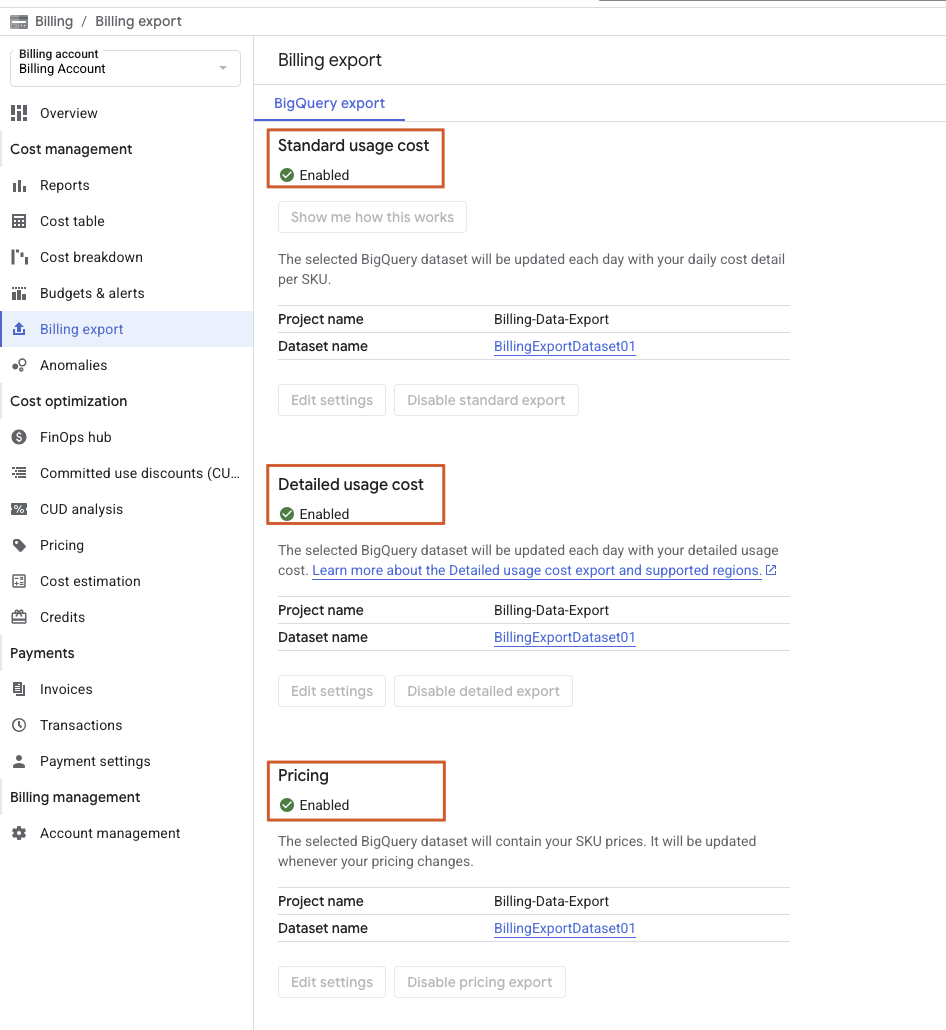
The Detailed usage cost export increases dataset size depending on the number of resources in the organization. The Pricing export requires the BigQuery dataset to be located in the multi region EU or US (multiple regions in the United States) or a region location.
After enabling the exports, record the Project ID and Dataset ID used for the billing export. These values are required when configuring the Google Cloud connection in Ternary.
Refer to the below video tutorial for a better walkthrough of this step:
Step 2: Share the BigQuery billing export dataset
After enabling the billing export, wait until the billing tables appear in BigQuery. This may take 1 to 2 hours.
Open BigQuery in the Google Cloud Console and locate the project that contains the billing export dataset. Select the dataset, then open Share → Manage permissions.
In the Dataset Permissions panel, select Add Principal and add the Ternary service account ID:
- Principal: [email protected]
- Role: BigQuery Data Viewer
Save the configuration to grant Ternary read access to the billing export dataset.
Refer to the below video tutorial for a better walkthrough of this step:
Step 3: Share permissions on the billing account
-
Open the Billing page in the Google Cloud Console and select Account Management. Note that the permissions panel may be hidden. Click the “Show info panel” in the upper-right corner to access it.
-
Select Add Principal and add the Ternary service account:
-- Principal: [email protected]
-- Role: Billing Account Viewer
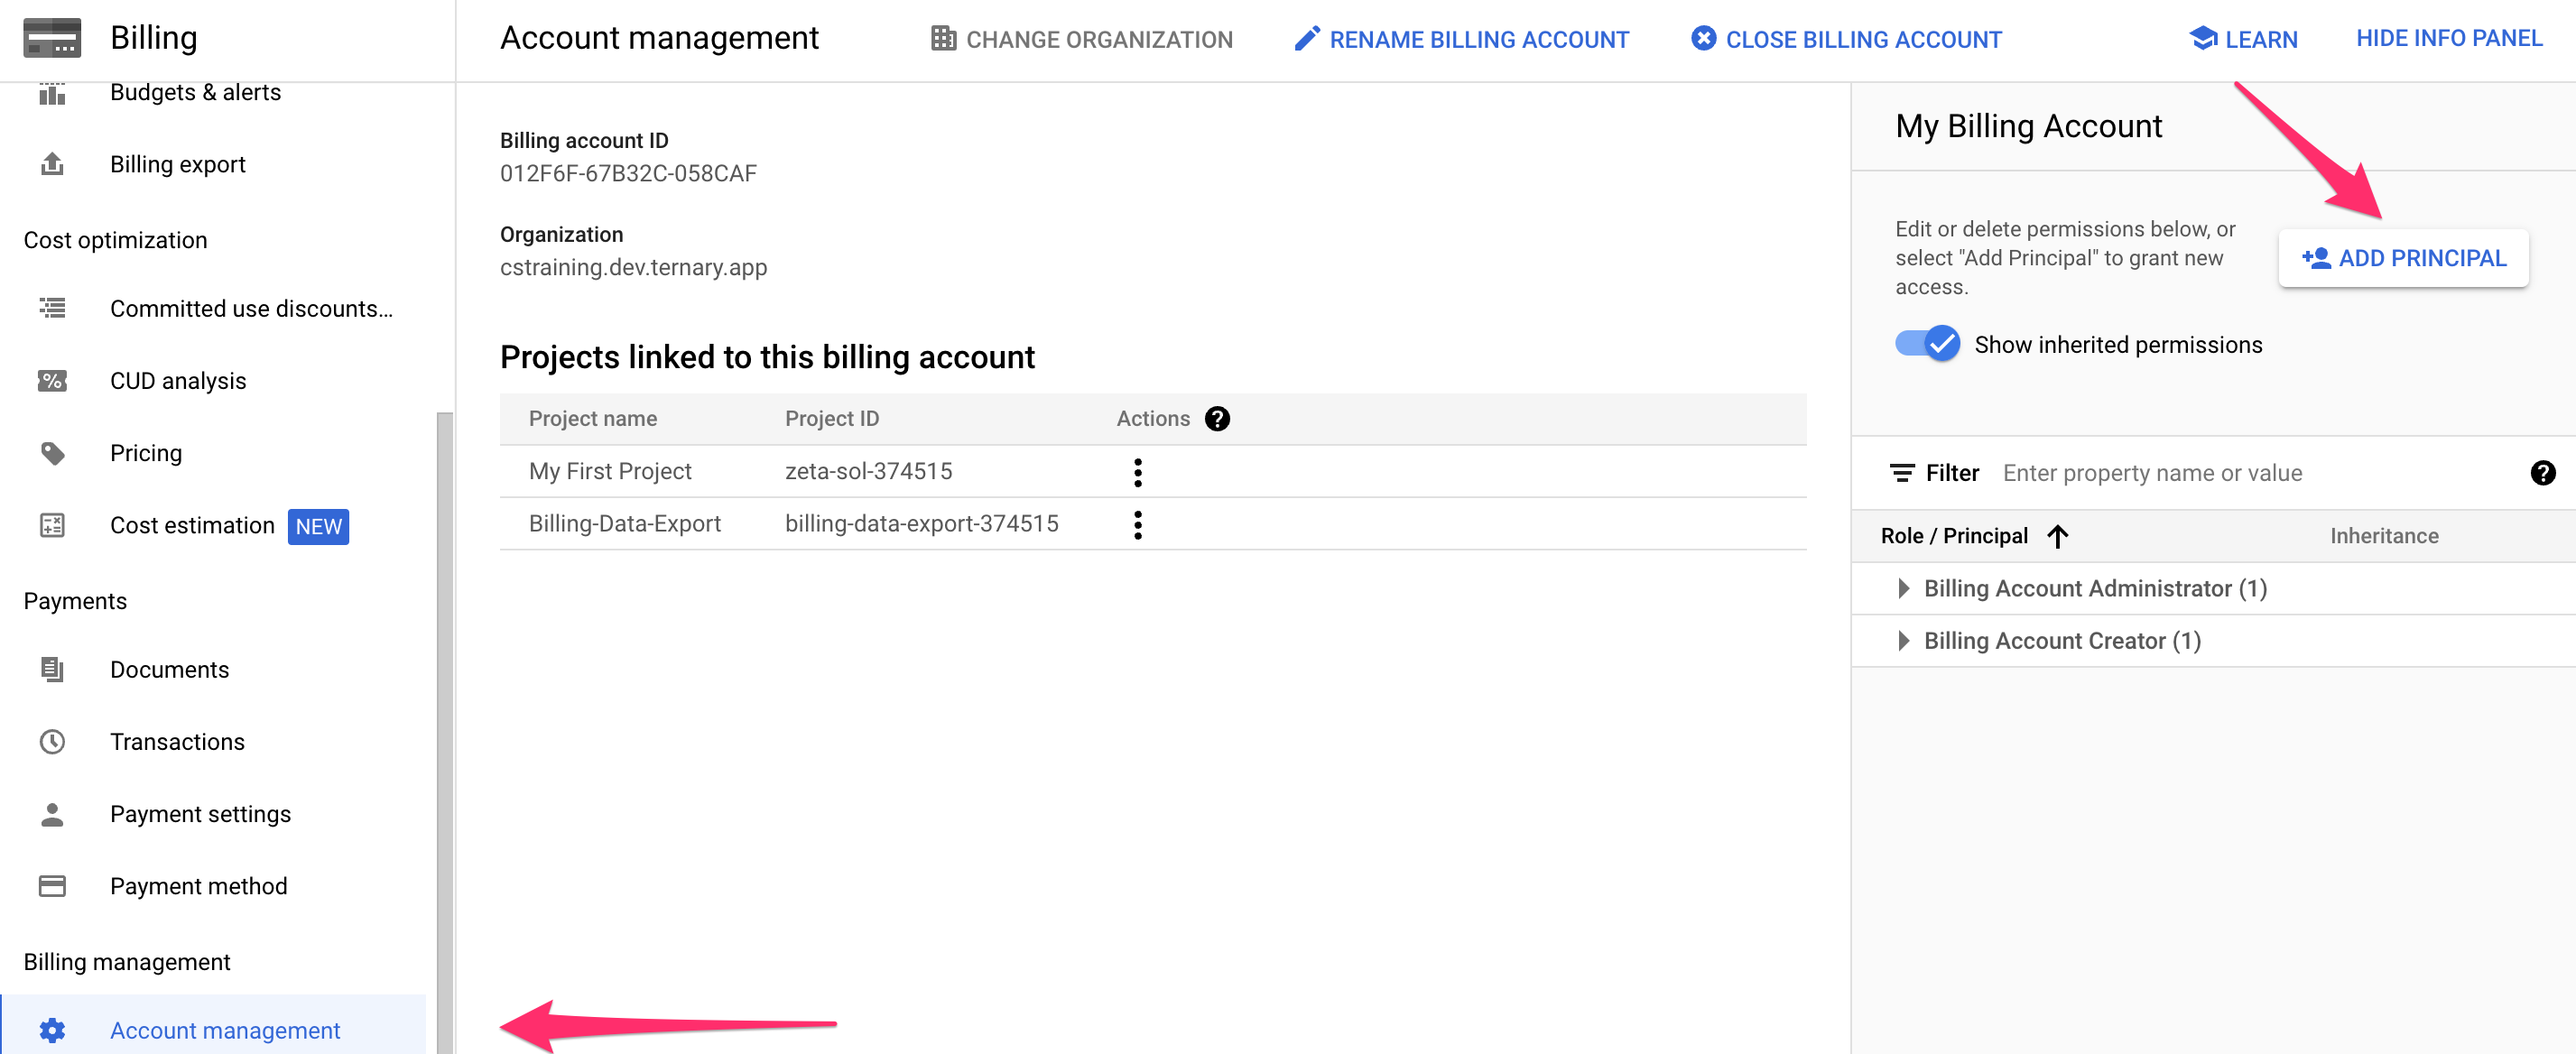
Save the configuration to grant Ternary access to the billing account metadata.
Step 4: Grant Ternary permissions using Cloud Shell or CLI
Ternary provides version controlled YAML and Terraform templates that define the IAM permissions required for the integration. These templates are available in the Ternary public GitHub repository.
The instructions below describe how to apply the YAML template using Cloud Shell or the gcloud CLI. If Terraform is used, running the module in the repository creates the required role and bindings automatically. Refer to the repository README for deployment guidance.
Prerequisites
- Administrative access to Cloud Shell or the gcloud CLI
- Permission to create IAM roles and bind roles to principals
- The Ternary service account ID associated with the tenant
- The role.yaml file downloaded from the Ternary GitHub repository
Create the Ternary custom role
Ternary recommends assigning permissions at the organization level.
- Start a Cloud Shell session in the Google Cloud Console or open the gcloud CLI on a local machine.
- Retrieve the organization ID that will be shared with Ternary. The organization ID is a 12 digit numeric value and can be obtained from the IAM & Admin → Manage Resources page or by running
gcloud organizations listcommand. - Upload the role.yaml file to the Cloud Shell environment and create the custom role:
gcloud iam roles create TernaryCMPServiceAgent --organization=YOUR_ID --file=role.yaml - After the role is created, bind it to the Ternary service account referred to as SERVICE_ACCOUNT_ID. The service account name begins with “tenant-”
- Note: If in doubt, run
gcloud organizations listto see the range of available values. It will be a 12 digit numeric value, without hyphens. Run the gcloud command corresponding to your choice of Organization:
gcloud organizations add-iam-policy-binding YOUR_ID
  --member='serviceAccount:SERVICE_ACCOUNT_ID'
  --role='organizations/YOUR_ID/roles/TernaryCMPServiceAgent'
Step 5: Configure the Google Cloud connection in Ternary
After completing the Google Cloud configuration, enter the connection details in Ternary.
- Open Admin → Integrations in Ternary and select New Integration, then choose GCP.
- In the first screen, enter a display name for the connection and provide the organization identifier in the following format:
organizations/YOUR_ID - The Billing Account ID can be found on the same Billing Export configuration page in the Google Cloud Console. This value is an 18 character alphanumeric identifier formatted as three groups of six characters.
- If commitment sharing is enabled within the billing account, enable Commitment Sharing as well. This ensures accurate reporting of commitment usage.
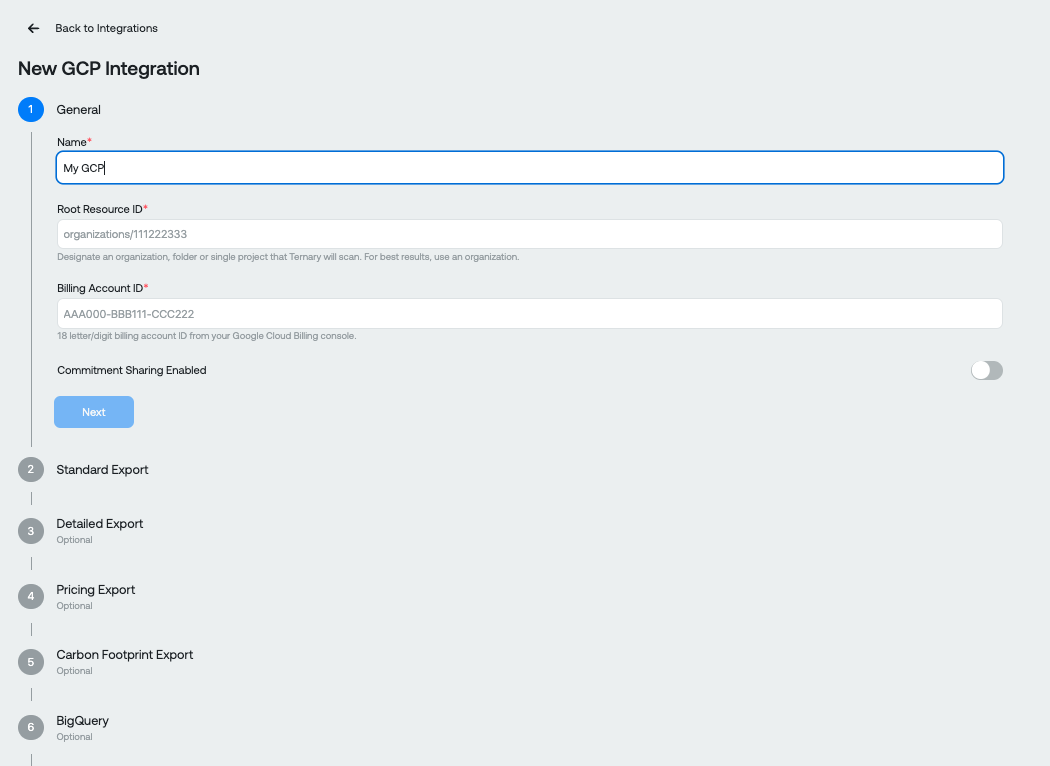
- Proceed to the Configure Billing Exports screen.
- Click “Add Billing Export.” From the “Export Type” dropdown, select “Standard Export.” Then enter the Project ID, Dataset ID, and Table name that were configured when enabling the BigQuery billing export.
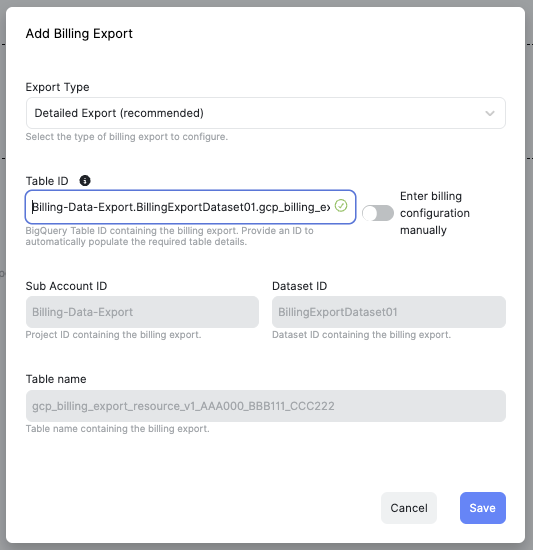
- The Table ID typically follows this format
gcp_billing_export_v1_<billing_account_id_with_underscores>, where the billing account ID uses underscores instead of hyphens and is prefixed withgcp_billing_export_v1_. Click Save.
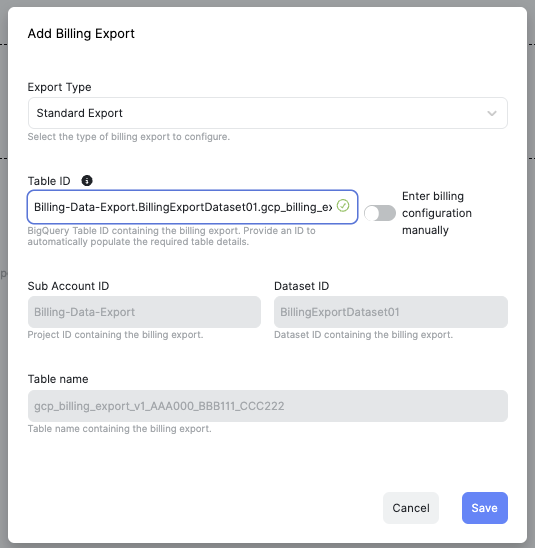
- The Table ID can also be retrieved directly from BigQuery. Navigate to BigQuery in the Google Cloud Console, select the table containing the billing export, open the Details tab, and copy the Table ID. Paste this value into the Table ID field in the export configuration. For more details about BigQuery tables, check out this documentation.
- Add the Detailed Export. Click “Add Billing Export,” then select “Detailed Export” from the Export Type dropdown. Enter the Project ID, Dataset ID, and Table name used when enabling the BigQuery billing export earlier. For the Table ID, use the underscored billing account ID, prefixed with gcp_billing_export_resourcev1. Click Save.
- Proceed to Detailed Billing Export. It behaves the same as the regular one, except you should set the table ID to the underscored billing account ID, prepended with
gcp_billing_export_resource_v1_. A completed example is shown below.
- Similar to the previous exports, click “Add Billing Export”, select “Pricing Export” from the Export type drop down. If the same dataset is used for all exports, the Project ID and Dataset ID remain the same. The Table ID for the pricing export is always
cloud_pricing_export. Click Save. - Optionally, add any BigQuery projects that you want to monitor. Then click Next.
- Submit. If the configuration is successful, the Google Cloud connection appears in the Integrations list. If an error occurs, click the “Click to view validation errors” button, review and correct any issues.
If any further support with Google Cloud setup is needed, reach out to our Success Team.
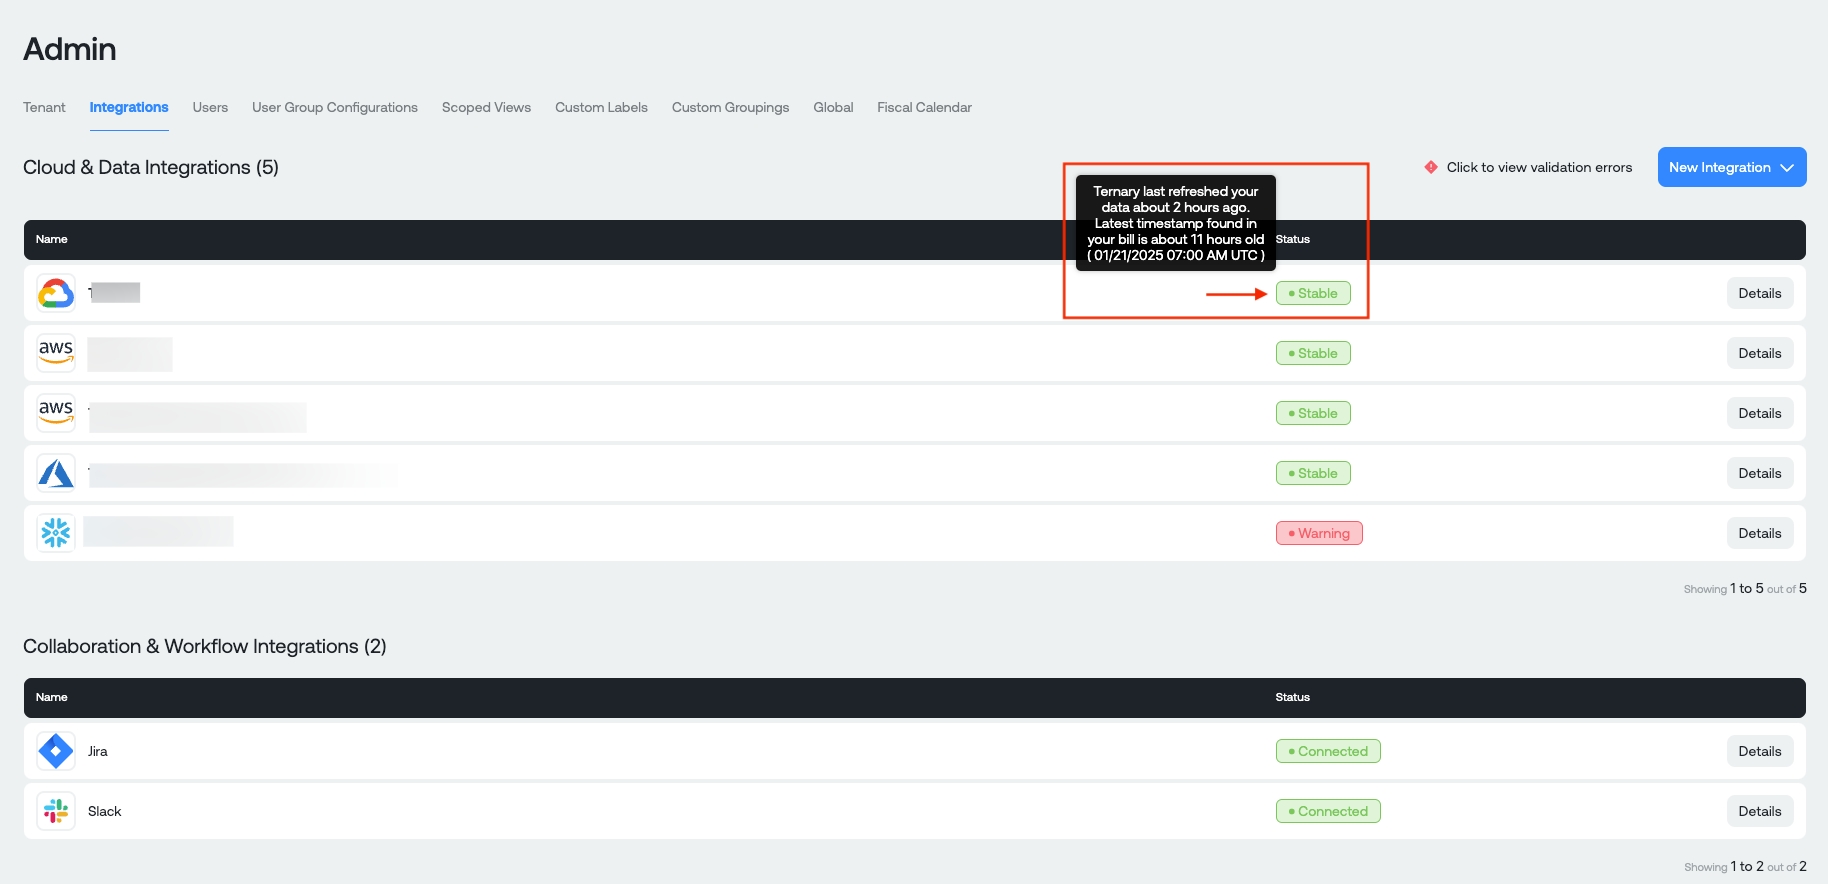
If this happens, click the Details button to view your configuration, and try again.
If you need further support with Google Cloud setup, don't hesitate to reach out to our Success Team.
Additional configuration options for Google Cloud
Additional Google Cloud capabilities supported by Ternary include:
Sub-account onboarding
Ingest billing data for specific Cloud Billing subaccounts instead of the entire billing account. This is done using a BigQuery materialized view that filters the required subaccounts. Refer to the subaccounts onboarding documentation for setup steps.
Committed Use Discounts (CUD) metadata export
Enable CUD metadata export to track commitment terms, expiration, and utilization in Ternary. This supports accurate commitment reporting and analysis. Refer to the CUD metadata export documentation for configuration steps.
Kubernetes cost visibility
Google Kubernetes Engine supports cost allocation labels in the Detailed Billing Export. When enabled, these labels allow cost breakdowns by cluster, namespace, workload, and pod in Ternary. Refer to the Kubernetes cost allocation documentation for setup and reporting configuration.
Carbon footprint
Monitor Google Cloud usage in kg/CO2e metrics within Ternary to track environmental impact alongside cost data. Refer to the Carbon Footprint documentation for more details.
Updated about 2 months ago