Google Cloud Platform
Learn how to connect your Google Cloud Platform (GCP) organization to Ternary.
Ternary has rich support for ingesting your Google Cloud Billing Export, as well as connecting to metrics data from Google Cloud Metrics (formerly Stackdriver) and accessing committed use information. We also provide service-specific pages for you to dive in to your personalized utilization of features like Compute Engine, Cloud Storage, Memorystore, and more. In this guide, we'll help you connect your Google Cloud organization to Ternary.
Prerequisites
- You are the Organization Administrator of a GCP organization that you want to share with Ternary. For best results with Ternary, use a GCP Organization. Ternary aligns very well with GCP best practices for enterprise organization.
- You are the Billing Account Administrator of the billing account that you want to have visibility on using Ternary. The billing account should be the one used for the organization you chose above.
- You already have a Ternary Tenant (customer space) assigned to your company. Each Tenant has a unique GCP Service Account ID (an email address in the form [email protected]). Keep this service account ID handy throughout this process.
Standard Configuration
Enable your BigQuery Billing Export
Enable the export of your billing data to BigQuery by following these steps. You will want to enable the Standard usage cost, Detailed usage cost and Pricing exports shown below. (Note: If you experience an issue enabling the Pricing export, in most cases it is because your BigQuery dataset is not located specifically in the GCP multi-region 'US (multiple regions in the United States)', which is a GCP requirement for the Pricing export). Enabling the Detailed usage cost export will increase the size of your export dependent on the number of resources in your organization. Your billing export configuration in the GCP console should look similar to the following after enabling the three exports:
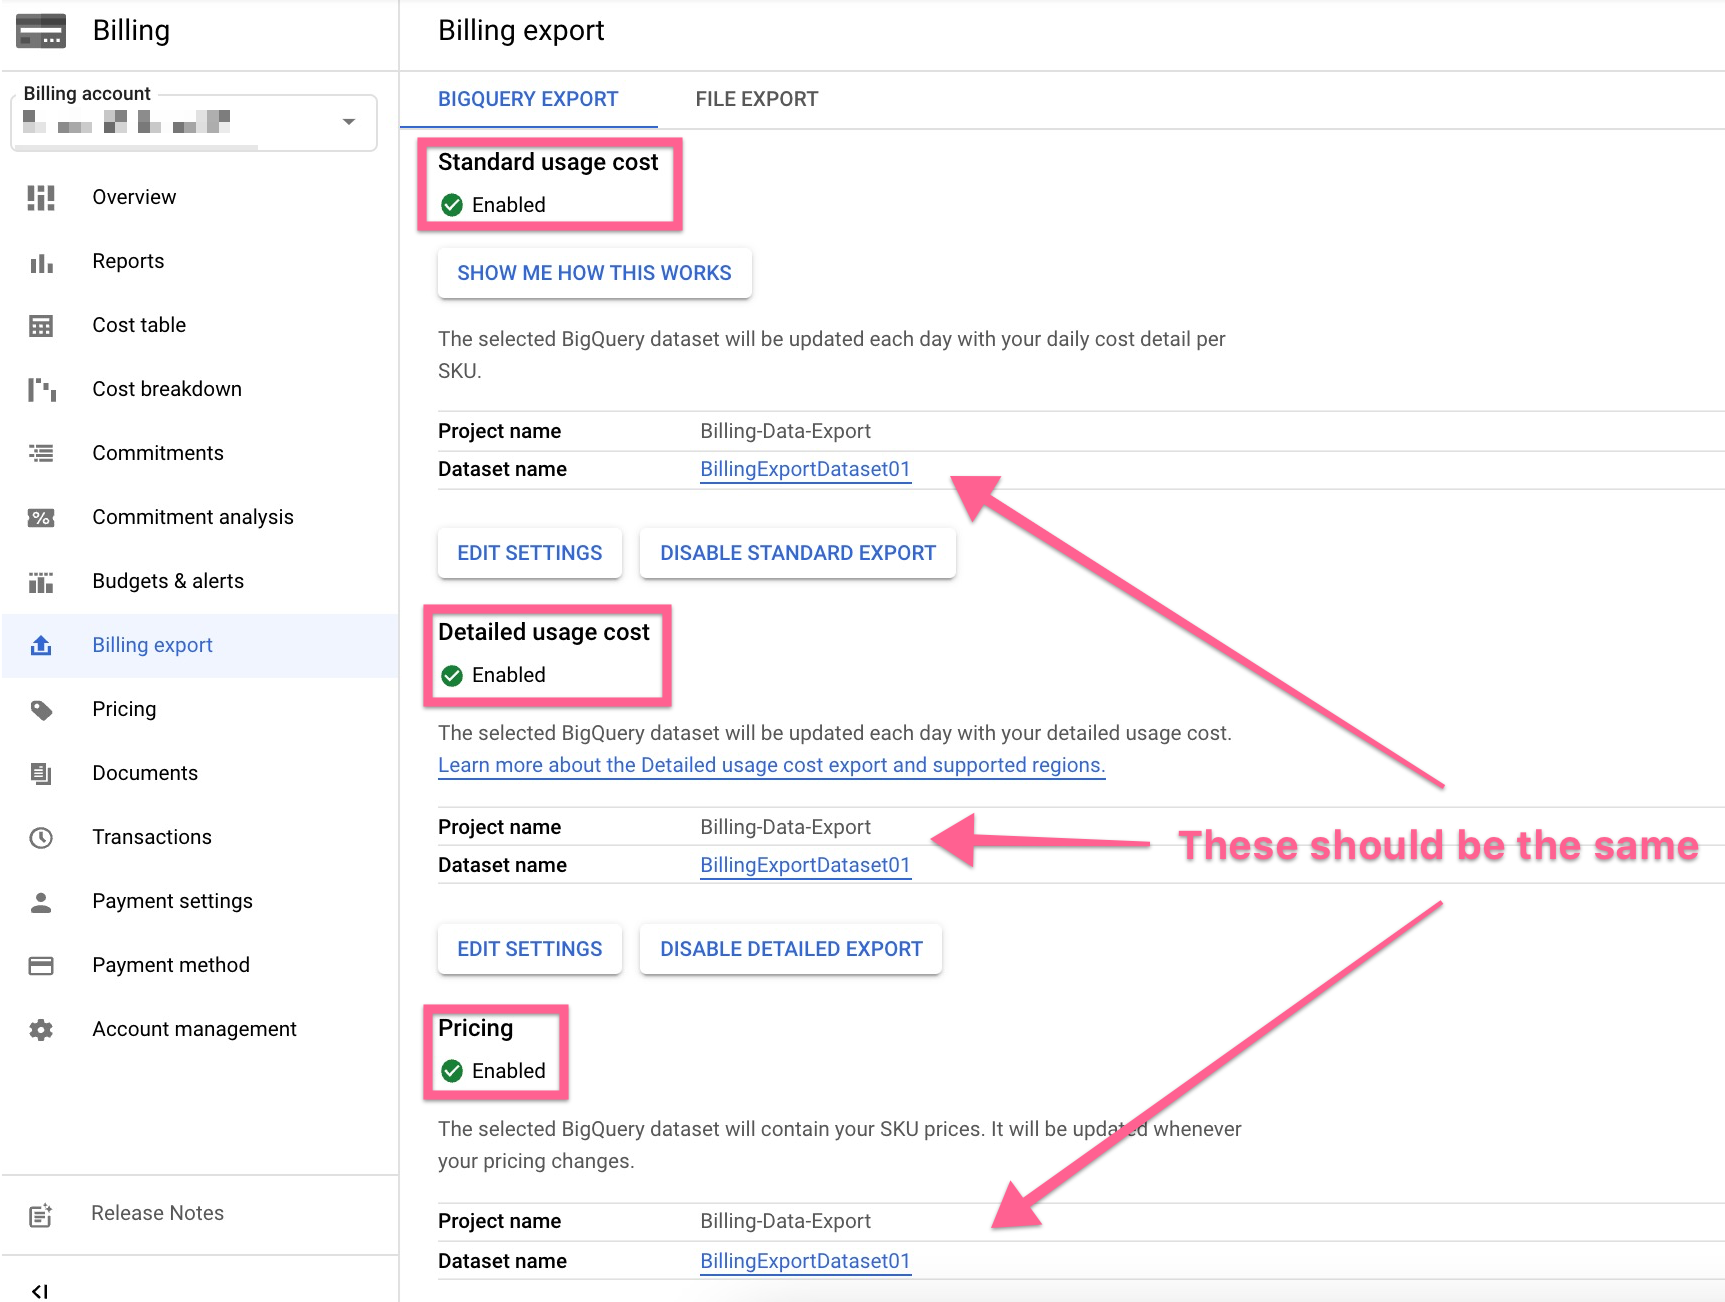
Record the Project name and Dataset name you used.
Share your BigQuery Billing Export dataset
After you are able to see the billing export in BigQuery (may take 1-2 hours), navigate to the BigQuery console in the GCP console, find and expand the project containing your billing export dataset, select the dataset by clicking it, and press Sharing, then Permissions

In the Dataset Permissions drawer, select Add Principal, in the New principals box, paste in your Ternary Service Account ID ([email protected]).
In the Assign roles box, find and select the BigQuery Data Viewer role then press Save.
Share permissions on your billing account
Navigate to the Cloud Billing page in Cloud Console, and click Account Management. In the drawer that appears, click Add principals as shown below.
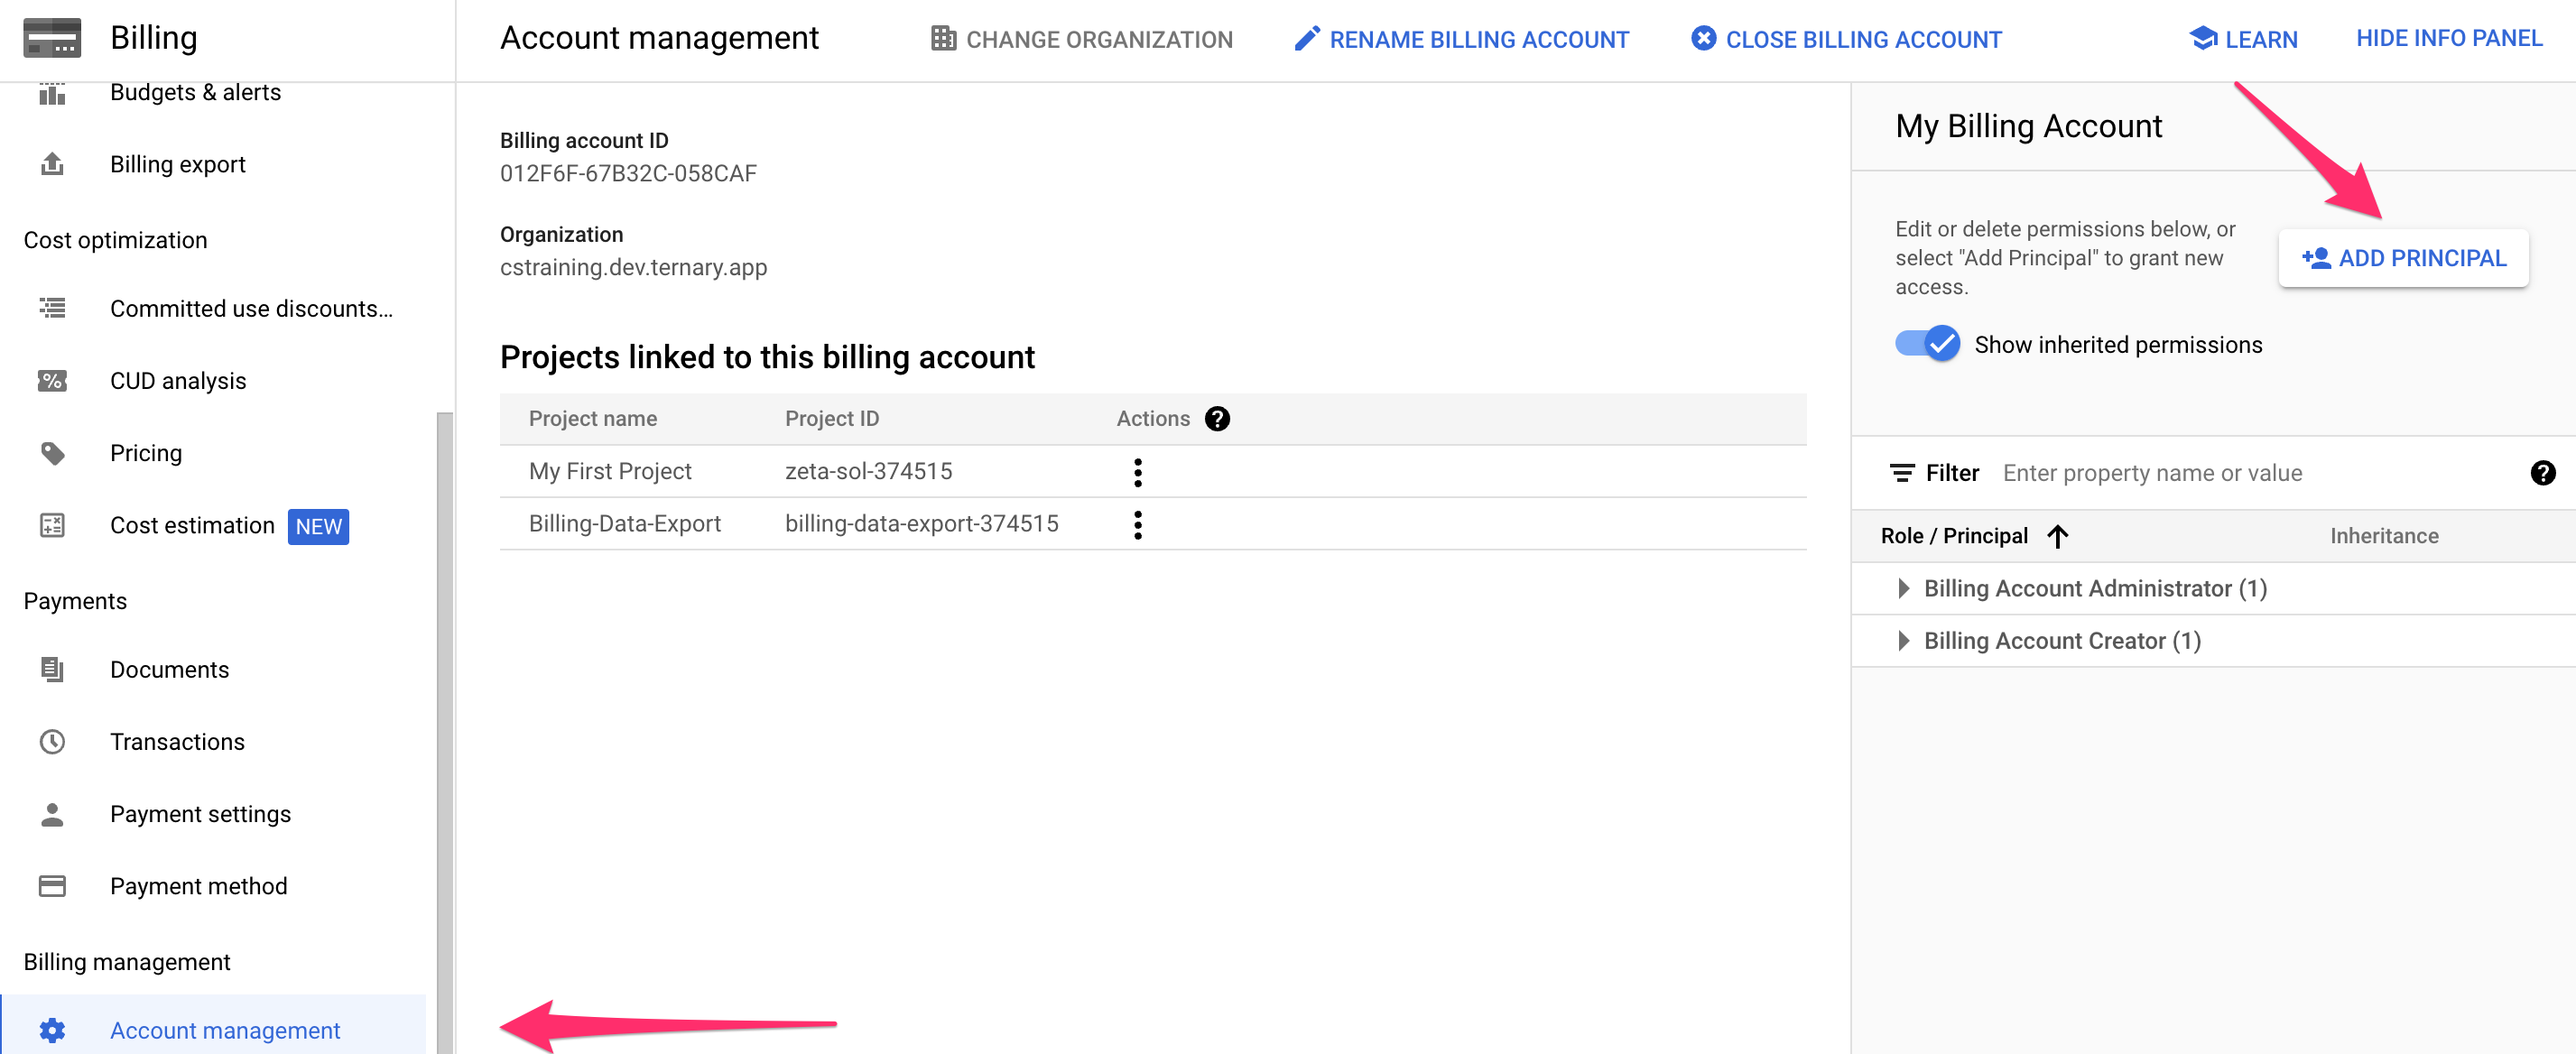
In the drawer that appears, paste your Ternary service account ID ([email protected]) into New Members field. In Select a Role, choose Billing Account Viewer.
Press Save to finalize the change.
Grant Ternary permissions using Cloud Shell or CLI
Ternary provides version controlled YAML and Terraform formatted templates to create and assign the required Ternary permissions using automation. You will find the YAML and Terraform files in our public Github repo. In the following section, we provide detailed instructions to incorporate the YAML template into your GCP environment using Cloud Shell or the CLI.
If you are using Terraform, executing the module within the repo should result in the service account having the correct permissions, but we do not specifically advise on how best to run Terraform modules as environments vary greatly. Please review the README within the repository for best practices on how to deploy it.
Prerequisites
- GCP Administrative access to Cloud Shell or gcloud CLI
- GCP Administrative access to create an IAM role and bind roles to principals
- Ternary Service Account ID unique to your Ternary Tenant
- Download from our public Github repo the Organization YAML file Org-role.yaml
Create Ternary Custom Role
Recall that Ternary recommends assigning permissions to the Ternary service account at your GCP Organization level. Start a GCP Cloud Shell session in the GCP console or a gcloud CLI on your local machine.
Obtain the GCP organization ID that you want to share with Ternary. From here we will refer to this value as YOUR_ID in the subsequent steps below. Your organization ID can easily be obtained in the GCP IAM and Admin console Manage Resources or in the GCP Cloud Shell, run the command gcloud organizations list. This should be a 12-digit numeric string.
In your Cloud Shell, upload the Org-role.yaml file from your local machine to your Cloud Shell environment, then run the gcloud command corresponding to the GCP Organization you intend to grant Ternary permission:
gcloud iam roles create TernaryCMPServiceAgent --organization=YOUR_ID --file=Org-role.yaml
Bind Ternary Custom Role to Ternary Service Account Principal
Next you will bind the newly created Ternary custom role to your Ternary Service Account ID referred to as SERVICE_ACCOUNT_ID. Your Ternary Service Account ID name begins with 'tenant-'
Helpful note: If in doubt, run gcloud organizations list to see the range of available values. It will be a 12 digit numeric value, without hyphens. Run the gcloud command corresponding to your choice of Organization:
gcloud organizations add-iam-policy-binding YOUR_ID
  --member='serviceAccount:SERVICE_ACCOUNT_ID'
  --role='organizations/YOUR_ID/roles/TernaryCMPServiceAgent'
Enable Google Cloud within Ternary
Once you have completed the appropriate GCP configuration steps above, you are ready to enter the data into Cloud Admin within My Ternary. In Admin > Clouds, click New Cloud and then select New GCP Cloud. A dialog will appear with several tabs.
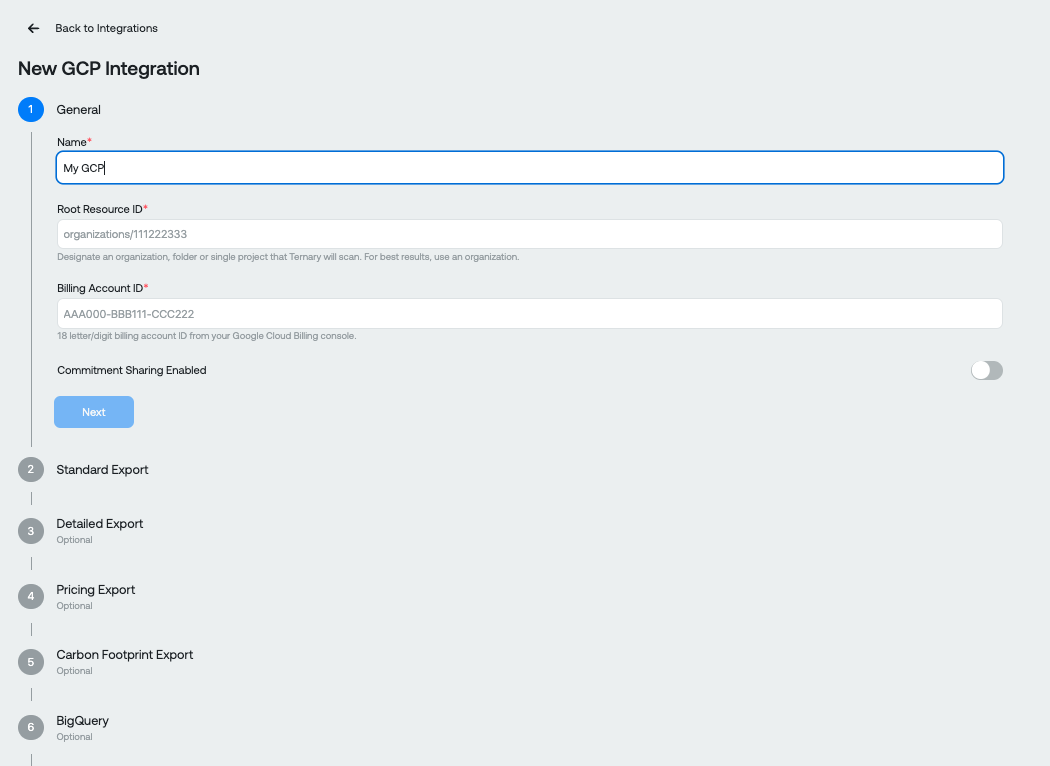
In the first screen, enter a display name for this cloud provider connection and enter the organizations/YOUR_ID value from above. Advance to Billing Data.
Check the box Commitment Sharing Enabled if you have enabled discount sharing within your billing account. This will enable accurate reporting of commitment usage.
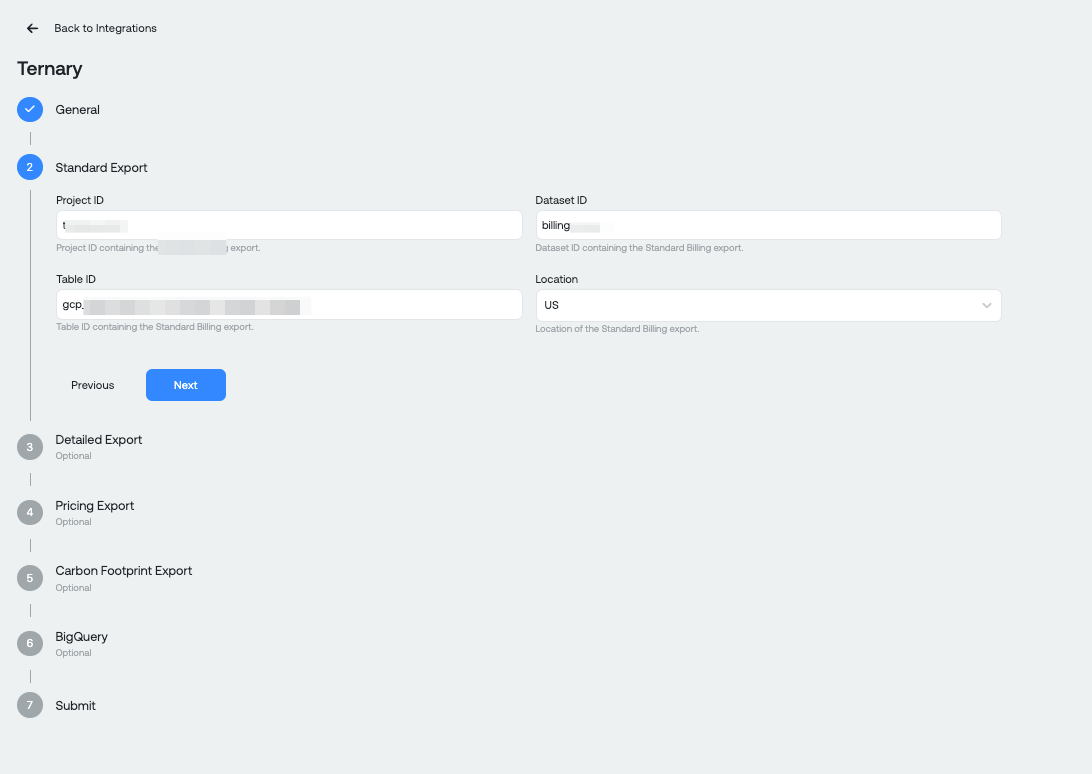
In the Standard Export step, enter the Project ID and Dataset ID that you used in Enable your BigQuery Billing Export above. For the Billing Account ID, this can be found on the same page where you enabled the billing exports and is an 18 character, alphanumeric string split into three groups of six characters. The Table ID is usually the billing account ID with hyphens turned to underscores, and prepended with gcp_billing_export_v1_. A full example is shown below.
There are a few more items if you scroll down:
Set the region of your dataset if it is different from US.
Proceed to Detailed Billing Export. It behaves the same as the regular one, except you should set the table ID to the underscored billing account ID, prepended with gcp_billing_export_resource_v1_. A completed example is shown below.
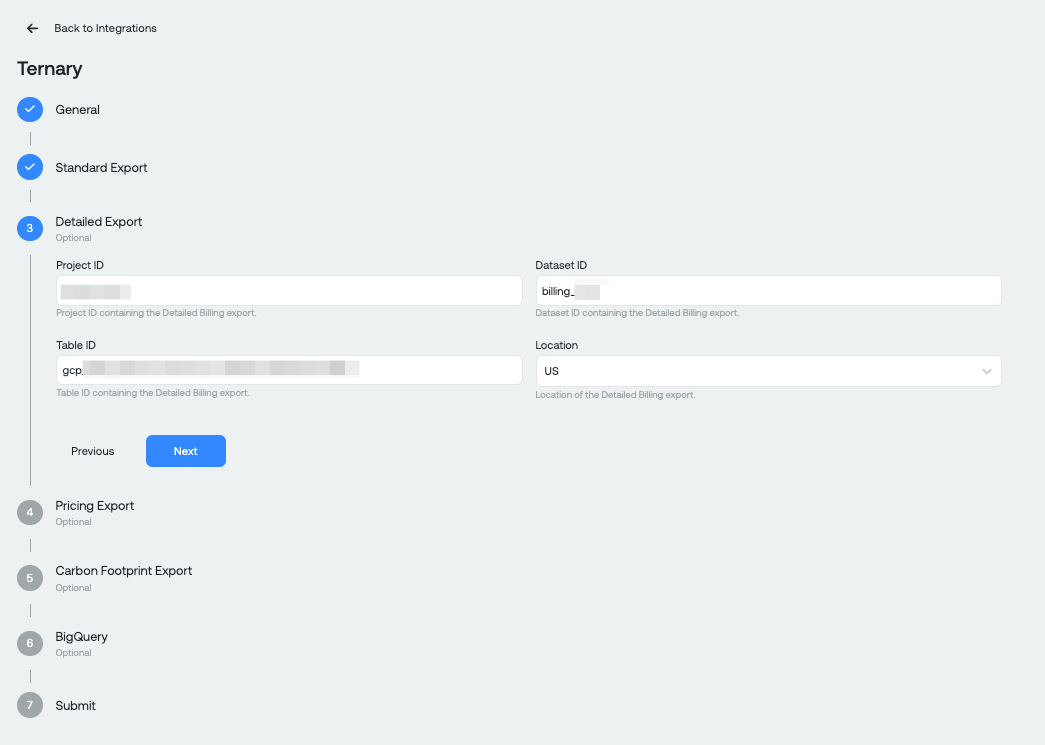
Proceed to Pricing Export. Again, enter the same fields if you used the same dataset for all exports, except for the table ID, which should always be named cloud_pricing_export.
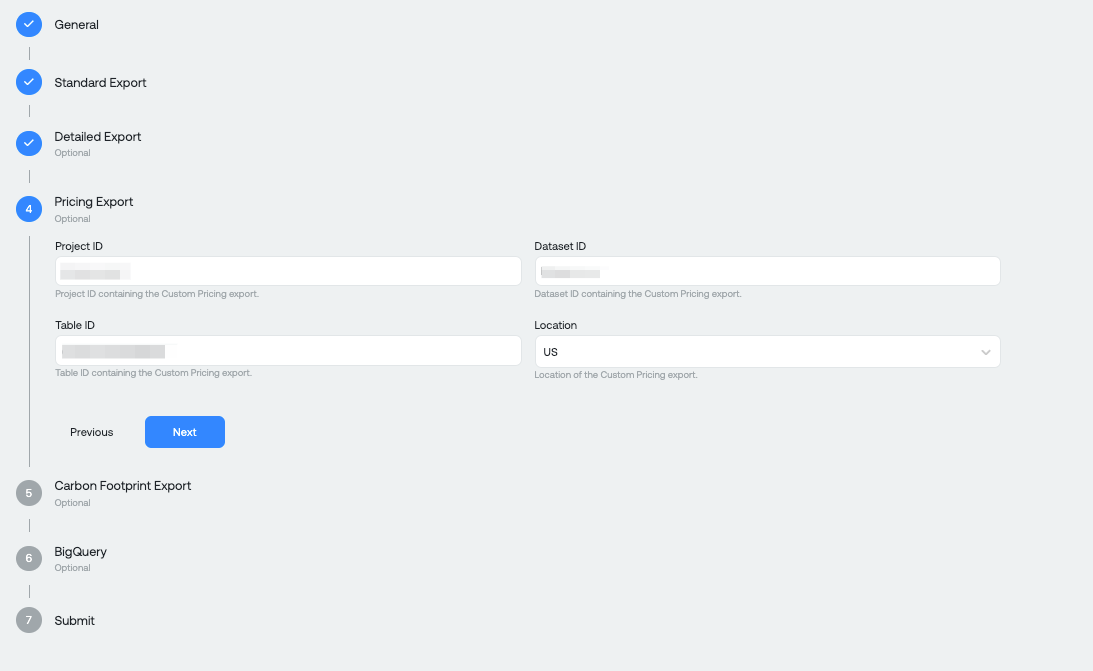
You're done!
You can now hit the blue Save button to record your Google Cloud configuration and have it validated by our back end. If everything is good, you should see a clean tile in your Clouds list which repeats the information you have just saved. If there are issues, you will see an error icon <!> next to your tile, and you will be able to hover over the tile to view the error:
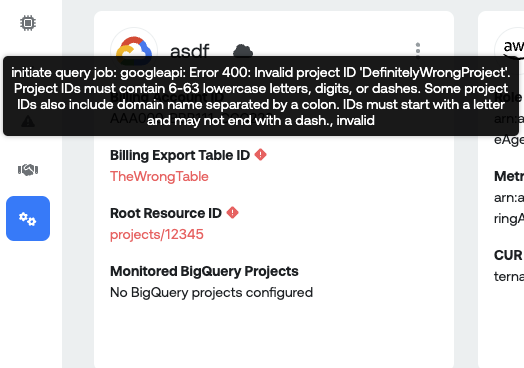
If this happens, click the [...] next to your tile to Edit your configuration, and try again.
If you need further support with Google Cloud setup, don't hesitate to reach out to our Success Team.
Additional Configuration Options
Onboarding Billing Subaccounts
For various reasons, customers may find it necessary to onboard a subset of GCP Cloud Billing subaccounts rather than an entire parent Cloud Billing account. This guide will provide detailed instructions to create a BigQuery materialized view and associated permissions which Ternary will use to ingest GCP billing data for your subaccounts. Refer to the GCP BigQuery materialized view documentation for additional information.
Prerequisites
- You are the Organization Administrator of a GCP organization, or the Owner of a GCP project, that you want to share with Ternary. For best results with Ternary, use an organization. Ternary aligns very well with GCP best practices for enterprise organization. You can view GCP best practices here
- You already have a Tenant (customer space) in Ternary assigned to your company. Each Tenant has a unique service account ID (a long email address [email protected]). Keep this service account ID handy throughout this process.
Guide
1. Enable your BigQuery Billing Export and Share with Ternary
If you have not already created a BigQuery billing export, you will need to first enable the export of your Cloud Billing account to BigQuery by following Step 1 Enable your BigQuery Billing Export in our standard onboarding guide. Once you have confirmed your BigQuery billing export is configured and identified the subset of billing accounts you intend to share with Ternary, you are ready to create and share a BigQuery Materialized View with Ternary. You should have received a service account from Ternary Customer Success when your Ternary tenant was provisioned. You will use the service account to share your view with Ternary.
2. Create your BigQuery Materialized View
Now that you have BigQuery billing export configured, you can create a BigQuery materialized view from the export using the your BigQuery billing export table as the view's base table. The syntax to create your materialized view:
CREATE MATERIALIZED VIEW
project_id.dataset.viewname
PARTITION BY DATE(pt)
AS SELECT *, _PARTITIONTIME AS pt FROM
project_id.dataset.basetable
WHERE
billing_account_id IN (
'SUB-ACCOUNT-1',
'SUB-ACCOUNT-2',
...
)
3. Share and Authorize access to your BigQuery Materialized View
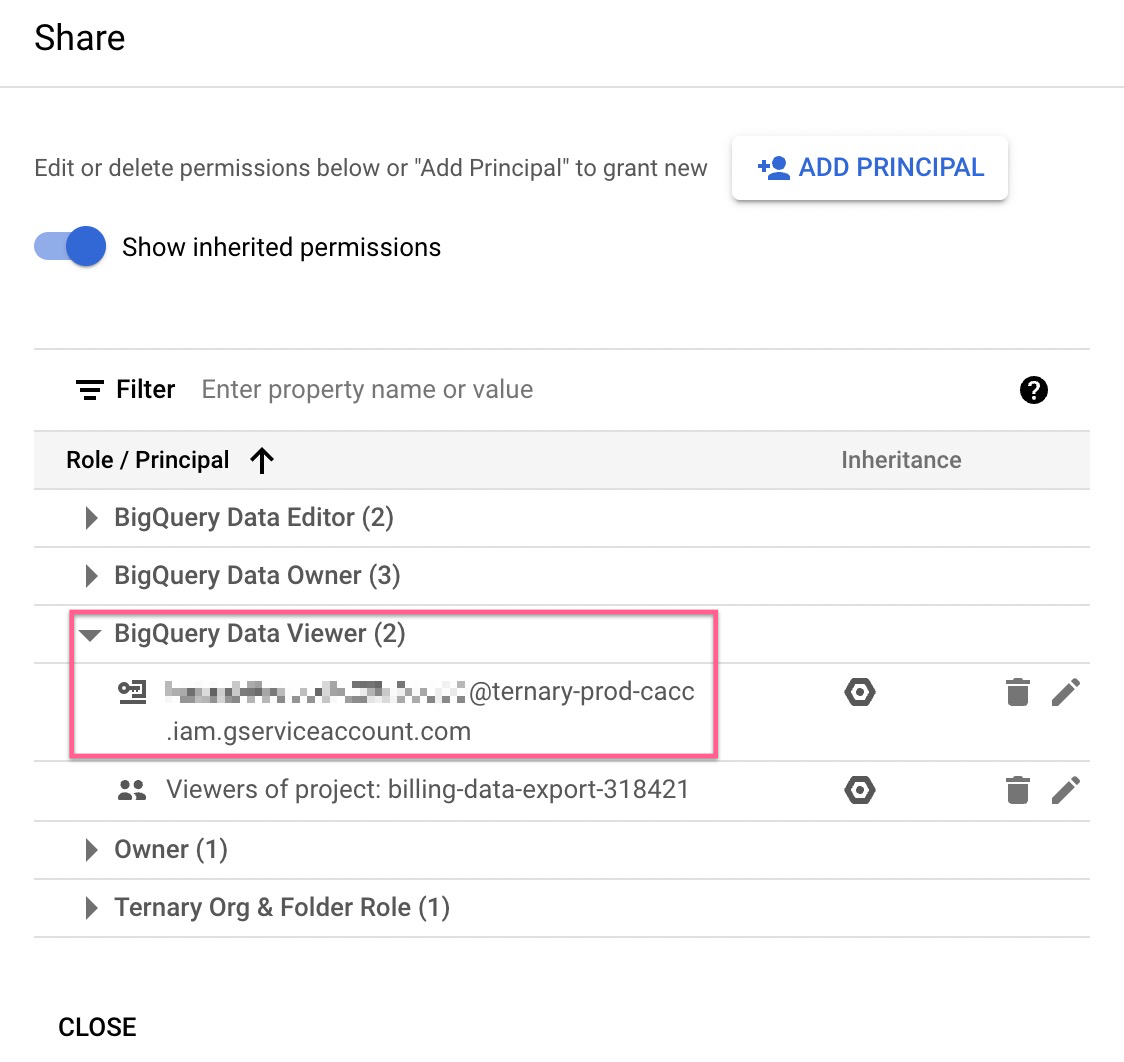
In this two-part step, you will first share your BigQuery materialized view with Ternary using the Ternary service account followed by authorizing your view access to the underlying BigQuery dataset containing your BigQuery billing export. To share your BigQuery materialized view, select your materialized view in the GCP console which should load your view's schema and provide a 'Share' button. Clicking 'Share', select Add Principal, paste your Ternary service account and select the BigQuery Data Viewer role to grant access to the view. Your materialized view 'Share' configuration card should look similar to the following
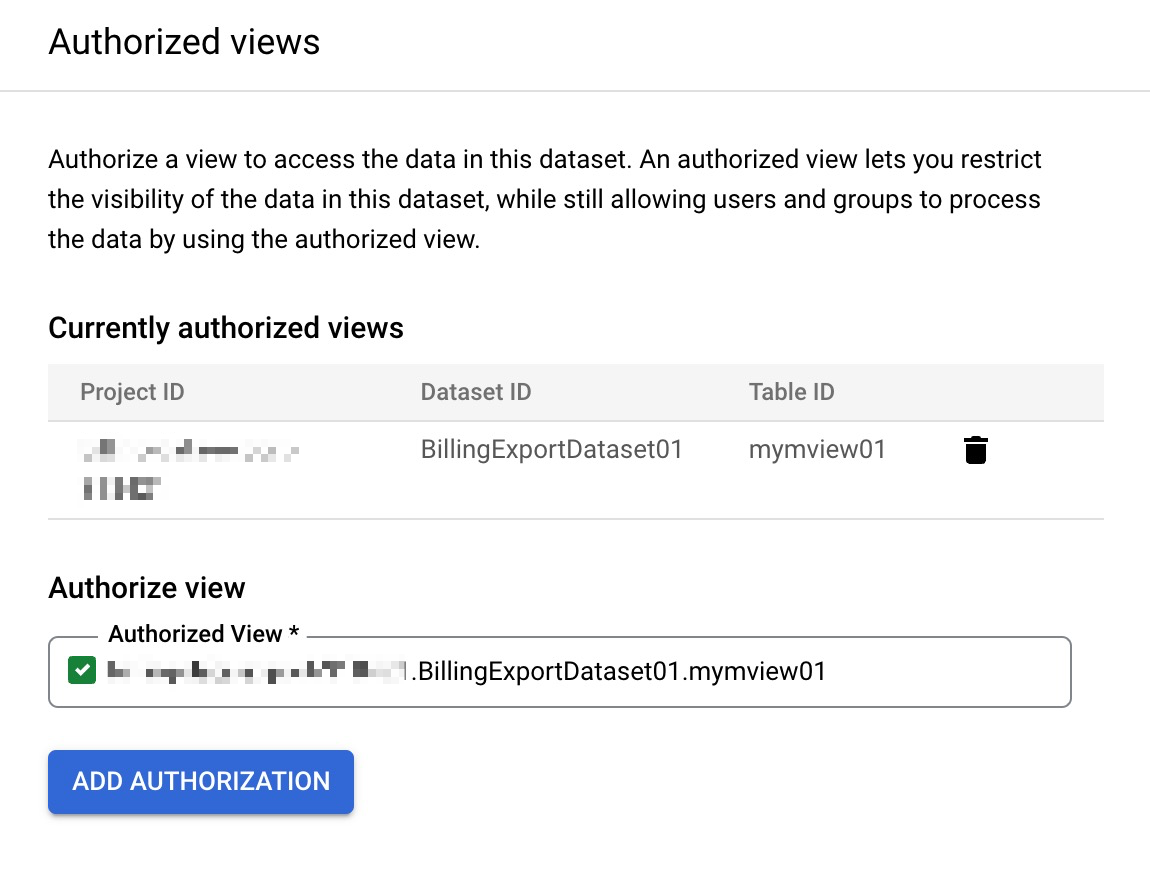
In this second step, you will now authorize your materialized view access to your billing data stored in the underlying BigQuery billing export dataset. In the GCP BigQuery console, open your billing export dataset, select Sharing, Authorize Views

In the Authorized View card, add your materialized view selecting Add Authorization. Your authorized views should look similar to the following
4. Complete Ternary Configuration
We are ready to configure your Ternary tenant to begin ingesting cloud billing subaccount cost data from your materialized view. You should send your Ternary Customer Success representative the following:
- GCP ProjectID containing your materialized view
- GCP DatasetID containing your materialized view
- Materialized view name
You can find these details in the Authorized View card in the GCP console similar to the card shown in Step 3 above. Ternary will configure your tenant and invite you to login after we have confirmed your billing data is loading in the platform as expected.
Optional features
To learn about what extra features Ternary provides around Google Cloud Platform, you can jump to the following doc pages and learn more about what they do and how to enable them.
- BigQuery: Monitor BigQuery slot, job and on-demand usage within your organization.
- Carbon Footprint: Monitor your Google Cloud usage in the units of kg/CO2e.
Updated 3 days ago
