Microsoft Azure
Learn how to connect your Microsoft Azure environment to Ternary.
Ternary supports connectivity to your Microsoft Azure Cost and Usage Data Export, as well as connecting to Azure Monitor to obtain usage metrics that go along with your costs. Additionally, we offer service-specific pages so you can dive into your personalized usage of features like Azure Virtual Machines, Azure SQL, and Azure Blob Storage. In this guide, we'll learn how to connect your Microsoft Azure environment to Ternary in just a few steps.
Prerequisites
- Azure Active Directory administrator permissions
- Azure Billing Administrator permissions
- Blob Storage permissions in a Subscription to create a container and assign container permissions (to hold your Cost and Usage Data export)
Configuration
Part 1: Download your Azure Certificate
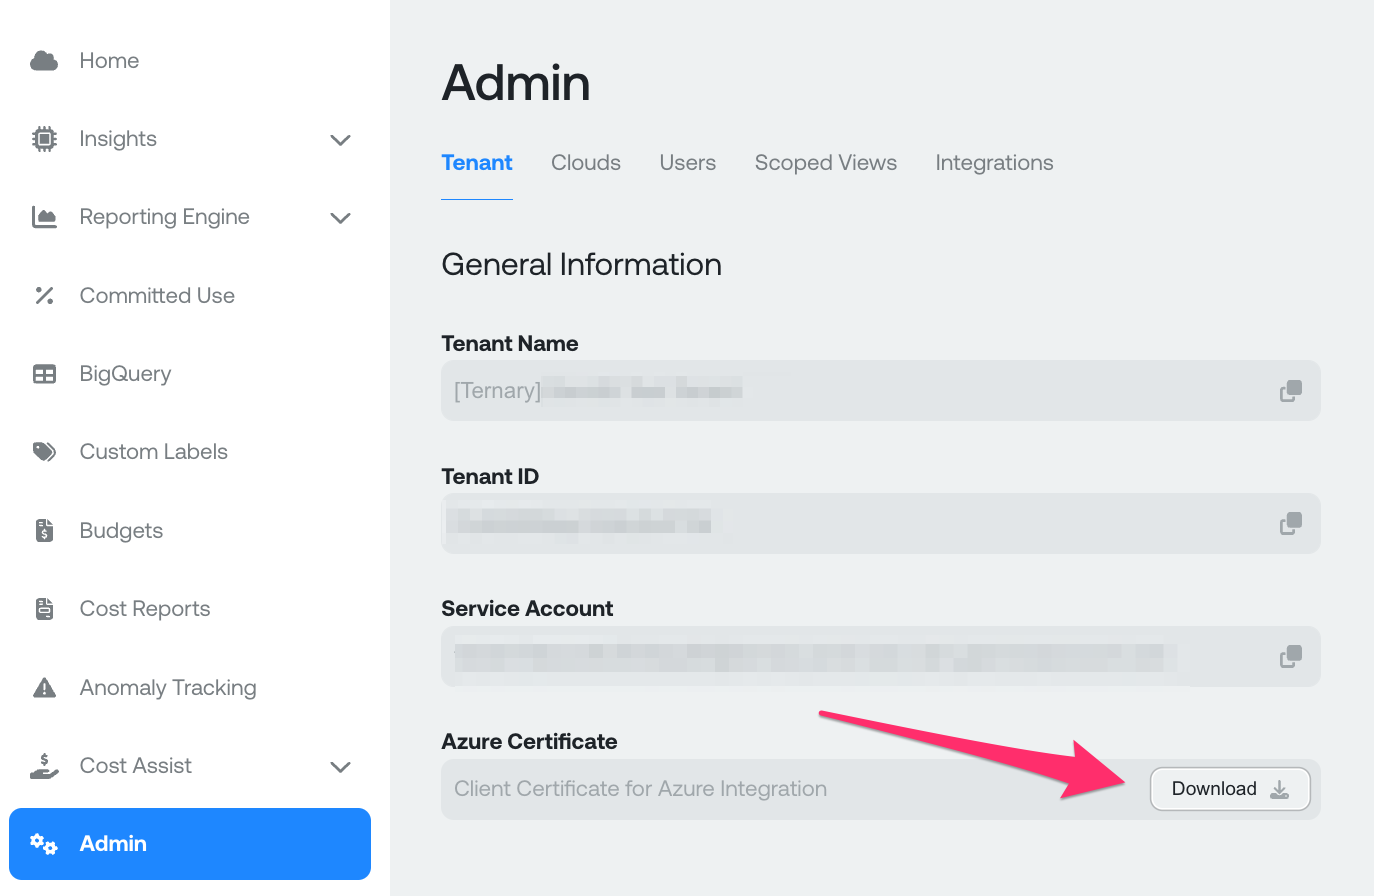
Ternary will authenticate to Azure environment using a unique certificate generated in your Ternary tenant. You will need to download the certificate for use in the next step. After downloading your certificate, you can verify its authenticity by following the steps in the Appendix 'Verifying the client certificate'.
To download your certificate, login to your Ternary tenant and navigate to Admin. Click the 'Download' button under Azure Certificate.You will be prompted to locally save the certificate as Ternary_Azure.pem. This file will be valuable in Part 2.
Part 2: Azure Cost Export Setup and Permissions
Ternary offers a comprehensive Terraform module for setting up all the resources and permissions that are needed for visibility to your Azure resources within our platform. While manual steps for doing the same follow below, if you deploy our Terraform module to your Azure environment, then you can skip all the way to Part 3 right away after collecting the outputs from the module. If you choose to manually configure your Azure environment, start with 'Create an app registration' found just after the Terraform module below.
The Terraform module can be found here: https://github.com/TernaryInc/ternary-onb-permissions/tree/master/azure/terraform and includes information on how to deploy it. As Terraform workspaces vary, we cannot explain exactly how to integrate the module into your specific workspace.
You will just need to supply your Azure Billing Account ID (that your user has Administrator permissions to), the path to your downloaded Ternary_Azure.pem from Part 1, and a list of entities (subscriptions, management groups, etc.) you want Ternary to be able to see. The example from our GitHub repo is repeated below:
module "ternary" {
  source = "https://github.com/TernaryInc/ternary-onb-permissions.git//azure/terraform?ref=master"

  billing_account_id      = "MY_MICROSOFT_BILLING_ACCOUNT_ID"
  client_certificate_path = "/path/to/your/Ternary_Azure.pem"
  enhanced_access_scopes = [
    "/providers/Microsoft.Management/managementGroups/MY-ROOT-MANAGEMENT-GROUP-GUID"
  ]
}

output "ternary_directory_id" { value = module.ternary.directory_id }
output "ternary_app_id" { value = module.ternary.app_id }
output "ternary_storage_account" { value = module.ternary.storage_account }
output "ternary_storage_container" { value = module.ternary.storage_container }
output "ternary_actuals_path" { value = module.ternary.actuals_path }
output "ternary_amortized_path" { value = module.ternary.amortized_path }

provider "azuread" {
  tenant_id = "my-active-directory-tenant-id"
}

provider "azurerm" {
  features {}
}
Once you successfully run the module, skip to Part 3.
Create an app registration
-
As the AD administrator, navigate to Azure Active Directory > App Registrations
-
Click "+ New Registration"
-
Fill in the fields:
- Name: My Ternary (suggested)
- Supported Account Types: Accounts in this organizational directory only (Single tenant)
- Redirect URI: Leave blank
-
After submitting, you will be brought to this page with the new application. Copy the Application ID and Directory ID and save for Part 3.

-
After this, per the above screenshot, click the 'Add a certificate or secret' button.
-
Click the 'Certificates' tab, then click "Upload certificate". In the drawer that appears, browse for the Client Certificate File (Ternary_Azure.pem) you downloaded. You can leave "Description" blank, if you like. Hit "Add" to complete the process.
-
If everything worked, you should now see a certificate with either your requested Description or a '[email protected]' subject, as below.
-

Note that this certificate expires every 3 years for security purposes. If you would like a certificate with a different (longer or shorter) expiration, contact Ternary CS to assist.
If you already have an Azure Billing Export that is of the type "Daily export of month-to-date costs", then you can skip directly to Part 3. It's recommended to use an export you already have, as it is likely to contain more robust historical data. Exports you create through the following steps will begin populating from the current day.
-
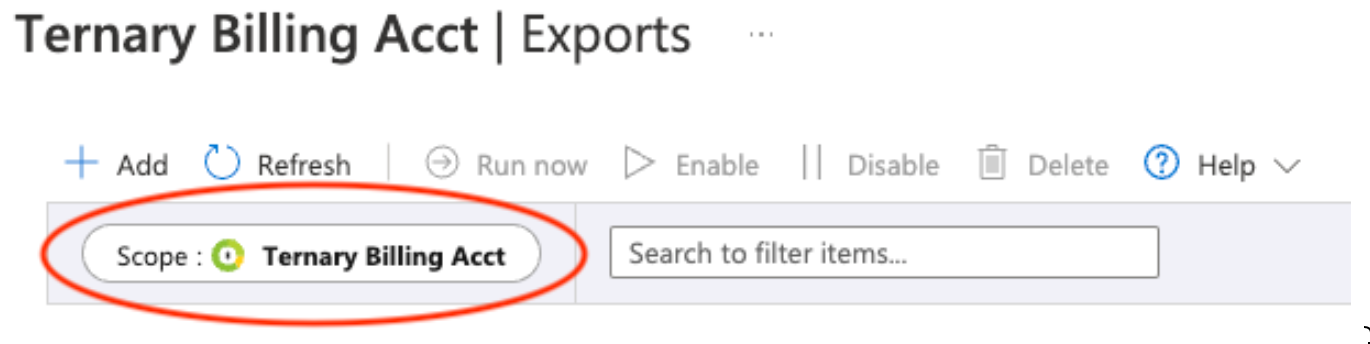
As a billing administrator, access Cost Management in the Azure Portal.
-
In the left navigation, hit Exports
-
Ensure that the Scope matches the billing scope that you want to manage with Ternary. You could choose a Subscription, Invoice Section or Billing Account. Ternary recommends choosing the Billing Account to maximize your cost and usage visibility within Ternary.
-
Make the following selections:
- Name: ternarybillexport (suggested)
- Metric: Actual cost (usage and purchases)
- Export type: Daily export of month-to-date costs
- File Partitioning: On
- Storage: Choose a subscription, storage account, container and directory (path prefix) to place the export. It is recommended to choose a container that exclusively contains the billing export data, so you do not share more data with Ternary than is necessary. Make note of your billing export container, as you will be granting permissions to Ternary in part 4.
Grant Ternary Access to Billing Export
Now, we will grant Ternary's account, created in Part 1 and authenticated by the Client Certificate, access to the billing export created just above.
- Navigate to the Blob Storage Accounts list. Make sure you are in the same subscription that you chose in step 4 of part 2 and you should see the storage account that you selected or created. Click the storage account.
- In the Storage Account view, click "Access Control (IAM)"
- Click "Add Role Assignment".
- Use the search box to locate the role "Storage Blob Data Reader". Click the role so it is highlighted, then press Next.
- Now you are on the Members tab. Ensure you are granting to a "User, group or service principal", then press "Select members".
- Type in the first few letters of the name you came up with in Part 2, Step 3 ("My Ternary" if you went with our suggestion) and it should autocomplete and be clickable. Click the My Ternary identity and press Select to close the drawer.
- Press "Review + Assign" to complete the role assignment. Now, Ternary will have access to read this storage container. Ensure you do not place data into this container that you do not wish made available to the Ternary platform.
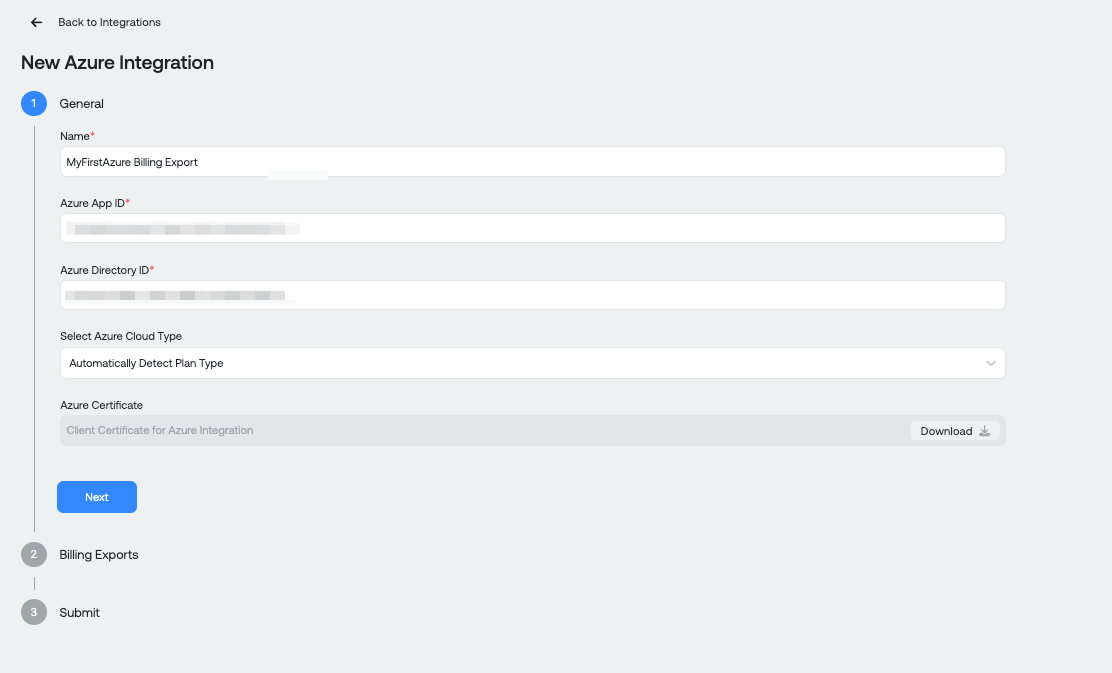
You are now ready to create a new Azure Cloud inside Ternary. A Ternary Cloud is simply a configuration to ingest your Azure (or Google Cloud, Amazon Web Services) billing export.
-
Start by navigating to Admin in the Ternary UI. There you should find a 'New Cloud' button with a drop-down to 'Create Azure Cloud'
-
In the 'Create Azure' dialog, on the 'Basic' tab, you will reference values from your Azure configuration:
- The Application ID from Part 1
- Directory (Tenant) ID from Part 1
-
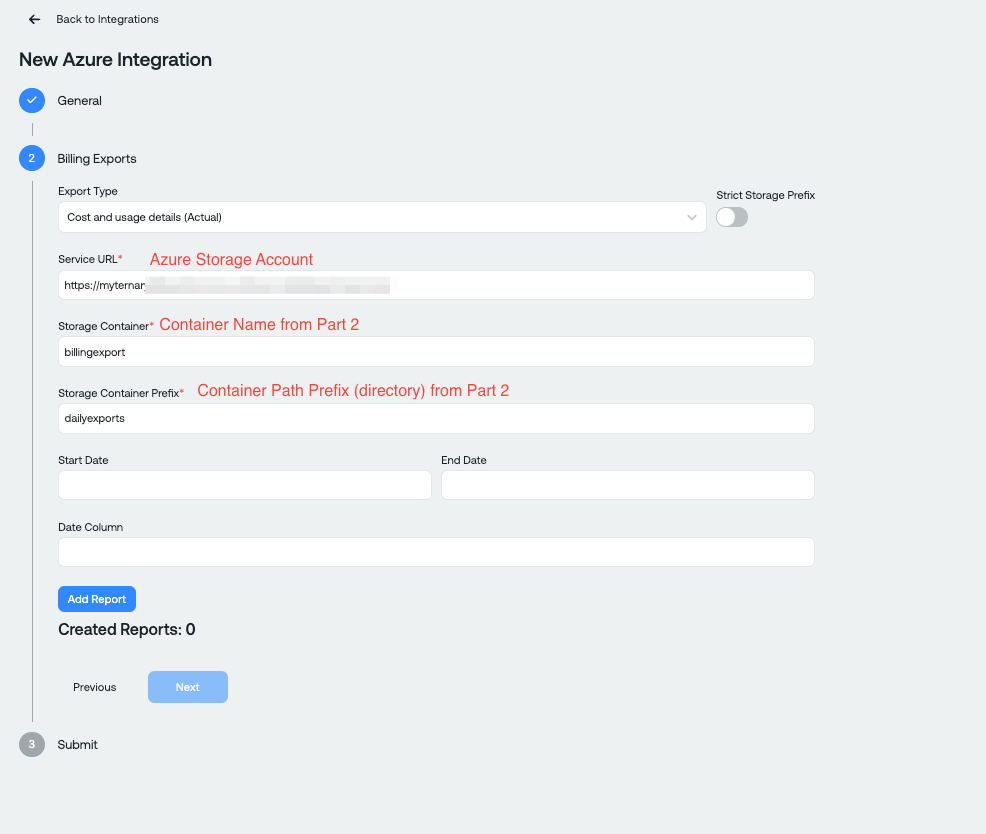
Click "Next" to add your billing exports. You will again reference values from your Azure configuration to complete the Service URL, Storage Container and Storage Container Prefix input values:
- Service URL: You will use your Azure Storage Account name to enter the Service URL in the format: https://yourstorageaccountname.blob.core.windows.net
- Storage Container: From Part 2, enter the Storage container name
- Storage Container Prefix: From Part 2, , enter the container path prefix (directory)
- Enter a start and end date if you have multiple billing exports where, for historical purposes, you know when a legacy billing export started and ended. This is optional.
You can now 'Submit' the new Azure Cloud configuration. It may take a few hours for Azure billing data to populate in Ternary.
Repeat these steps for every bill export you want to make available to Ternary. You might have multiple bill exports to build if your company has different types of contracts with Microsoft, or if you have a different Azure AD directory instance that is still part of your company.
Final Thoughts
Keep in mind that there will not be historical data if you have followed these steps to create a new bill export as part of setup. To gain historical data, consider creating separate prior-month exports to represent the historical pieces while leaving the freshly created exports collecting ongoing data. Then, remember to repeat Part 3 for those exports to make sure My Ternary has access to each one.
If you're not sure exactly what to do to fully represent your Azure costs in Ternary, our solutions architects can help you determine the correct combination of exports to request from Azure.
Appendix
Verifying the client certificate
You may wish to validate that the client certificate is authentic and generated by Ternary. All client certificates which we generate are signed by a Root CA which you can download at the bottom of this document.
Here are the particulars of the Ternary Root CA:
- Issuer: C=US, ST=Delaware, L=Claymont, O=Ternary, Inc., OU=Client Certificates for Azure, CN=Ternary RSA Root CA 2022.7/emailAddress=[email protected]
- Subject: C=US, ST=Delaware, L=Claymont, O=Ternary, Inc., OU=Client Certificates for Azure, CN=Ternary RSA Root CA 2022.7/emailAddress=[email protected]
- SHA256 Fingerprint=52:0E:36:2C:36:D2:25:88:1E:E2:03:B9:88:63:D8:E1:25:78:BC:DB:89:84:81:9B:4A:72:B2:E1:56:C6:E4:42
To validate you received an authenticate Ternary_Azure.pem from the Ternary root CA, download the Ternary root certificate ca.pem from our public Github repo and run the following command:
openssl verify -CAfile ca.pem Ternary_Azure.pem
where Ternary_Azure.pem is the certificate you downloaded in Step 1.
If the output is 'OK', Ternary_Azure.pem is a certificate signed by the private key of the Ternary Root CA that only Ternary employees have access to.
Enhanced Functionality
Introduction
Today, Ternary's integration with Azure consists of onboarding billing data from Azure's cost exports into Ternary's multi-cloud reporting interface. We have introduced enhanced Azure support in the Ternary platform, which provides access to recommendations and rich metrics information from Azure Monitor which brings our support for Azure to a similar level as what we have for AWS and GCP.
Ternary requires additional permissions at various levels in your Azure environment to allow our enhanced support to function. In this developmental state, we welcome feedback on whether you feel the increased permissions for Ternary are appropriate or not, as we will eventually make this part of our overall Azure onboarding instructions.
This document assumes you already have a 'Ternary' or 'My Ternary' managed principal created for our standard Azure onboarding, and that Ternary already has the permissions to read your billing export files.
Creating a new Cost Management Export in Azure
Amortized Cost Export
Ternary will begin providing insights into your Azure Amortized costs in addition to supporting Actual costs as we do today. To accomplish this we need access to one more cost export.
In Azure Cost Management, select Exports and Create. In the ‘Add Export’ panel, configure a new export similar to the following being sure to select ‘Cost and usage details (amortized)’ as the ‘Type of data’.
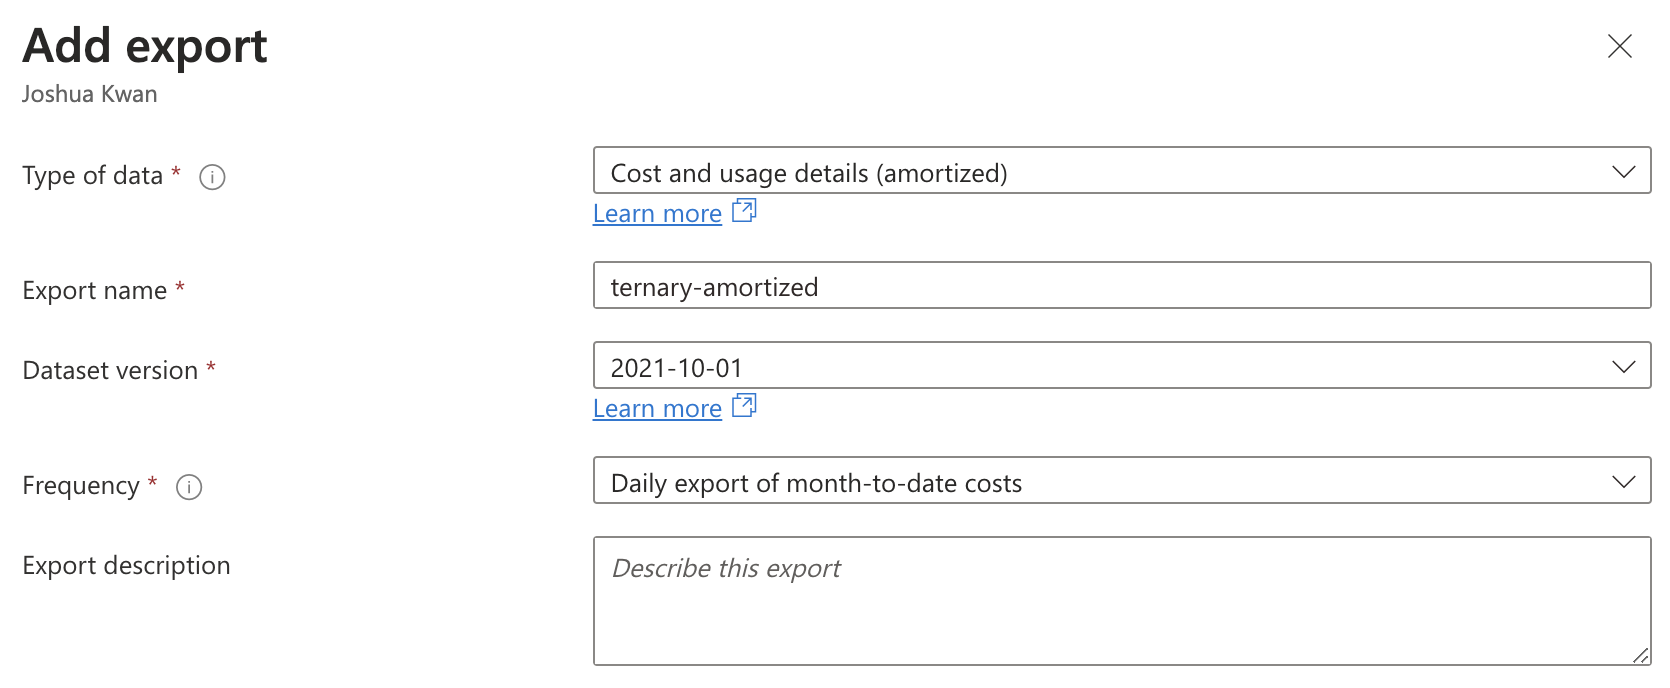
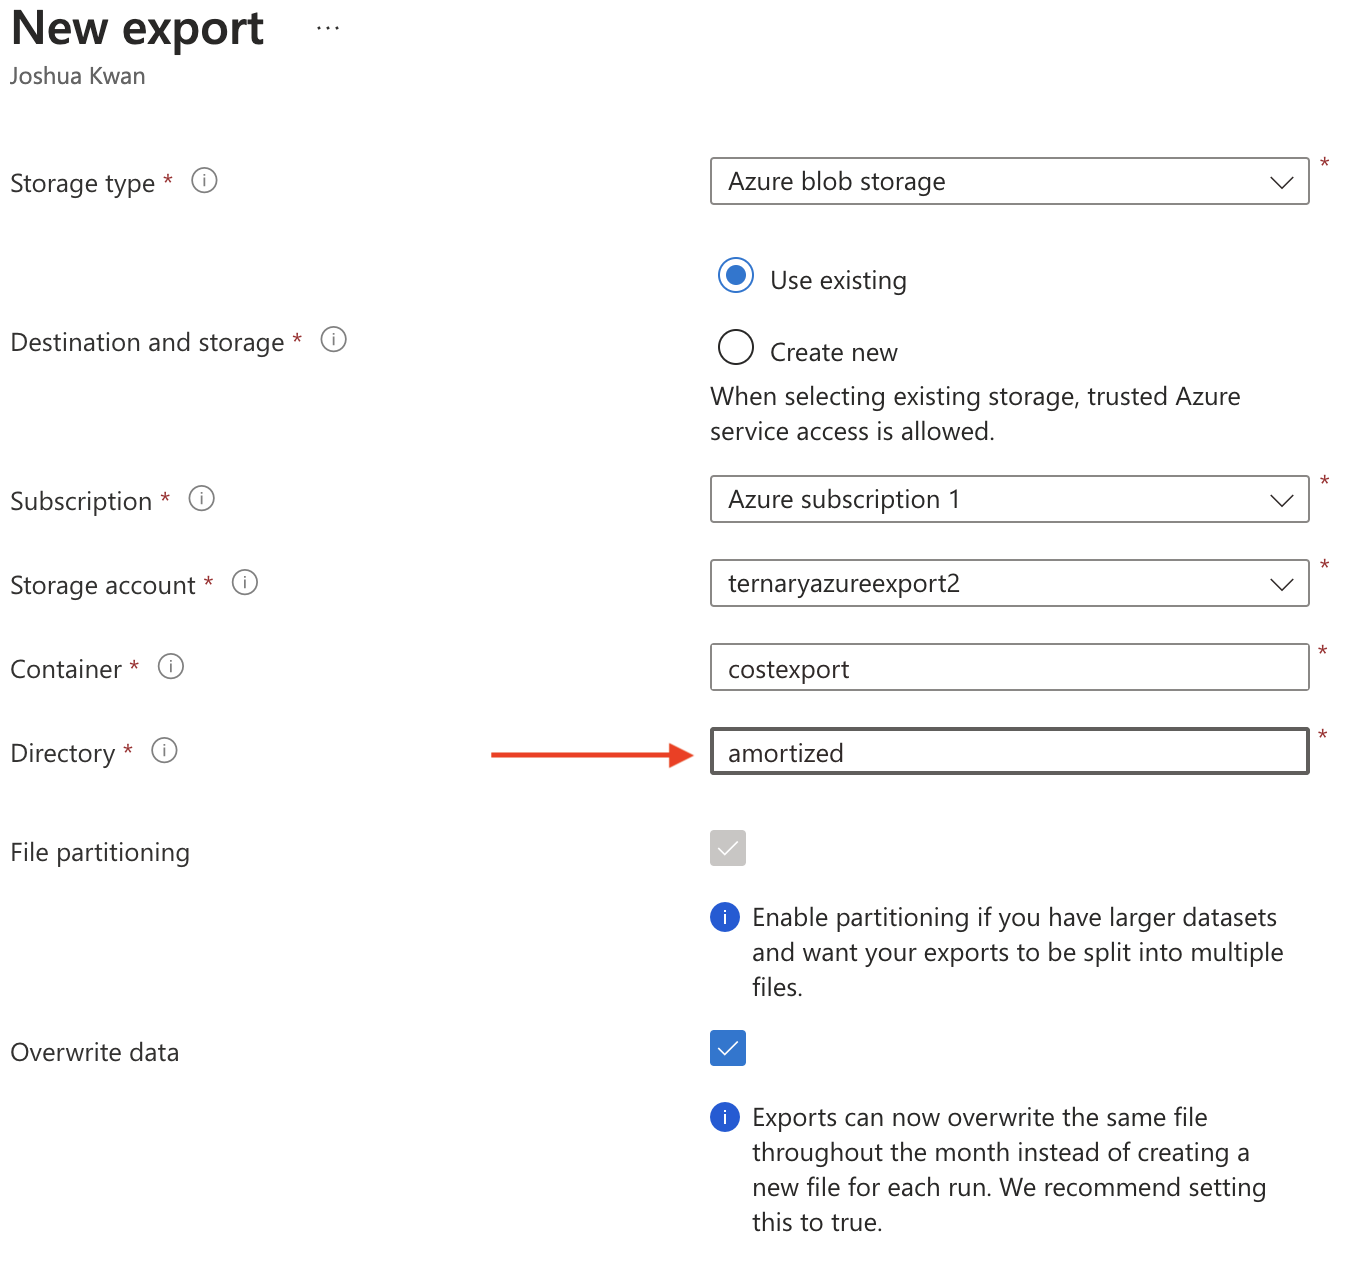
After selecting ‘Add, configure the export destination.
- We recommend selecting the option to ‘Use existing’ destination and storage selecting the same Subscription, Storage Account and Container as the existing export you already have configured for the Actual costs export that Ternary authorized to access.
- You will need to create a different Directory from the existing directory path used for the Actual costs export by typing in a new ‘Directory path’ to avoid a conflict in the Ternary ingestion process.
- The ‘File partitioning’ and ‘Overwrite data’ options should be enabled.
New Permissions
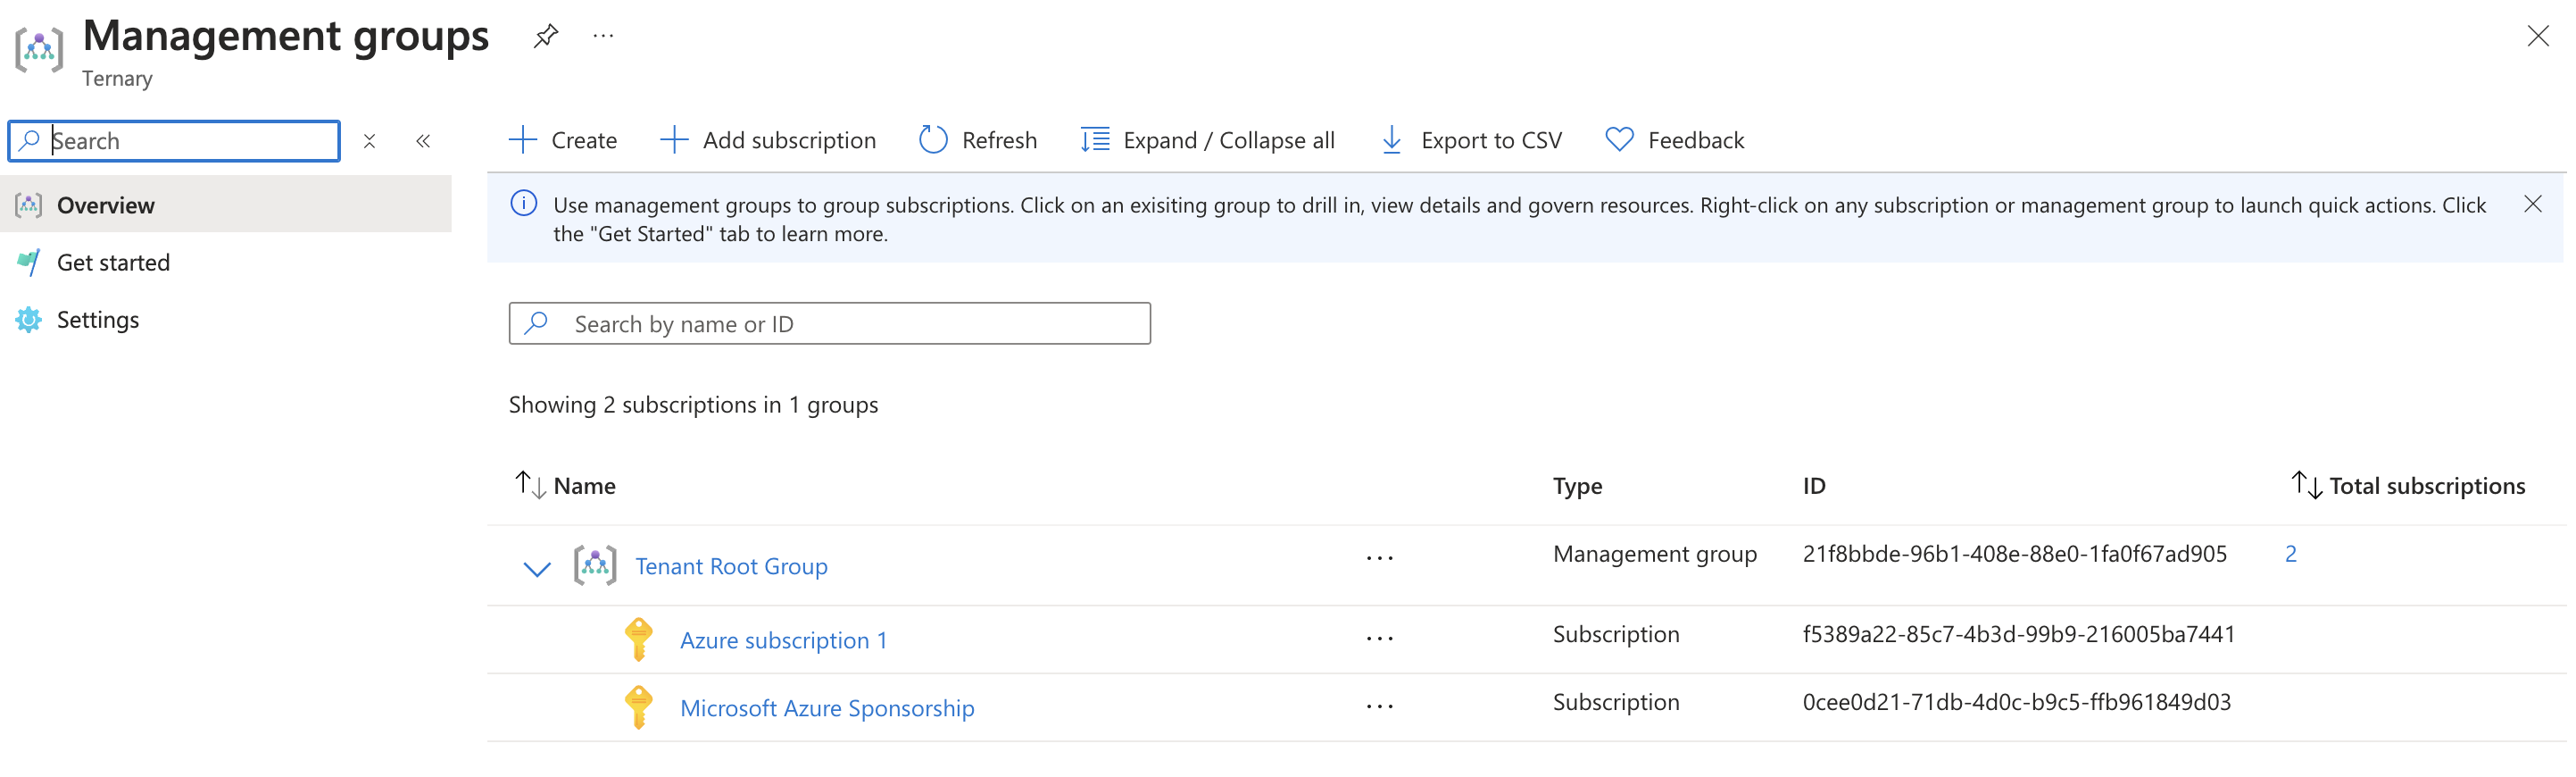
Management Group
Next, you will assign read-only roles to Ternary. We recommend assigning these roles at the Tenant Root Group in the Azure Management groups panel. Click the ‘Tenant Root Group’
Select ‘Access Control (IAM)’, ‘Add role assignment’
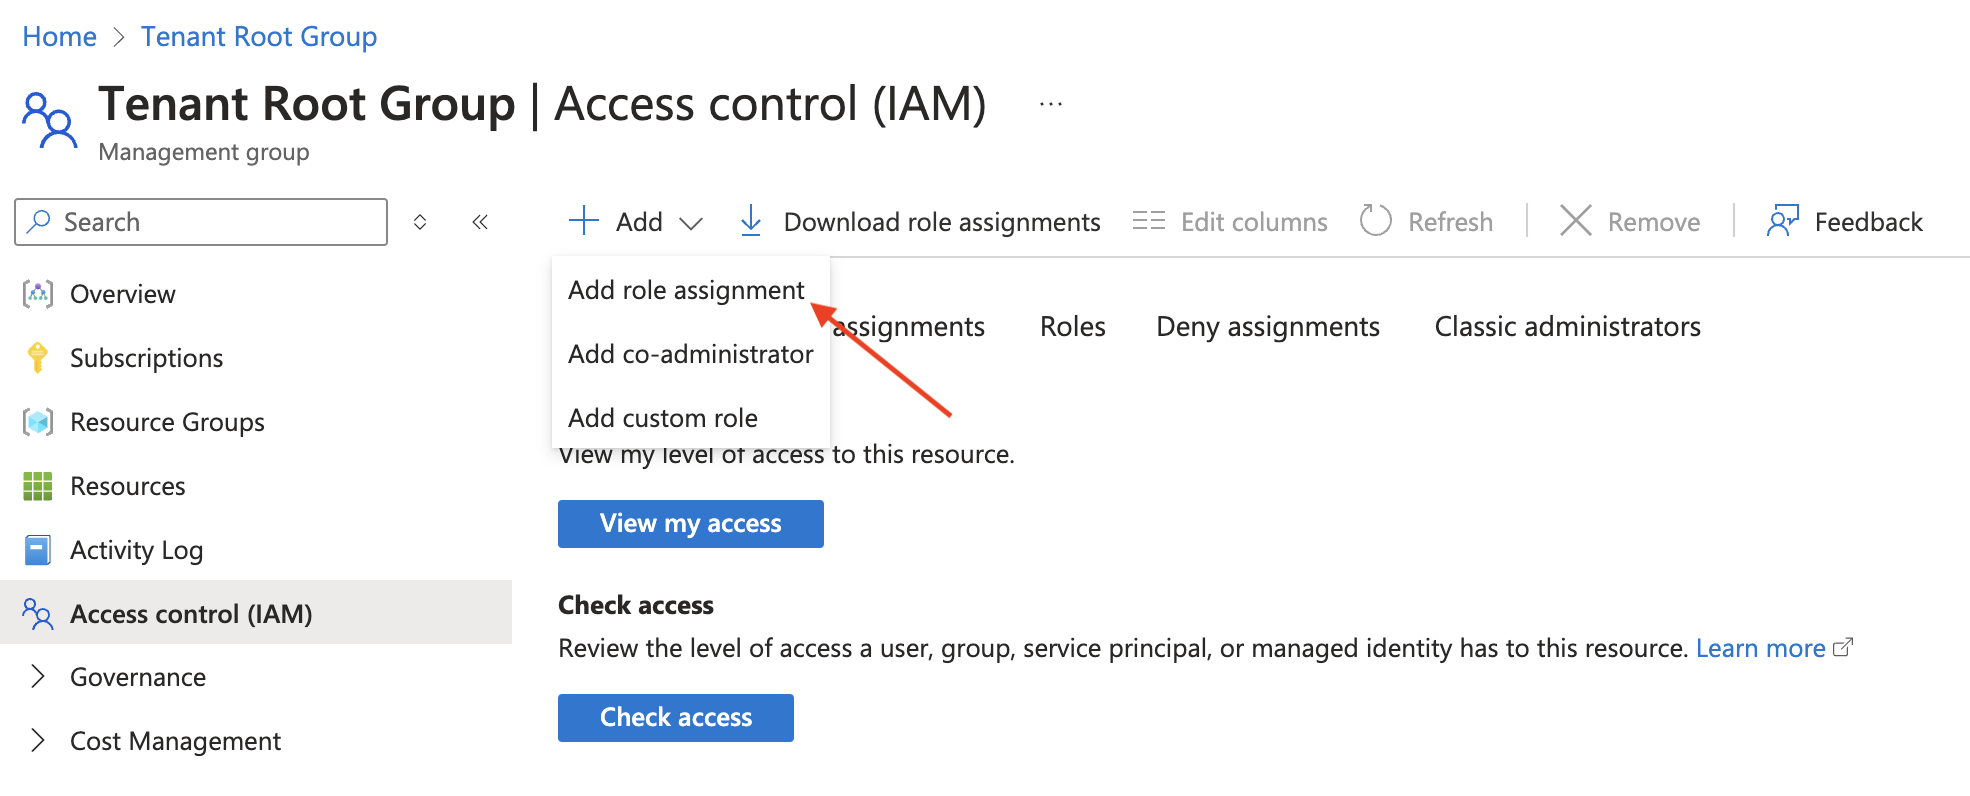
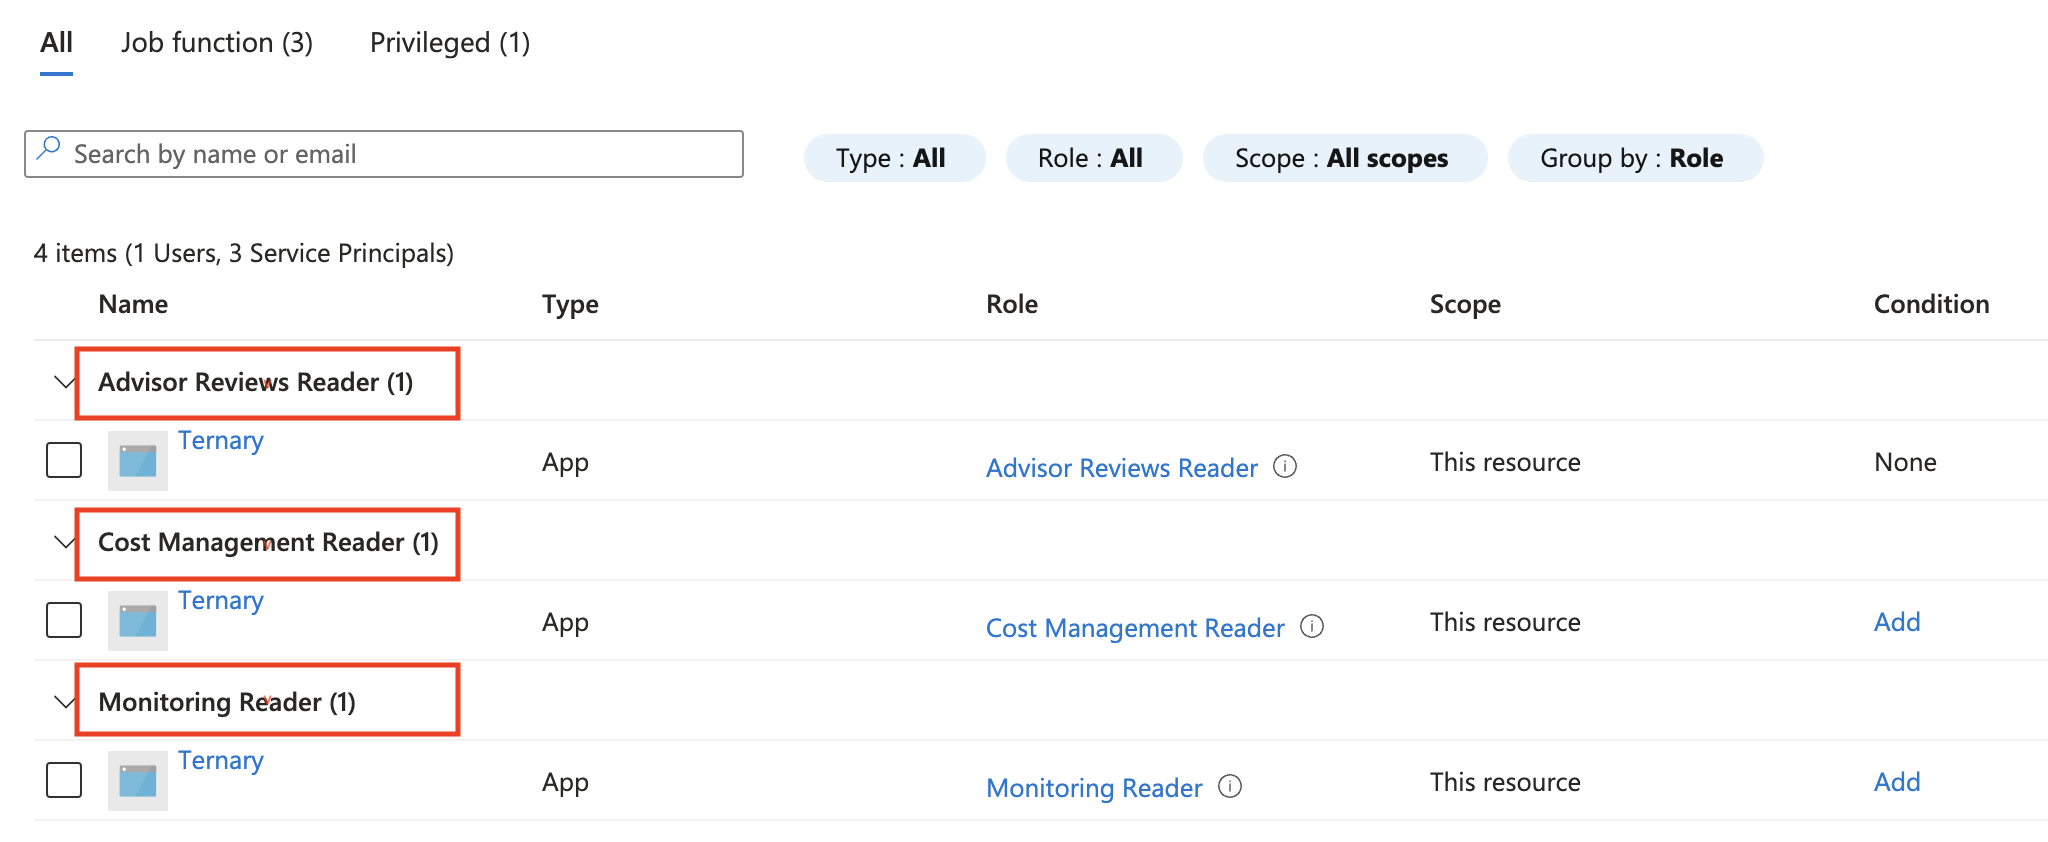
And add three Role Assignments for Ternary to the Tenant Root Group (you may need to search for ‘My Ternary’ when selecting the member to be assigned the role)
- Advisor Reviews Reader: Allows Ternary to reflect Azure-generated cost recommendations within Ternary alongside cost recommendations for your other cloud providers.
- Cost Management Reader: Allows Ternary to inquire on billing profiles and billing accounts to generate Reservation and Savings Plan recommendations and utilization summaries.
- Monitoring Reader: Allows Ternary to retrieve usage based information for your Azure resources to be joined to billing data for the same resources to provide enhanced views.
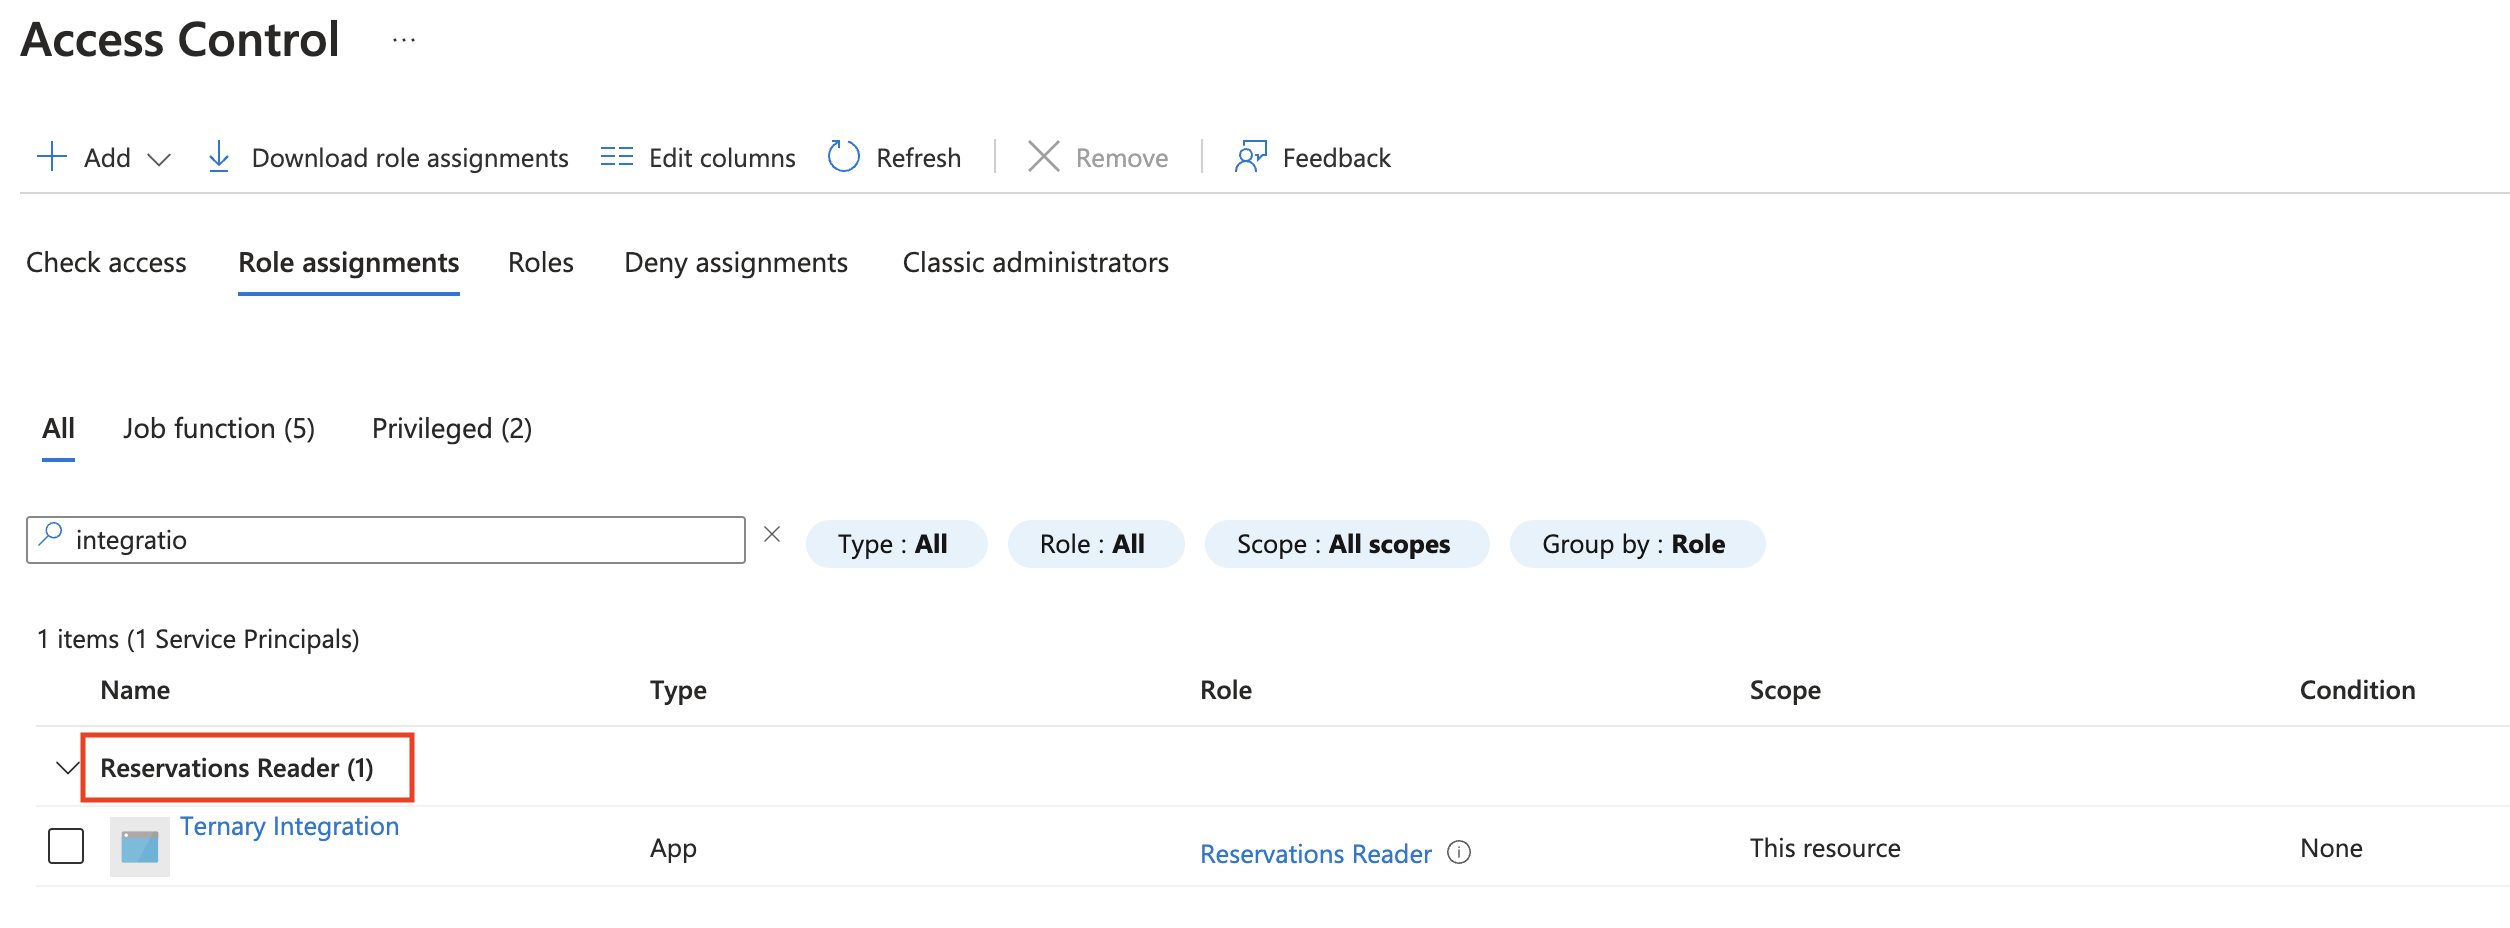
Reservations
In the Azure Reservations panel, select ‘Add Role assignment’ and grant Ternary the
Reservations Reader role to view all Reservations across the entire Azure tenant
Billing Account
In Azure Cost Management, select ‘Access control’ and grant Ternary the Reader role for Ternary to query Azure for Savings Plans information for your entire Billing Account. If you are unable to grant read-only access, the alternative would be to individually grant Ternary the same access over every individual Savings Plan in your Azure tenant. You would have to repeat this process as new Savings Plans are acquired.
Confirm that your scope (the large text next to "Access control (IAM)") refers to your billing account before proceeding. In my dev environment, ‘David Shurtliff’ is the name of my billing scope and billing account.

Updated 3 days ago