Carbon Footprint
Learn how to enable Carbon Footprint visibility for Google Cloud in Ternary
Prerequisites
- A GCP Cloud Engineer or Project owner with the following IAM roles: Project Owner and Carbon Footprint Viewer or Billing Account Viewer.
- Specifically, you must have the following IAM permissions on the Google Cloud project:
- resourcemanager.projects.update
- serviceusage.services.enable
- bigquery.transfers.updateSetup
- And the following IAM permission on the billing account:
billing.accounts.getCarbonInformation - A Ternary user assigned the Ternary 'Owner' role to edit an existing GCP cloud in Ternary.
Setup
If you are seeing current data in the GCP console for Carbon Footprint data, it suggests there may be an issue with the BigQuery recurring data transfer or the recurring data transfer was cancelled. You can verify this two different ways:
Run the following Query on the BigQuery carbon footprint data set and check what the latest usage_month returned is:
SELECT MAX(usage_month) as usage_month FROM `your_project_id.your_dataset_id.your_carbon_footprint_table`
Check the Data Transfers tab in BigQuery (https://cloud.google.com/carbon-footprint/docs/export) to verify that the job is still configured, scheduled and succeeding.
Part 1: Configure Carbon Export to BigQuery
Your project’s GCP Carbon Footprint data is generated and transferred by the BigQuery Data Transfer Service into a monthly partitioned table called carbon_footprint within BigQuery. Before Ternary can begin to ingest the carbon footprint data, users must create the export config which exports new carbon reports on the 15th of every month. You can configure the export manually using the GCP Console or using Terraform. Additional detail can found in the GCP Carbon Export documentation.
Configure via GCP Console
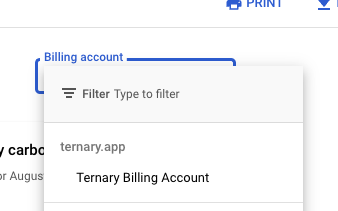
Navigate to the Carbon Footprint Console, then select the Cloud Billing account you want to export from the Billing account menu (top right).
Select Export and choose a project where to send your Carbon Footprint data. Afterwards click Configure Export.
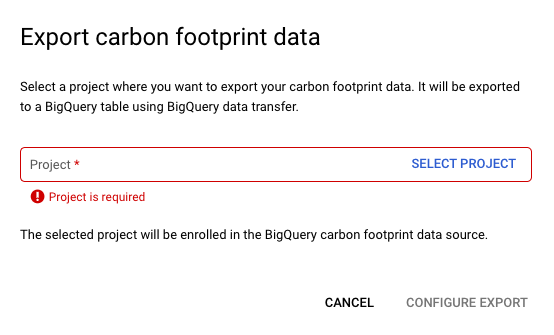
You will then be redirected to the Data Transfer page. On that page, fill out the following information:
Source: Google Cloud Carbon Footprint Exports
Transfer config name: Enter a display name
Destination settings: Choose dataset to house the exported carbon data
Click save and in the access request window, click Allow.
The transfer configuration will be created and will export data on the 15th of every future month.
Configure via Terraform
You can instead use this Terraform snippet to accomplish the same thing as the console method.
resource "google_bigquery_data_transfer_config" "carbon_footprint_transfer" {
  display_name           = "Carbon Footprint BigQuery Transfer" // can be anything
  location               = "US" // or "EU"
  data_source_id         = "61cede5a-0000-2440-ad42-883d24f8f7b8" // set by Google, do not change
  destination_dataset_id = "YOUR_EXPORT_DATASET_ID_HERE"
  params = {
    billing_accounts     = "YOUR_BILLING_ACCOUNT_ID_HERE"
  }
}
Part 2: Backfill Carbon Footprint Data
Once completed, the transfer config does not automatically backfill historical carbon data. In order to start viewing your project’s carbon data as soon as possible, we recommend you backfill data via the GCP Console otherwise you will have to wait until the 15th of the current month to start collecting current carbon data.
-
After successfully completing 'Part 1: Configure Carbon Export to BigQuery', go the details of the transfer you just created.
-
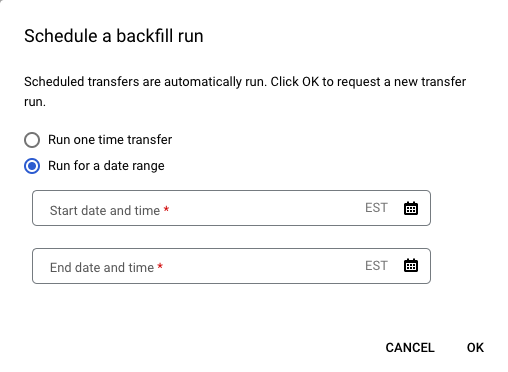
Click "Schedule Backfill" as below:

-
Select Run for a Date Range.
-
Select February 15, 2021 as the start date and today’s date as the end date. Because Carbon Footprint is updated monthly, Feb 15, 2021 contains data for January 2021 and is the earliest month available to export carbon data.
-
Click OK to request the data backfill.
Part 3: Configure Carbon Footprint Access in Ternary
Now that your project’s carbon footprint data is in the process of being transferred or has successfully transferred, you can grant Ternary access within the Ternary web app.
Navigate to the Clouds tab in the Admin page and edit your existing GCP Ternary cloud already configured with the billing account ID that your associating with your carbon footprint data.
Select the toggle to enable Ternary to ingest your Carbon Footprint BigQuery export.
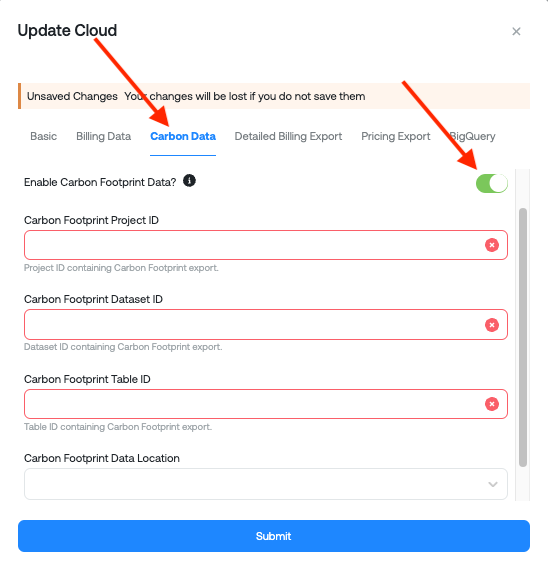
Enter the following configuration details and click 'Submit':
- Project ID: The project that contains the necessary dataset (most likely the same as your billing export Project ID)
- Dataset ID: The dataset that houses the carbon footprint exported data.
- Table ID: The name given when the transfer config was created (most likely carbon_footprint)
- Location: GCP Region BigQuery is using for your carbon footprint exportmceclip0.png
Part 4: Building Reports in Ternary Reporting Engine
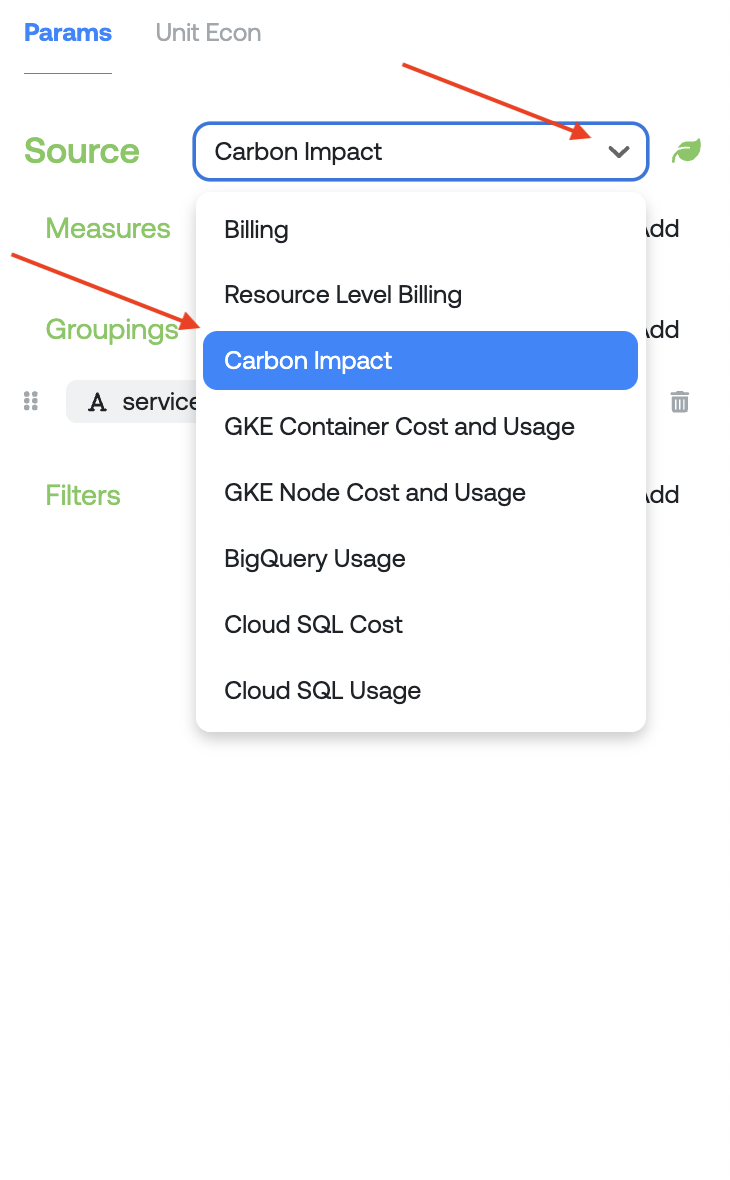
Selecting the Carbon Impact data source
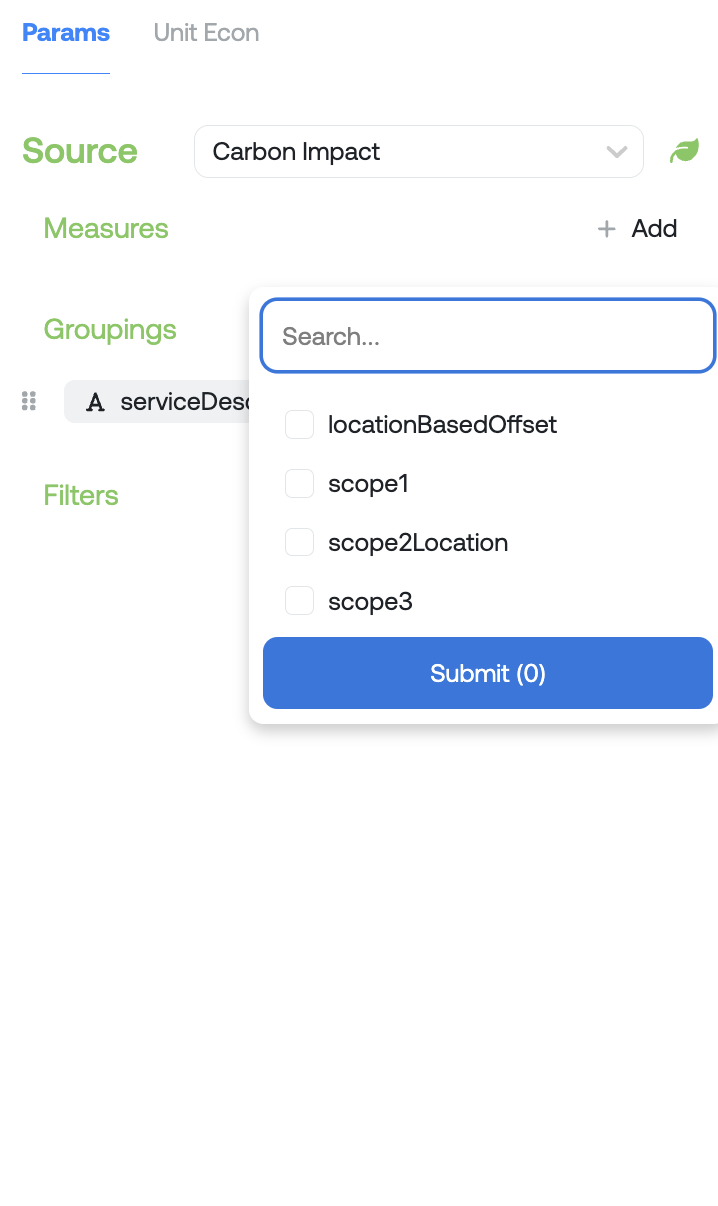
Selecting which Measures to report on (description of the different scopes is located below in our FAQ)
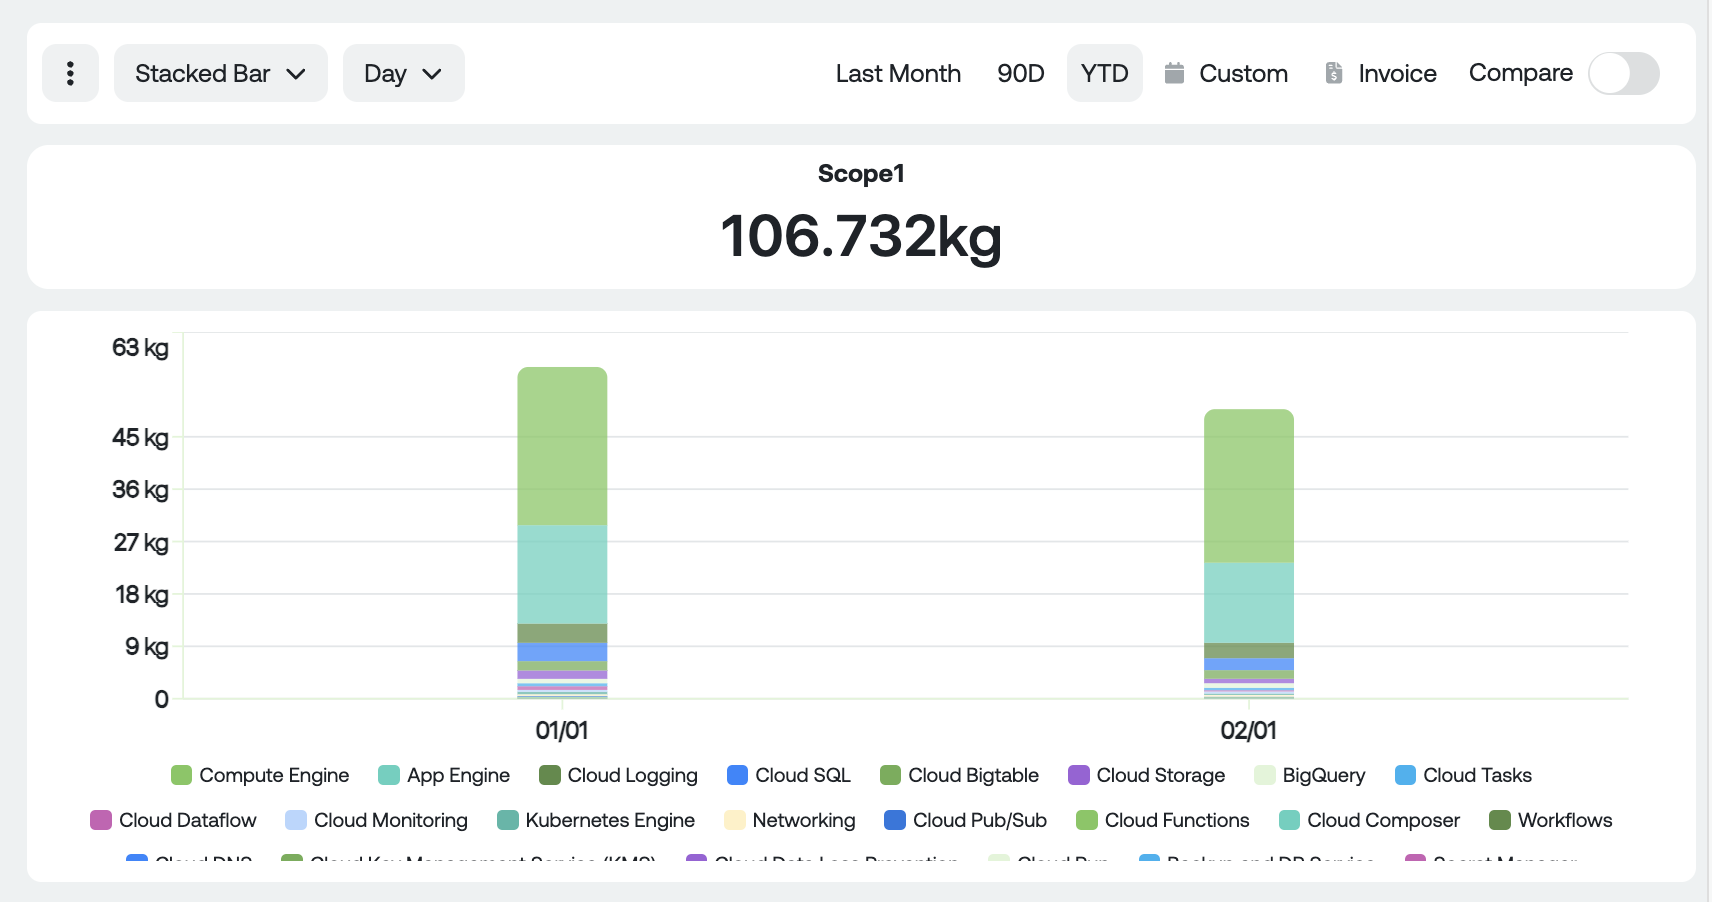
Example of a Carbon Impact of emissions by Service in GCP
FAQ
Q: Where can I find documentation from GCP on what the Carbon Footprint data means?
A: Documentation from GCP is located here: https://cloud.google.com/carbon-footprint/docs/methodology
Q: What do scope 1, 2 and 3 mean in the measures drop down?
A: Greenhouse gas emissions (GHG) are generally measured in three main scopes that help us understand who and what is responsible for emitting them.
- Scope 1: Direct GHG emissions (ex: refrigerants gas emissions from owned and operated equipment or vehicles used on company property, or generates burning fuel owned and operated by the company)
- Scope 2: Emissions associated with the off-site generation of electricity, heating/cooling or steam. Often purchased for your own consumption. (ex: electricity purchased from the national grid to power your homes/computers/work stations).
- Scope 3: Indirect emissions. Often the hardest scope to measure but is any GHG emitted that has some connection to the consumer. (ex: external services, transportation and distribution, capital goods).
Q: Does GCP Carbon Footprint offer other measures in this carbon impact report?
A: Yes, GCP Carbon Footprint has outlined a schema of export data. Some of these categories are currently NULL within Big Query itself and will be available on Ternary as soon as GCP has updated them. Here is a quick overview of the available measures/dimensions from Carbon Footprint in the Reporting Engine:
| Name | Description | Example |
|---|---|---|
| carbonModel | Version of carbon model that produced this output. This value is updated whenever the model is changed | 6 |
| location | Location of the carbon footprint at the level of a country, region, or zone | us-central1-a |
| projectId | Identifier of the Google Cloud project the carbon footprint is from | my-project |
| serviceId | Identifier of the Google Cloud service the carbon footprint is from | F17B-412E-CB64 |
| serviceDescription | Readable name for the Google Cloud service the carbon footprint is from Kubernetes Engine | Kubernetes Engine |
| scope1 | Total scope 1 carbon footprint for the account, project, service, location, and month in kg of CO2 equivalent | 10kgCO2e |
| scope2Location | Total scope 2 location-based carbon footprint for the account, project, service, location, and month in kg of CO2 equivalent | 400kgCO2e |
| scope3 | Total scope 3 carbon footprint for the account, project, service, location, and month in kg of CO2 equivalent | 900kg CO2e |
| locationBasedOffset | Total carbon footprint for the account, project, service, location, and month in kg of CO2 equivalent. Equivalent to scope 1 + scope 2 location-based + scope 3 | 1587.3kg CO2e |
Q: Why are there only 3 date range options for Carbon Impact? Will there be additional granularity in the future?
A: According to Google Cloud, Carbon Footprint uses hourly green house gas emission factors to calculate location-based emissions, but reports are restricted to monthly reports. Due to the monthly granularity of the data imposed by GCP Carbon Footprint, we set default date range to YTD to show sufficient data points upon querying, however users can select larger date ranges up the dates selected in Step 2 (backfill).
Updated about 1 month ago
